标签:
要明白这个流程,我们还得从第一部开始,大家都知道 在activity里面 setcontentview 调用结束以后 就可以看到程序加载好我们的布局文件了,从而让我们在手机上看到这个画面。
那么我们来看一下这个源码是如何实现的。
 1 /**
 2      * Set the activity content from a layout resource.  The resource will be
 3      * inflated, adding all top-level views to the activity.
 4      *
 5      * @param layoutResID Resource ID to be inflated.
 6      *
 7      * @see #setContentView(android.view.View)
 8      * @see #setContentView(android.view.View, android.view.ViewGroup.LayoutParams)
 9      */
10     public void setContentView(int layoutResID) {
11         getWindow().setContentView(layoutResID);
12         initActionBar();
13     }
我们这里看到是调用了getwindow的返回值 来调用setcontentview 方法的。
 1  /**
 2      * Retrieve the current {@link android.view.Window} for the activity.
 3      * This can be used to directly access parts of the Window API that
 4      * are not available through Activity/Screen.
 5      *
 6      * @return Window The current window, or null if the activity is not
 7      *         visual.
 8      */
 9     public Window getWindow() {
10         return mWindow;
11     }
我们再来看看mWindow 这个值是从哪来的。
 1 final void attach(Context context, ActivityThread aThread,
 2             Instrumentation instr, IBinder token, int ident,
 3             Application application, Intent intent, ActivityInfo info,
 4             CharSequence title, Activity parent, String id,
 5             NonConfigurationInstances lastNonConfigurationInstances,
 6             Configuration config) {
 7         attachBaseContext(context);
 8
 9         mFragments.attachActivity(this);
10
11         mWindow = PolicyManager.makeNewWindow(this);
12         mWindow.setCallback(this);
13         mWindow.getLayoutInflater().setPrivateFactory(this);
14         if (info.softInputMode != WindowManager.LayoutParams.SOFT_INPUT_STATE_UNSPECIFIED) {
15             mWindow.setSoftInputMode(info.softInputMode);
16         }
17         if (info.uiOptions != 0) {
18             mWindow.setUiOptions(info.uiOptions);
19         }
20         mUiThread = Thread.currentThread();
21
22         mMainThread = aThread;
23         mInstrumentation = instr;
24         mToken = token;
25         mIdent = ident;
26         mApplication = application;
27         mIntent = intent;
28         mComponent = intent.getComponent();
29         mActivityInfo = info;
30         mTitle = title;
31         mParent = parent;
32         mEmbeddedID = id;
33         mLastNonConfigurationInstances = lastNonConfigurationInstances;
34
35         mWindow.setWindowManager(null, mToken, mComponent.flattenToString(),
36                 (info.flags & ActivityInfo.FLAG_HARDWARE_ACCELERATED) != 0);
37         if (mParent != null) {
38             mWindow.setContainer(mParent.getWindow());
39         }
40         mWindowManager = mWindow.getWindowManager();
41         mCurrentConfig = config;
42     }
注意看11行的代码 我们发现这个mWindow的值 是通过 makeNewWindow这个方法来实现的。我们再来看看这个方法,当然了我们要先找到这个类,这个类位于

 1 /*
 2  * Copyright (C) 2008 The Android Open Source Project
 3  *
 4  * Licensed under the Apache License, Version 2.0 (the "License");
 5  * you may not use this file except in compliance with the License.
 6  * You may obtain a copy of the License at
 7  *
 8  *      http://www.apache.org/licenses/LICENSE-2.0
 9  *
10  * Unless required by applicable law or agreed to in writing, software
11  * distributed under the License is distributed on an "AS IS" BASIS,
12  * WITHOUT WARRANTIES OR CONDITIONS OF ANY KIND, either express or implied.
13  * See the License for the specific language governing permissions and
14  * limitations under the License.
15  */
16
17 package com.android.internal.policy;
18
19 import android.content.Context;
20 import android.view.FallbackEventHandler;
21 import android.view.LayoutInflater;
22 import android.view.Window;
23 import android.view.WindowManagerPolicy;
24
25 import com.android.internal.policy.IPolicy;
26
27 /**
28  * {@hide}
29  */
30
31 public final class PolicyManager {
32     private static final String POLICY_IMPL_CLASS_NAME =
33         "com.android.internal.policy.impl.Policy";
34
35     private static final IPolicy sPolicy;
36
37     static {
38         // Pull in the actual implementation of the policy at run-time
39         try {
40             Class policyClass = Class.forName(POLICY_IMPL_CLASS_NAME);
41             sPolicy = (IPolicy)policyClass.newInstance();
42         } catch (ClassNotFoundException ex) {
43             throw new RuntimeException(
44                     POLICY_IMPL_CLASS_NAME + " could not be loaded", ex);
45         } catch (InstantiationException ex) {
46             throw new RuntimeException(
47                     POLICY_IMPL_CLASS_NAME + " could not be instantiated", ex);
48         } catch (IllegalAccessException ex) {
49             throw new RuntimeException(
50                     POLICY_IMPL_CLASS_NAME + " could not be instantiated", ex);
51         }
52     }
53
54     // Cannot instantiate this class
55     private PolicyManager() {}
56
57     // The static methods to spawn new policy-specific objects
58     public static Window makeNewWindow(Context context) {
59         return sPolicy.makeNewWindow(context);
60     }
61
62     public static LayoutInflater makeNewLayoutInflater(Context context) {
63         return sPolicy.makeNewLayoutInflater(context);
64     }
65
66     public static WindowManagerPolicy makeNewWindowManager() {
67         return sPolicy.makeNewWindowManager();
68     }
69
70     public static FallbackEventHandler makeNewFallbackEventHandler(Context context) {
71         return sPolicy.makeNewFallbackEventHandler(context);
72     }
73 }
这里发现是一个反射的动态加载,我们暂时不去深究他,继续看代码,找到Policy这个类,他位于

 1 /*
 2  * Copyright (C) 2008 The Android Open Source Project
 3  *
 4  * Licensed under the Apache License, Version 2.0 (the "License");
 5  * you may not use this file except in compliance with the License.
 6  * You may obtain a copy of the License at
 7  *
 8  *      http://www.apache.org/licenses/LICENSE-2.0
 9  *
10  * Unless required by applicable law or agreed to in writing, software
11  * distributed under the License is distributed on an "AS IS" BASIS,
12  * WITHOUT WARRANTIES OR CONDITIONS OF ANY KIND, either express or implied.
13  * See the License for the specific language governing permissions and
14  * limitations under the License.
15  */
16
17 package com.android.internal.policy.impl;
18
19 import android.content.Context;
20 import android.util.Log;
21 import android.view.FallbackEventHandler;
22 import android.view.LayoutInflater;
23 import android.view.Window;
24 import android.view.WindowManagerPolicy;
25
26 import com.android.internal.policy.IPolicy;
27 import com.android.internal.policy.impl.PhoneLayoutInflater;
28 import com.android.internal.policy.impl.PhoneWindow;
29 import com.android.internal.policy.impl.PhoneWindowManager;
30
31 /**
32  * {@hide}
33  */
34
35 // Simple implementation of the policy interface that spawns the right
36 // set of objects
37 public class Policy implements IPolicy {
38     private static final String TAG = "PhonePolicy";
39
40     private static final String[] preload_classes = {
41         "com.android.internal.policy.impl.PhoneLayoutInflater",
42         "com.android.internal.policy.impl.PhoneWindow",
43         "com.android.internal.policy.impl.PhoneWindow$1",
44         "com.android.internal.policy.impl.PhoneWindow$ContextMenuCallback",
45         "com.android.internal.policy.impl.PhoneWindow$DecorView",
46         "com.android.internal.policy.impl.PhoneWindow$PanelFeatureState",
47         "com.android.internal.policy.impl.PhoneWindow$PanelFeatureState$SavedState",
48     };
49
50     static {
51         // For performance reasons, preload some policy specific classes when
52         // the policy gets loaded.
53         for (String s : preload_classes) {
54             try {
55                 Class.forName(s);
56             } catch (ClassNotFoundException ex) {
57                 Log.e(TAG, "Could not preload class for phone policy: " + s);
58             }
59         }
60     }
61
62     public Window makeNewWindow(Context context) {
63         return new PhoneWindow(context);
64     }
65
66     public LayoutInflater makeNewLayoutInflater(Context context) {
67         return new PhoneLayoutInflater(context);
68     }
69
70     public WindowManagerPolicy makeNewWindowManager() {
71         return new PhoneWindowManager();
72     }
73
74     public FallbackEventHandler makeNewFallbackEventHandler(Context context) {
75         return new PhoneFallbackEventHandler(context);
76     }
77 }
看62行代码,到这里我们就发现了 在activity里 getwindow 返回的 实际上就是这个phonewindow对象!!!!!!!!!!!!!!

我们继续看这个phonewindow类 他位于


注意在这里我就不放这个类的源码了,因为2000多行。。。我只抽部分重要的说一下
 1 /**
 2  * Android-specific Window.
 3  * <p>
 4  * todo: need to pull the generic functionality out into a base class
 5  * in android.widget.
 6  */
 7 public class PhoneWindow extends Window implements MenuBuilder.Callback {
 8
 9     private final static String TAG = "PhoneWindow";
10
11     private final static boolean SWEEP_OPEN_MENU = false;
12
13     /**
14      * Simple callback used by the context menu and its submenus. The options
15      * menu submenus do not use this (their behavior is more complex).
16      */
17     final DialogMenuCallback mContextMenuCallback = new DialogMenuCallback(FEATURE_CONTEXT_MENU);
18
19     final TypedValue mMinWidthMajor = new TypedValue();
20     final TypedValue mMinWidthMinor = new TypedValue();
21
22     // This is the top-level view of the window, containing the window decor.
23     private DecorView mDecor;
24
25     // This is the view in which the window contents are placed. It is either
26     // mDecor itself, or a child of mDecor where the contents go.
27     private ViewGroup mContentParent;
28
29     SurfaceHolder.Callback2 mTakeSurfaceCallback;
30
31     InputQueue.Callback mTakeInputQueueCallback;
32
33     private boolean mIsFloating;
34
35     private LayoutInflater mLayoutInflater;
36
37     private TextView mTitleView;
38
39     private ActionBarView mActionBar;
40     private ActionMenuPresenterCallback mActionMenuPresenterCallback;
41     private PanelMenuPresenterCallback mPanelMenuPresenterCallback;
42
43     private DrawableFeatureState[] mDrawables;
44
45     private PanelFeatureState[] mPanels;
看22和23行代码 我们就知道 这个DectorView 就是我们绘制view的时候 最顶层的那个view。换句话说就是最根部的视图。
而且 再继续跟代码 我们会发现 他就是phonewindow的一个内部类 注意看他是继承的framelayout
 1  private final class DecorView extends FrameLayout implements RootViewSurfaceTaker {
 2         /* package */int mDefaultOpacity = PixelFormat.OPAQUE;
 3
 4         /** The feature ID of the panel, or -1 if this is the application‘s DecorView */
 5         private final int mFeatureId;
 6
 7         private final Rect mDrawingBounds = new Rect();
 8
 9         private final Rect mBackgroundPadding = new Rect();
10
11         private final Rect mFramePadding = new Rect();
12
13         private final Rect mFrameOffsets = new Rect();
14
15         private boolean mChanging;
16
17         private Drawable mMenuBackground;
18         private boolean mWatchingForMenu;
19         private int mDownY;
20
21         private ActionMode mActionMode;
22         private ActionBarContextView mActionModeView;
23         private PopupWindow mActionModePopup;
24         private Runnable mShowActionModePopup;
25
26         public DecorView(Context context, int featureId) {
27             super(context);
28             mFeatureId = featureId;
29         }
所以到这里我们可以发现 在activity里调用setconteview的时候 最终就是调用的phonewindow的这个方法
 @Override
    public void setContentView(int layoutResID) {
        if (mContentParent == null) {
            installDecor();
        } else {
            mContentParent.removeAllViews();
        }
        mLayoutInflater.inflate(layoutResID, mContentParent);
        final Callback cb = getCallback();
        if (cb != null && !isDestroyed()) {
            cb.onContentChanged();
        }
    }
这里代码其实也很好理解,如果是第一次调用就installDecor 否则就remove所有的view 我们来看这个installdector的代码
 1  private void installDecor() {
 2         if (mDecor == null) {
 3             mDecor = generateDecor();
 4             mDecor.setDescendantFocusability(ViewGroup.FOCUS_AFTER_DESCENDANTS);
 5             mDecor.setIsRootNamespace(true);
 6         }
 7         if (mContentParent == null) {
 8             mContentParent = generateLayout(mDecor);
 9
10             mTitleView = (TextView)findViewById(com.android.internal.R.id.title);
11             if (mTitleView != null) {
12                 if ((getLocalFeatures() & (1 << FEATURE_NO_TITLE)) != 0) {
13                     View titleContainer = findViewById(com.android.internal.R.id.title_container);
14                     if (titleContainer != null) {
15                         titleContainer.setVisibility(View.GONE);
16                     } else {
17                         mTitleView.setVisibility(View.GONE);
18                     }
19                     if (mContentParent instanceof FrameLayout) {
20                         ((FrameLayout)mContentParent).setForeground(null);
21                     }
22                 } else {
23                     mTitleView.setText(mTitle);
24                 }
25             } else {
26                 mActionBar = (ActionBarView) findViewById(com.android.internal.R.id.action_bar);
27                 if (mActionBar != null) {
28                     mActionBar.setWindowCallback(getCallback());
29                     if (mActionBar.getTitle() == null) {
30                         mActionBar.setWindowTitle(mTitle);
31                     }
32                     final int localFeatures = getLocalFeatures();
33                     if ((localFeatures & (1 << FEATURE_PROGRESS)) != 0) {
34                         mActionBar.initProgress();
35                     }
36                     if ((localFeatures & (1 << FEATURE_INDETERMINATE_PROGRESS)) != 0) {
37                         mActionBar.initIndeterminateProgress();
38                     }
39
40                     boolean splitActionBar = false;
41                     final boolean splitWhenNarrow =
42                             (mUiOptions & ActivityInfo.UIOPTION_SPLIT_ACTION_BAR_WHEN_NARROW) != 0;
43                     if (splitWhenNarrow) {
44                         splitActionBar = getContext().getResources().getBoolean(
45                                 com.android.internal.R.bool.split_action_bar_is_narrow);
46                     } else {
47                         splitActionBar = getWindowStyle().getBoolean(
48                                 com.android.internal.R.styleable.Window_windowSplitActionBar, false);
49                     }
50                     final ActionBarContainer splitView = (ActionBarContainer) findViewById(
51                             com.android.internal.R.id.split_action_bar);
52                     if (splitView != null) {
53                         mActionBar.setSplitView(splitView);
54                         mActionBar.setSplitActionBar(splitActionBar);
55                         mActionBar.setSplitWhenNarrow(splitWhenNarrow);
56
57                         final ActionBarContextView cab = (ActionBarContextView) findViewById(
58                                 com.android.internal.R.id.action_context_bar);
59                         cab.setSplitView(splitView);
60                         cab.setSplitActionBar(splitActionBar);
61                         cab.setSplitWhenNarrow(splitWhenNarrow);
62                     } else if (splitActionBar) {
63                         Log.e(TAG, "Requested split action bar with " +
64                                 "incompatible window decor! Ignoring request.");
65                     }
66
67                     // Post the panel invalidate for later; avoid application onCreateOptionsMenu
68                     // being called in the middle of onCreate or similar.
69                     mDecor.post(new Runnable() {
70                         public void run() {
71                             // Invalidate if the panel menu hasn‘t been created before this.
72                             PanelFeatureState st = getPanelState(FEATURE_OPTIONS_PANEL, false);
73                             if (!isDestroyed() && (st == null || st.menu == null)) {
74                                 invalidatePanelMenu(FEATURE_ACTION_BAR);
75                             }
76                         }
77                     });
78                 }
79             }
80         }
81     }
注意看第八行代码 这个就是绘制activity根布局最关键的地方 这个函数一共有300行左右 我也不能全部放上来,有兴趣的同学可以自己看一下源码,我在这截取部分重要的说。
其实重要的代码就是这么一些
 1  int layoutResource;
 2         int features = getLocalFeatures();
 3         // System.out.println("Features: 0x" + Integer.toHexString(features));
 4         if ((features & ((1 << FEATURE_LEFT_ICON) | (1 << FEATURE_RIGHT_ICON))) != 0) {
 5             if (mIsFloating) {
 6                 TypedValue res = new TypedValue();
 7                 getContext().getTheme().resolveAttribute(
 8                         com.android.internal.R.attr.dialogTitleIconsDecorLayout, res, true);
 9                 layoutResource = res.resourceId;
10             } else {
11                 layoutResource = com.android.internal.R.layout.screen_title_icons;
12             }
13             // XXX Remove this once action bar supports these features.
14             removeFeature(FEATURE_ACTION_BAR);
15             // System.out.println("Title Icons!");
16         } else if ((features & ((1 << FEATURE_PROGRESS) | (1 << FEATURE_INDETERMINATE_PROGRESS))) != 0
17                 && (features & (1 << FEATURE_ACTION_BAR)) == 0) {
18             // Special case for a window with only a progress bar (and title).
19             // XXX Need to have a no-title version of embedded windows.
20             layoutResource = com.android.internal.R.layout.screen_progress;
21             // System.out.println("Progress!");
22         } else if ((features & (1 << FEATURE_CUSTOM_TITLE)) != 0) {
23             // Special case for a window with a custom title.
24             // If the window is floating, we need a dialog layout
25             if (mIsFloating) {
26                 TypedValue res = new TypedValue();
27                 getContext().getTheme().resolveAttribute(
28                         com.android.internal.R.attr.dialogCustomTitleDecorLayout, res, true);
29                 layoutResource = res.resourceId;
30             } else {
31                 layoutResource = com.android.internal.R.layout.screen_custom_title;
32             }
33             // XXX Remove this once action bar supports these features.
34             removeFeature(FEATURE_ACTION_BAR);
35         } else if ((features & (1 << FEATURE_NO_TITLE)) == 0) {
36             // If no other features and not embedded, only need a title.
37             // If the window is floating, we need a dialog layout
38             if (mIsFloating) {
39                 TypedValue res = new TypedValue();
40                 getContext().getTheme().resolveAttribute(
41                         com.android.internal.R.attr.dialogTitleDecorLayout, res, true);
42                 layoutResource = res.resourceId;
43             } else if ((features & (1 << FEATURE_ACTION_BAR)) != 0) {
44                 if ((features & (1 << FEATURE_ACTION_BAR_OVERLAY)) != 0) {
45                     layoutResource = com.android.internal.R.layout.screen_action_bar_overlay;
46                 } else {
47                     layoutResource = com.android.internal.R.layout.screen_action_bar;
48                 }
49             } else {
50                 layoutResource = com.android.internal.R.layout.screen_title;
51             }
52             // System.out.println("Title!");
53         } else if ((features & (1 << FEATURE_ACTION_MODE_OVERLAY)) != 0) {
54             layoutResource = com.android.internal.R.layout.screen_simple_overlay_action_mode;
55         } else {
56             // Embedded, so no decoration is needed.
57             layoutResource = com.android.internal.R.layout.screen_simple;
58             // System.out.println("Simple!");
59         }
60
61         mDecor.startChanging();
62
63         View in = mLayoutInflater.inflate(layoutResource, null);
64         decor.addView(in, new ViewGroup.LayoutParams(MATCH_PARENT, MATCH_PARENT));
这个layoutResource的值 实际上就代表了窗口修饰的哪些布局文件,你看最后两行代码就知道
当我们确定了这个布局文件以后就把她add 到decor这个对象里。
所以我们就能想明白 为啥 我们的requestWindowFeature这个方法一定要在setContentview前面调用才有作用了~~
然后给大家随便看下布局文件吧,就是系统自带的这些跟布局。
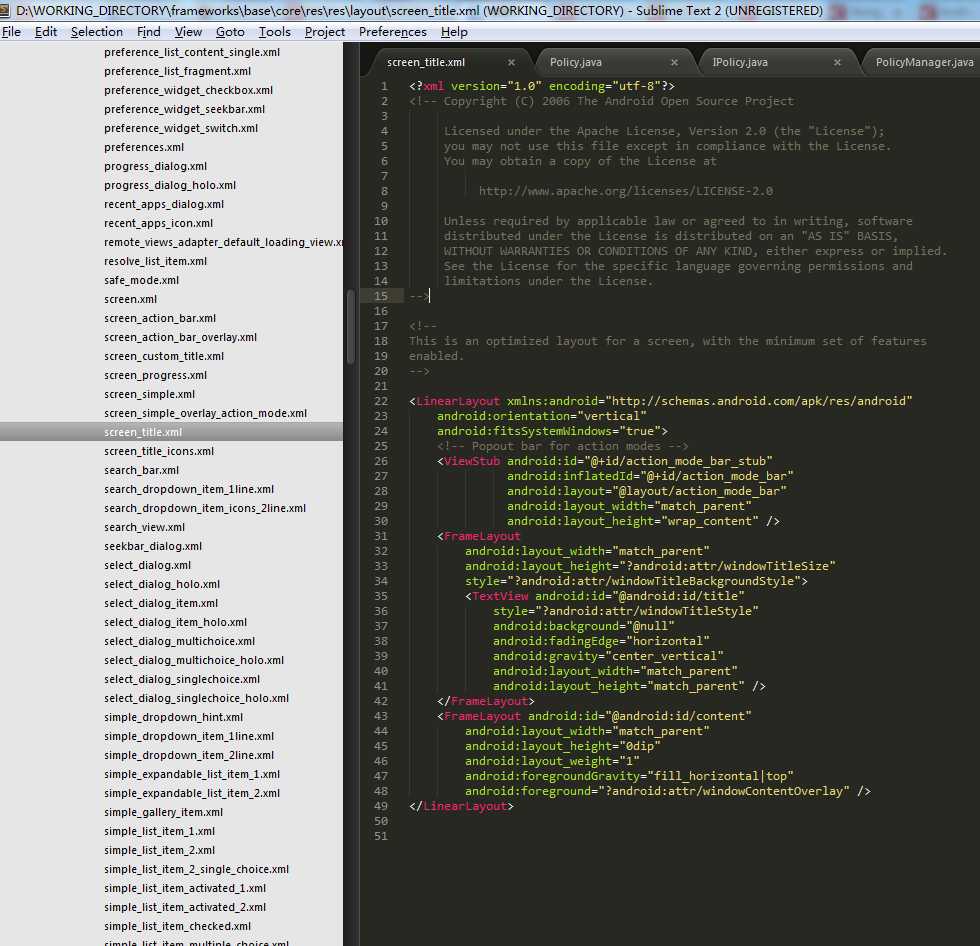
这种大家肯定经常用了,就是上面有个标题 然后下面就放我们自己的布局文件来展示内容
当然了还有人喜欢用全屏的screen_simple,他的代码也是很简单的。这里不截图上代码
 1 <?xml version="1.0" encoding="utf-8"?>
 2 <!--
 3 /* //device/apps/common/assets/res/layout/screen_simple.xml
 4 **
 5 ** Copyright 2006, The Android Open Source Project
 6 **
 7 ** Licensed under the Apache License, Version 2.0 (the "License");
 8 ** you may not use this file except in compliance with the License.
 9 ** You may obtain a copy of the License at
10 **
11 **     http://www.apache.org/licenses/LICENSE-2.0
12 **
13 ** Unless required by applicable law or agreed to in writing, software
14 ** distributed under the License is distributed on an "AS IS" BASIS,
15 ** WITHOUT WARRANTIES OR CONDITIONS OF ANY KIND, either express or implied.
16 ** See the License for the specific language governing permissions and
17 ** limitations under the License.
18 */
19
20 This is an optimized layout for a screen, with the minimum set of features
21 enabled.
22 -->
23
24 <LinearLayout xmlns:android="http://schemas.android.com/apk/res/android"
25     android:fitsSystemWindows="true"
26     android:orientation="vertical">
27     <ViewStub android:id="@+id/action_mode_bar_stub"
28               android:inflatedId="@+id/action_mode_bar"
29               android:layout="@layout/action_mode_bar"
30               android:layout_width="match_parent"
31               android:layout_height="wrap_content" />
32     <FrameLayout
33          android:id="@android:id/content"
34          android:layout_width="match_parent"
35          android:layout_height="match_parent"
36          android:foregroundInsidePadding="false"
37          android:foregroundGravity="fill_horizontal|top"
38          android:foreground="?android:attr/windowContentOverlay" />
39 </LinearLayout>
那 注意 33行代码 android:id="@android:id/content" 这个地方跟我们上一张的博客 那边有一样的地方,都是用的这个id content为根布局的,有兴趣的同学可以看看我们view教程05的结尾部分,
两个串起来看就能明白了~~~
然后看一下这个函数 另外一个重要的代码
 1 ViewGroup contentParent = (ViewGroup)findViewById(ID_ANDROID_CONTENT);
 2         if (contentParent == null) {
 3             throw new RuntimeException("Window couldn‘t find content container view");
 4         }
 5
 6         if ((features & (1 << FEATURE_INDETERMINATE_PROGRESS)) != 0) {
 7             ProgressBar progress = getCircularProgressBar(false);
 8             if (progress != null) {
 9                 progress.setIndeterminate(true);
10             }
11         }
12
13         // Remaining setup -- of background and title -- that only applies
14         // to top-level windows.
15         if (getContainer() == null) {
16             Drawable drawable = mBackgroundDrawable;
17             if (mBackgroundResource != 0) {
18                 drawable = getContext().getResources().getDrawable(mBackgroundResource);
19             }
20             mDecor.setWindowBackground(drawable);
21             drawable = null;
22             if (mFrameResource != 0) {
23                 drawable = getContext().getResources().getDrawable(mFrameResource);
24             }
25             mDecor.setWindowFrame(drawable);
26
27             // System.out.println("Text=" + Integer.toHexString(mTextColor) +
28             // " Sel=" + Integer.toHexString(mTextSelectedColor) +
29             // " Title=" + Integer.toHexString(mTitleColor));
30
31             if (mTitleColor == 0) {
32                 mTitleColor = mTextColor;
33             }
34
35             if (mTitle != null) {
36                 setTitle(mTitle);
37             }
38             setTitleColor(mTitleColor);
39         }
40
41         mDecor.finishChanging();
42
43         return contentParent;
返回值是contentParent 而他的值实际上就是我们那个布局文件里装内容的android id content,很好理解吧
所以generateLayout这个函数的作用就是 确定一下我们activity的显示风格还有把content这个framelayout的值
给mContentParent,然后通过第8行的代码就把我们的布局文件添加到这个freamlayout里了。
 1  @Override
 2     public void setContentView(int layoutResID) {
 3         if (mContentParent == null) {
 4             installDecor();
 5         } else {
 6             mContentParent.removeAllViews();
 7         }
 8         mLayoutInflater.inflate(layoutResID, mContentParent);
 9         final Callback cb = getCallback();
10         if (cb != null && !isDestroyed()) {
11             cb.onContentChanged();
12         }
13     }
最终由ActivityManagerService 这个类还显示我们的decorview。
最后我们再把前面的流程简单复述一下
启动一个activity的时候,我们最终是调用的phonewindow的setcontent方法 ,这个方法会创建一个decorview对象
然后再过一遍窗口属性这个流程,最后取得android id content 这个framelayout,然后将布局文件添加到这个framelayout里面
最后由activitymanagerservice负责把这个最终的界面展示出来~~~
自定义view 07 将会讲一下view的绘制流程~
Android自定义view教程06--Activity的绘制流程简单分析(基于android 4.0源码进行分析)
标签:
原文地址:http://www.cnblogs.com/punkisnotdead/p/4578761.html