标签:des style blog http color 使用
一、程序框架
1、程序结构

2、storyboard
一个navigation controller 仅保留最基础部分,其他删除

根视图设置为view controller:


另外两个视图:

二、主要代码
1、ViewController.m中的主要代码
1)- (void)viewDidLoad方法
- (void)viewDidLoad {
    [super viewDidLoad];
    //根视图导航栏左侧和右侧的两个按钮
    UIBarButtonItem *leftButton = [[UIBarButtonItem alloc] initWithBarButtonSystemItem:UIBarButtonSystemItemAction target:self action:@selector(selectLeftAction:)];
    self.navigationItem.leftBarButtonItem = leftButton;

    UIBarButtonItem *rightButton = [[UIBarButtonItem alloc] initWithBarButtonSystemItem:UIBarButtonSystemItemAdd target:self action:@selector(selectRightAction:)];
    self.navigationItem.rightBarButtonItem = rightButton;

    //自定义从下一个视图左上角,“返回”根视图的按钮
    UIBarButtonItem *backButton = [[UIBarButtonItem alloc] initWithTitle:@"后退" style:UIBarButtonItemStyleDone target:nil action:nil];
    self.navigationItem.backBarButtonItem=backButton;

    //自定义根视图下方的工具条,可进一步绑定各个按钮的处理函数;只对当前视图有效,切换到其他视图时为空白
    [self.navigationController  setToolbarHidden:NO animated:YES];
    UIBarButtonItem *one = [[UIBarButtonItem alloc] initWithBarButtonSystemItem:UIBarButtonSystemItemAdd target:nil action:nil];
    UIBarButtonItem *two = [[UIBarButtonItem alloc] initWithBarButtonSystemItem:UIBarButtonSystemItemBookmarks target:nil action:nil];
    UIBarButtonItem *three = [[UIBarButtonItem alloc] initWithBarButtonSystemItem:UIBarButtonSystemItemAction target:nil action:nil];
    UIBarButtonItem *four = [[UIBarButtonItem alloc] initWithBarButtonSystemItem:UIBarButtonSystemItemEdit target:nil action:nil];
    UIBarButtonItem *flexItem = [[UIBarButtonItem alloc] initWithBarButtonSystemItem:UIBarButtonSystemItemFlexibleSpace target:nil action:nil];
    [self setToolbarItems:[NSArray arrayWithObjects:flexItem, one, flexItem, two, flexItem, three, flexItem, four, flexItem, nil]];

}
2)导航条左侧按钮响应函数
-(void)selectLeftAction:(id)sender
{
    UIAlertView *alter = [[UIAlertView alloc] initWithTitle:@"提示" message:@"你点击了导航栏左按钮" delegate:self  cancelButtonTitle:@"确定" otherButtonTitles:nil, nil];
    [alter show];
}
3)导航条右侧按钮响应函数
-(void)selectRightAction:(id)sender
{
    VCSecondView *vcSecondView;
    vcSecondView =[self.storyboard instantiateViewControllerWithIdentifier: @"second_view"];
    [self.navigationController pushViewController:vcSecondView animated:YES];
}
2、VCSecondView.m中的主要代码
1)- (void)viewDidLoad
- (void)viewDidLoad
{
    [super viewDidLoad];

    //自定义在导航条显示的对第二个视图对描述;
    //UINavigationController的title可以用别的view替代,比如用UIButton UILable等,此处使用uibutton
    UIButton *button = [UIButton buttonWithType: UIButtonTypeRoundedRect];
    [button setTitle: @"自定义title" forState: UIControlStateNormal];
    [button sizeToFit];
    self.navigationItem.titleView = button;

    //导航栏右侧按钮
    UIBarButtonItem *rightButton = [[UIBarButtonItem alloc] initWithBarButtonSystemItem:UIBarButtonSystemItemAdd target:self action:@selector(selectRightAction:)];
    self.navigationItem.rightBarButtonItem = rightButton;

    //自定义从下一个视图左上角,“返回”本视图的按钮
    UIBarButtonItem *backButton = [[UIBarButtonItem alloc] initWithTitle:@"后退" style:UIBarButtonItemStyleDone target:nil action:nil];
    self.navigationItem.backBarButtonItem=backButton;
}
2)导航条右侧按钮响应函数
-(void)selectRightAction:(id)sender
{
    VCThirdView *vcThirdView;
    vcThirdView =[self.storyboard instantiateViewControllerWithIdentifier: @"third_view"];
    [self.navigationController pushViewController:vcThirdView animated:YES];
}
2、VCThirdView.m中的主要代码
均是默认代码
三、运行测试
1、初始界面

2、单击根视图左侧按钮

3、单击根视图右侧按钮

4、单击第二个视图右侧按钮

四、另外两个功能:不常用
在第二个视图中操作
1、分割功能:UISegmentedControl
1)- (void)viewDidLoad添加如下代码:
- (void)viewDidLoad
{
  。。。
   NSArray *array = [NSArray arrayWithObjects:@"分割a",@"分割b", nil];
    UISegmentedControl *segmentedController = [[UISegmentedControl alloc] initWithItems:array];
    segmentedController.segmentedControlStyle = UISegmentedControlSegmentCenter;

    [segmentedController addTarget:self action:@selector(segmentAction:) forControlEvents:UIControlEventValueChanged];
    self.navigationItem.titleView = segmentedController;
  。。。
}
2)分割按钮响应函数:
-(void)segmentAction:(id)sender
{
     switch ([sender selectedSegmentIndex]) {
         case 0:
         {
            UIAlertView *alter = [[UIAlertView alloc] initWithTitle:@"提示" message:@"你点击了分割a" delegate:self  cancelButtonTitle:@"确定" otherButtonTitles:nil, nil];
            [alter show];
         }
             break;
         case 1:
         {
             UIAlertView *alter = [[UIAlertView alloc] initWithTitle:@"提示" message:@"你点击了分割b" delegate:self  cancelButtonTitle:@"确定" otherButtonTitles:nil, nil];
             [alter show];
         }
             break;

         default:
             break;
     }
}
3)运行结果:


2、动态加载自定义的toolbar
1)VCSecondView.h
#import <UIKit/UIKit.h>

@interface VCSecondView : UIViewController
{
    UIToolbar *toolBar;
}
@end
2)- (void)viewDidLoad中添加如下代码:
  UIBarButtonItem *addButton = [[UIBarButtonItem alloc] initWithBarButtonSystemItem:UIBarButtonSystemItemSearch target:self action:nil/*@selector(gotoThridView:)*/];
    toolBar = [[UIToolbar alloc] initWithFrame:CGRectMake(0.0, self.view.frame.size.height - toolBar.frame.size.height - 44.0, self.view.frame.size.width, 44.0)];
    [toolBar setBarStyle:UIBarStyleDefault];
    toolBar.autoresizingMask = UIViewAutoresizingFlexibleTopMargin;
    [toolBar setItems:[NSArray arrayWithObject:addButton]];
    [self.view addSubview:toolBar];
3)运行结果:切换到第三个视图过程中右上角有黑色阴影

五、其他
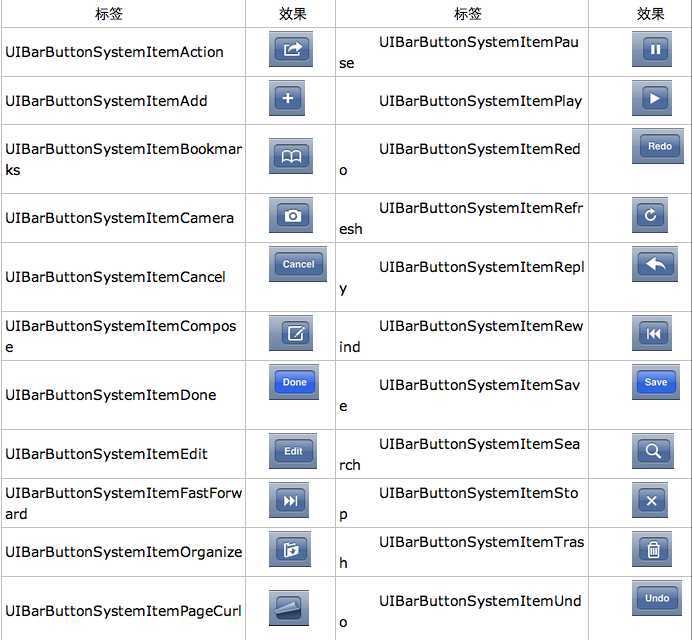
导航栏按钮图标类型:
参考:http://blog.csdn.net/totogo2010/article/details/7681879
navigation controller,布布扣,bubuko.com
标签:des style blog http color 使用
原文地址:http://www.cnblogs.com/edisonfeng/p/3818612.html