标签:
In rare cases, you might want to design your settings such that the first screen displays only a list of subscreens(such as in the system Settings app, as shown in figures 4 and 5). When you‘re developing such a design for Android 3.0 and higher, you should use a new "headers" feature in Android 3.0, instead of building subscreens with nested PreferenceScreen elements.
To build your settings with headers, you need to:
PreferenceFragment. That is, each group of settings needs a separate XML file.PreferenceActivity class to host your settings.onBuildHeaders() callback to specify the headers file.A great benefit to using this design is that PreferenceActivity automatically presents the two-pane layout shown in figure 4 when running on large screens.
Even if your application supports versions of Android older than 3.0, you can build your application to usePreferenceFragment for a two-pane presentation on newer devices while still supporting a traditional multi-screen hierarchy on older devices (see the section about Supporting older versions with preference headers).
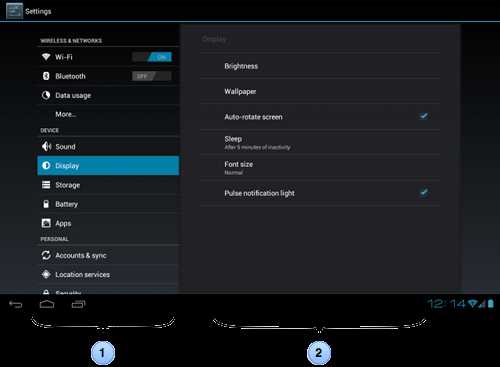
Figure 4. Two-pane layout with headers.
1. The headers are defined with an XML headers file.
2. Each group of settings is defined by a PreferenceFragment that‘s specified by a <header> element in the headers file.
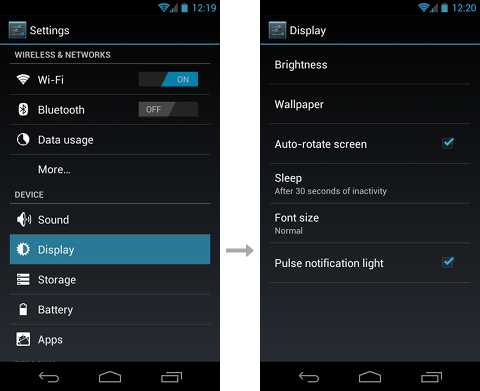
Figure 5. A handset device with setting headers. When an item is selected, the associated PreferenceFragmentreplaces the headers.
Each group of settings in your list of headers is specified by a single <header> element inside a root<preference-headers> element. For example:
<?xml version="1.0" encoding="utf-8"?>
<preference-headers xmlns:android="http://schemas.android.com/apk/res/android">
    <header
        android:fragment="com.example.prefs.SettingsActivity$SettingsFragmentOne"
        android:title="@string/prefs_category_one"
        android:summary="@string/prefs_summ_category_one" />
    <header
        android:fragment="com.example.prefs.SettingsActivity$SettingsFragmentTwo"
        android:title="@string/prefs_category_two"
        android:summary="@string/prefs_summ_category_two" >
        <!-- key/value pairs can be included as arguments for the fragment. -->
        <extra android:name="someKey" android:value="someHeaderValue" />
    </header>
</preference-headers>
With the android:fragment attribute, each header declares an instance of PreferenceFragment that should open when the user selects the header.
The <extras> element allows you to pass key-value pairs to the fragment in a Bundle. The fragment can retrieve the arguments by calling getArguments(). You might pass arguments to the fragment for a variety of reasons, but one good reason is to reuse the same subclass of PreferenceFragment for each group and use the argument to specify which preferences XML file the fragment should load.
For example, here‘s a fragment that can be reused for multiple settings groups, when each header defines an<extra> argument with the "settings" key:
public static class SettingsFragment extends PreferenceFragment {
    @Override
    public void onCreate(Bundle savedInstanceState) {
        super.onCreate(savedInstanceState);

        String settings = getArguments().getString("settings");
        if ("notifications".equals(settings)) {
            addPreferencesFromResource(R.xml.settings_wifi);
        } else if ("sync".equals(settings)) {
            addPreferencesFromResource(R.xml.settings_sync);
        }
    }
}
To display the preference headers, you must implement the onBuildHeaders() callback method and callloadHeadersFromResource(). For example:
public class SettingsActivity extends PreferenceActivity {
    @Override
    public void onBuildHeaders(List<Header> target) {
        loadHeadersFromResource(R.xml.preference_headers, target);
    }
}
When the user selects an item from the list of headers, the system opens the associated PreferenceFragment.
Note: When using preference headers, your subclass of PreferenceActivity doesn‘t need to implement theonCreate() method, because the only required task for the activity is to load the headers.
If your application supports versions of Android older than 3.0, you can still use headers to provide a two-pane layout when running on Android 3.0 and higher. All you need to do is create an additional preferences XML file that uses basic <Preference> elements that behave like the header items (to be used by the older Android versions).
Instead of opening a new PreferenceScreen, however, each of the <Preference> elements sends an Intentto the PreferenceActivity that specifies which preference XML file to load.
For example, here‘s an XML file for preference headers that is used on Android 3.0 and higher (res/xml/preference_headers.xml):
<preference-headers xmlns:android="http://schemas.android.com/apk/res/android">
    <header
        android:fragment="com.example.prefs.SettingsFragmentOne"
        android:title="@string/prefs_category_one"
        android:summary="@string/prefs_summ_category_one" />
    <header
        android:fragment="com.example.prefs.SettingsFragmentTwo"
        android:title="@string/prefs_category_two"
        android:summary="@string/prefs_summ_category_two" />
</preference-headers>
And here is a preference file that provides the same headers for versions older than Android 3.0 (res/xml/preference_headers_legacy.xml):
<PreferenceScreen xmlns:android="http://schemas.android.com/apk/res/android">
    <Preference
        android:title="@string/prefs_category_one"
        android:summary="@string/prefs_summ_category_one"  >
        <intent
            android:targetPackage="com.example.prefs"
            android:targetClass="com.example.prefs.SettingsActivity"
            android:action="com.example.prefs.PREFS_ONE" />
    </Preference>
    <Preference
        android:title="@string/prefs_category_two"
        android:summary="@string/prefs_summ_category_two" >
        <intent
            android:targetPackage="com.example.prefs"
            android:targetClass="com.example.prefs.SettingsActivity"
            android:action="com.example.prefs.PREFS_TWO" />
    </Preference>
</PreferenceScreen>
Because support for <preference-headers> was added in Android 3.0, the system calls onBuildHeaders() in your PreferenceActivity only when running on Androd 3.0 or higher. In order to load the "legacy" headers file (preference_headers_legacy.xml), you must check the Android version and, if the version is older than Android 3.0 (HONEYCOMB), call addPreferencesFromResource() to load the legacy header file. For example:
@Override
public void onCreate(Bundle savedInstanceState) {
    super.onCreate(savedInstanceState);
    ...

    if (Build.VERSION.SDK_INT < Build.VERSION_CODES.HONEYCOMB) {
        // Load the legacy preferences headers
        addPreferencesFromResource(R.xml.preference_headers_legacy);
    }
}

// Called only on Honeycomb and later
@Override
public void onBuildHeaders(List<Header> target) {
   loadHeadersFromResource(R.xml.preference_headers, target);
}
The only thing left to do is handle the Intent that‘s passed into the activity to identify which preference file to load. So retrieve the intent‘s action and compare it to known action strings that you‘ve used in the preference XML‘s <intent> tags:
final static String ACTION_PREFS_ONE = "com.example.prefs.PREFS_ONE";
...

@Override
public void onCreate(Bundle savedInstanceState) {
    super.onCreate(savedInstanceState);

    String action = getIntent().getAction();
    if (action != null && action.equals(ACTION_PREFS_ONE)) {
        addPreferencesFromResource(R.xml.preferences);
    }
    ...

    else if (Build.VERSION.SDK_INT < Build.VERSION_CODES.HONEYCOMB) {
        // Load the legacy preferences headers
        addPreferencesFromResource(R.xml.preference_headers_legacy);
    }
}
Beware that consecutive calls to addPreferencesFromResource() will stack all the preferences in a single list, so be sure that it‘s only called once by chaining the conditions with else-if statements.
Android偏好设置(5)偏好设置界面显示多个分组,每个分组也有一个界面
标签:
原文地址:http://www.cnblogs.com/cocl/p/4621065.html