标签:
1.UIPickerViewDataSource
这两个方法必须实现
// 返回有多少列
- (NSInteger)numberOfComponentsInPickerView:(UIPickerView *)pickerView;

// 返回第component有多少行
- (NSInteger)pickerView:(UIPickerView *)pickerView numberOfRowsInComponent:(NSInteger)component;
2.UIPickerViewDelegate
常用方法
// 返回第component列多宽
- (CGFloat)pickerView:(UIPickerView *)pickerView widthForComponent:(NSInteger)component

// 返回第component列多高
- (CGFloat)pickerView:(UIPickerView *)pickerView rowHeightForComponent:(NSInteger)component

// 返回第component列第row行标题
- (NSString *)pickerView:(UIPickerView *)pickerView titleForRow:(NSInteger)row forComponent:(NSInteger)component

// NSAttributedString:富文本,可以描述文本的外观属性,颜色,字体,阴影,空心,图文混排
- (NSAttributedString *)pickerView:(UIPickerView *)pickerView attributedTitleForRow:(NSInteger)row forComponent:(NSInteger)component

// 返回第component列第row行视图控件
- (UIView *)pickerView:(UIPickerView *)pickerView viewForRow:(NSInteger)row forComponent:(NSInteger)component reusingView:(UIView *)view

// 当用户选中某一行的时候调用
// 选中第component列第row行的时候调用
// 可以监听pickerView滚动
- (void)pickerView:(UIPickerView *)pickerView didSelectRow:(NSInteger)row inComponent:(NSInteger)component
1.UITextFieldDelegate
有些时候要拦截用户的输入
只能通过PickerView轮动选择来显示文本框内容
那么只要实现下面这个代理方法就行了
- (BOOL)textField:(UITextField *)textField shouldChangeCharactersInRange:(NSRange)range replacementString:(NSString *)string
{
    return NO;
}
UITextFieldDelegate还有两个常用方法
// 是否允许开始编辑
// 允许编辑文本框
- (BOOL)textFieldShouldBeginEditing:(UITextField *)textField

// 是否允许文本框结束编辑
- (BOOL)textFieldShouldEndEditing:(UITextField *)textField
2.自定义键盘
键盘由文本框inputView属性决定
3.KVC底层实现
// setValuesForKeysWithDictionary底层实现

//  利用KVC字典转模型,
    [flag setValuesForKeysWithDictionary:dict];

    // 1.遍历字典中的所有key
    [dict enumerateKeysAndObjectsUsingBlock:^(id key, id obj, BOOL *stop) {
        // 2.给模型的属性赋值,利用KVC,把字典中的key当做模型的属性名使用,字典中的值传递给模型的属性.
        [flag setValue:obj forKey:key];
        // name -> icon
        // KeyPath:模型中的属性名
        // 属性的值

//        [flag setValue:dict[@"name"] forKey:@"name"];
//        [flag setValue:dict[@"icon"] forKey:@"icon"];
    }];

// setValue:forKey:底层实现
// 给模型中的icon属性赋值
// [flag setValue:dict[@"icon"] forKey:@"icon"];

// 1.首先去寻找模型中有木有setIcon:方法,直接调用setIcon:方法,[flag setIcon:dict[@"icon"]]
// 2.接着寻找模型中有没有icon的属性名,如果有,就直接赋值 icon = dict[@"icon"]

// 3.接着寻找模型中有没有_icon的属性名,如果有,就直接赋值 _icon = dict[@"icon"]

// 4.找不到,直接报错,setValue:forUndefinedKey:
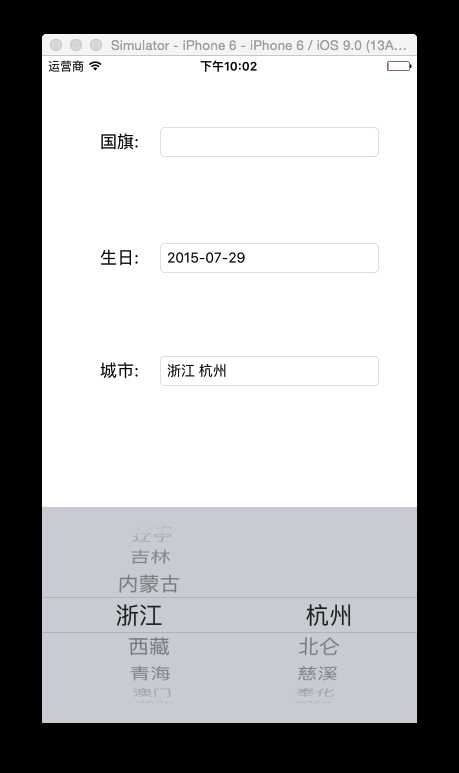
4.UIDatePicker自定义生日键盘
// 自定义生日键盘
- (void)setUp
{

    // 创建一个UIDatePicker
    UIDatePicker *datePicker = [[UIDatePicker alloc] init];

    // 设置日期模型
    datePicker.datePickerMode = UIDatePickerModeDate;

    // 设置地区,zh:中国
    datePicker.locale = [NSLocale localeWithLocaleIdentifier:@"zh"];

    // 监听UIDatePicker的选中的日期
    [datePicker addTarget:self action:@selector(dateChange:) forControlEvents:UIControlEventValueChanged];

    self.inputView = datePicker;
}

// 选中日期的时候调用
- (void)dateChange:(UIDatePicker *)datePicker
{
//    NSLog(@"%@",datePicker.date);
    // 获取日期 显示到文本框上

    // 日期格式字符串对象
    NSDateFormatter *fmt = [[NSDateFormatter alloc] init];

    // 设置格式 1988-01-01
    fmt.dateFormat = @"yyyy-MM-dd";


    self.text = [fmt stringFromDate:datePicker.date];


}
 // UIStoryboard : 帮你加载storyboard文件
    // 加载storyboard文件
    // name:storyboard文件名,不需要后缀名
    UIStoryboard *storyboard = [UIStoryboard storyboardWithName:@"Main" bundle:nil];

    // 创建storyboard描述的控制器
    // instantiateInitialViewController帮你加载箭头指向的控制器
    UIViewController *vc = [storyboard instantiateInitialViewController];

    // 根据标识符创建storyboard描述的控制器
//    UIViewController *vc = [storyboard instantiateViewControllerWithIdentifier:@"org"];
1.通过xib创建控制器原因:
是想通过Xib描述控制器的view
2.如何通过xib创建控制器
1)让xib与控制器产生联系,设置xib的文件拥有者是控制器,这时候xib就描述这个控制器
2)连线,告诉控制器是哪个view在描述
1.loadView
什么时候调用:当第一次使用控制器的view的时候就会调用
作用:加载控制器的view,自定义控制器的view
注意:
1)只要重写loadView,必须自己手动创建控制器的view
2)在没给_view赋值之前,不能调用self.view;
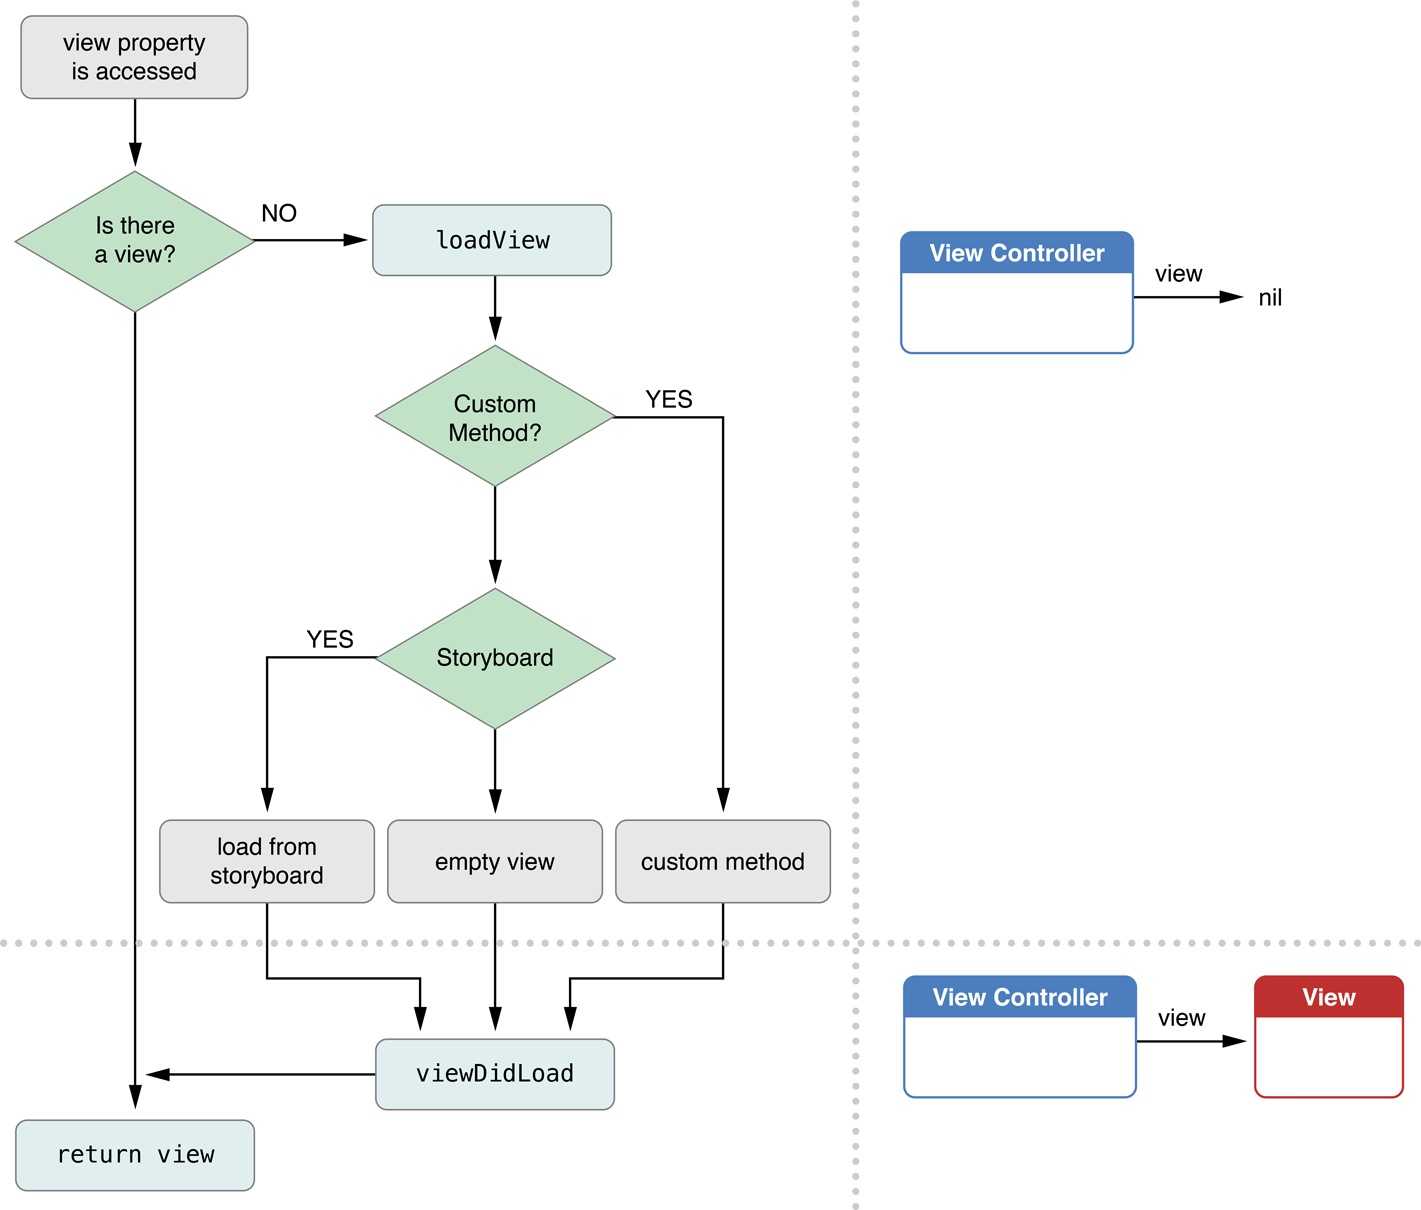
2.loadView加载流程
3.xib加载控制器的view
init底层会调用initWithNibName:bundle:
- (BOOL)application:(UIApplication *)application didFinishLaunchingWithOptions:(NSDictionary *)launchOptions {

    self.window = [[UIWindow alloc] initWithFrame:[UIScreen mainScreen].bounds];

    // 根据xib创建窗口的根控制器
    // init底层会调用initWithNibName:bundle:
    XMGViewController *vc = [[XMGViewController alloc] initWithNibName:nil bundle:nil];

    // 通过xib创建XMGViewController控制器的view
    // 1.判断下nibName有没有值,如果有值,就会去加载nibName指定的xib
    // 2.如果nibName为空,会先去查找有没有XMGView.xib,如果有就去加载
    // 3.如果没有XMGView.xib,就会去加载根类名同名的xib:XMGViewController.xib
    // 4.如果还没有找到,就生成一个空的view

    self.window.rootViewController = vc;

    [self.window makeKeyAndVisible];

    return YES;
}
4.控制器的view延迟加载
- (BOOL)application:(UIApplication *)application didFinishLaunchingWithOptions:(NSDictionary *)launchOptions {

    self.window = [[UIWindow alloc] initWithFrame:[UIScreen mainScreen].bounds];
    // 创建控制器,并不会创建控制器的view,前提是父类是UIViewController
    ViewController *vc = [[ViewController alloc] init];

    vc.view.backgroundColor = [UIColor redColor];// 控制器在这里才用到(加载)view

    // 设置窗口的根控制器
    self.window.rootViewController = vc;

    // 显示窗口,拿到控制器的view添加到窗口上显示
    [self.window makeKeyAndVisible];

    return YES;
}
实际上就是一个懒加载
- (UIView *)view
{
    if (_view == nil) {
        // 加载view
        [self loadView];
        // 当控制器的view加载完成的时候调用
        [self viewDidLoad];
    }
    return _view;
}
5.控制器view默认的是几乎透明的
1.导航控制器必须要有一个根控制器
- (BOOL)application:(UIApplication *)application didFinishLaunchingWithOptions:(NSDictionary *)launchOptions {

    // 1.创建窗口
    self.window = [[UIWindow alloc] initWithFrame:[UIScreen mainScreen].bounds];

    // 创建一个导航控制器的根控制器
    UIViewController *vc = [[OneViewController alloc] init];

    // 创建导航控制器
    // 导航控制器必须要有一个根控制器
    UINavigationController *nav = [[UINavigationController alloc] initWithRootViewController:vc];

    // 2.设置窗口的根控制器
    self.window.rootViewController = nav;

    // 3.显示窗口
    [self.window makeKeyAndVisible];


    return YES;
}
2.如果是导航控制器的子控制器可以直接拿到导航控制器
// 跳转到第二个界面
- (IBAction)jump2Two:(id)sender {

    // 创建第二个控制器
    TwoViewController *two = [[TwoViewController alloc] init];

    // 跳转
    // 如果是导航控制器的子控制器可以直接拿到导航控制器
    [self.navigationController pushViewController:two animated:YES];
}
3.initWithRootViewController底层其实是调用导航控制器的push方法,把vc成为导航控制器的子控制器
 UINavigationController *nav = [[UINavigationController alloc] initWithRootViewController:vc];
    // 会调用push方法
    // initWithRootViewController底层其实是调用导航控制器的push方法,把vc成为导航控制器的子控制器
//    [nav pushViewController:vc animated:YES];
IOS开发——UI进阶篇(八)pickerView简单使用,通过storyboard加载控制器,注册界面,通过xib创建控制器,控制器的view创建,导航控制器的基本使用
标签:
原文地址:http://www.cnblogs.com/chglog/p/4684529.html