标签:
只有在drawRect中才能获取到跟view相关联的上下文
- (void)drawRect:(CGRect)rect {}
一条线
    // 1.获取跟当前View相关联的layer上下文(画板)
    // 总结:目前获取的所有上下文都是以UIGraphics开头
    // CGContextRef:上下文类型
    // CG:CoreGraphics Ref:引用
    CGContextRef ctx = UIGraphicsGetCurrentContext();

    // 2.绘制内容,拼接路径
    // 创建贝瑟尔路径,因为里面已经封装好了很多路径
    UIBezierPath *path = [UIBezierPath bezierPath];
    // 绘制一条直线
    // 设置起点
    [path moveToPoint:CGPointMake(50, 50)];
    // 添加一根线到某个点
    [path addLineToPoint:CGPointMake(200, 200)];

    // 3.把拼接好的路径添加到上下文(画板)
    // UIBezierPath -> CGPath,直接.CGPath
    CGContextAddPath(ctx, path.CGPath);

    // 4.渲染上下文,就把内容显示到view
    // 只要跟上下文有关系的东西,都以CGContext开头
    CGContextStrokePath(ctx);
两条线
 // 1.获取上下文
    CGContextRef ctx = UIGraphicsGetCurrentContext();

    // 2.拼接路径,一个路径中可以保存多条线段
    UIBezierPath *path = [UIBezierPath bezierPath];

    [path moveToPoint:CGPointMake(10, 10)];

    [path addLineToPoint:CGPointMake(20, 20)];


    // 3.把路径添加到上下文
    CGContextAddPath(ctx, path.CGPath);

    // 一根线对应一个路径,只要绘制的线不连接,最好使用一根线对应一个路径的方法
    path = [UIBezierPath bezierPath];
    // 拼接另一根直线
    // 默认下一根线的起点就是上一根线的终点
    // 设置第二根线的起点
    //    [path moveToPoint:CGPointMake(20, 20)];
    // 如果想要绘制不连接的线,重新设置起点
    [path moveToPoint:CGPointMake(50, 50)];

    [path addLineToPoint:CGPointMake(20, 200)];

    // 3.把路径添加到上下文
    CGContextAddPath(ctx, path.CGPath);

    // 4.渲染上下文
    CGContextStrokePath(ctx);
绘制曲线
// 1.获取上下文
    CGContextRef ctx = UIGraphicsGetCurrentContext();

    // 2.拼接路径
    UIBezierPath *path = [UIBezierPath bezierPath];

    // 设置起点
    [path moveToPoint:CGPointMake(10, 125)];

    // 描述曲线
    [path addQuadCurveToPoint:CGPointMake(240, 125) controlPoint:CGPointMake(125, 240)];

    [path addLineToPoint:CGPointMake(10, 125)];

    // 3.添加路径到上下文
    CGContextAddPath(ctx, path.CGPath);

    // 设置绘图状态,一定要再渲染之前
    // 设置颜色
    [[UIColor redColor] setStroke];

    // 设置线段的宽度
    CGContextSetLineWidth(ctx, 15);
    // 设置线段的顶角样式
    CGContextSetLineCap(ctx, kCGLineCapRound);

    // 设置连接样式
    CGContextSetLineJoin(ctx, kCGLineJoinRound);

    // 4.渲染上下文
    CGContextStrokePath(ctx);
画扇形
// 1.获取上下文
    CGContextRef ctx = UIGraphicsGetCurrentContext();

    // 2.拼接路径
    CGPoint center = CGPointMake(self.bounds.size.width * 0.5, self.bounds.size.height * 0.5);
    // 画扇形
    UIBezierPath *path = [UIBezierPath bezierPathWithArcCenter:center radius:100 startAngle:0 endAngle:M_PI_2 clockwise:YES];

    [path addLineToPoint:center];

    [path closePath];

    // 3.把路径添加到上下文
    CGContextAddPath(ctx, path.CGPath);

    // 设置绘图的状态
    [[UIColor redColor] setFill];

    [[UIColor greenColor] setStroke];

    CGContextSetLineWidth(ctx, 5);

    // 4.渲染上下文
    CGContextDrawPath(ctx, kCGPathFillStroke);
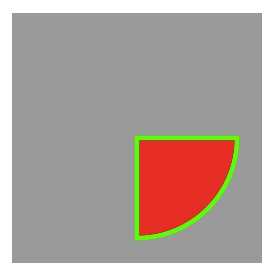
注意点:
// 关闭路径:从路径的终点连接到起点
    //    [path closePath];
    // 如果路径不是封闭的,默认会关闭路径
    [path fill];
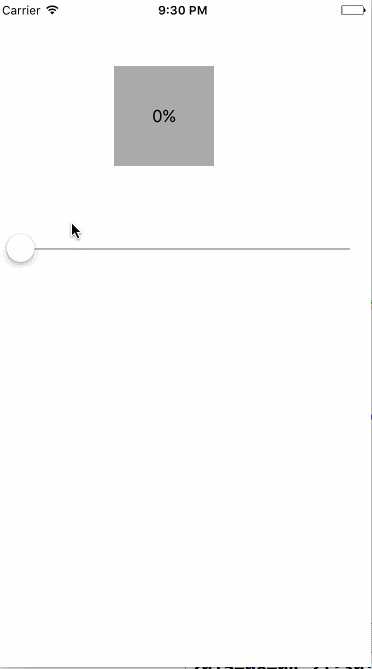
根据下载的进度来画圆 (slider当做下载进度)
核心代码
自定义view
/******************** ProgressView*****************/
#import <UIKit/UIKit.h>

@interface ProgressView : UIView

// 下载进度
@property (nonatomic, assign) CGFloat progress;

@end

#import "ProgressView.h"

@implementation ProgressView

- (void)setProgress:(CGFloat)progress
{
    _progress = progress;

    // drawRect不能手动调用
//    [self drawRect:self.bounds];
    // 重绘
    [self setNeedsDisplay];
}

// drawRect只会调用一次
// drawRect只能系统调用,而且每次调用之前系统都会创建一个跟View相关联的上下文传递给你
- (void)drawRect:(CGRect)rect {

    // 画圆弧
    CGPoint center = CGPointMake(self.bounds.size.width * 0.5, self.bounds.size.width * 0.5);
    CGFloat radius = self.bounds.size.width * 0.5 - 2;
    CGFloat startA = -M_PI_2;
    CGFloat endA = -M_PI_2 + _progress * M_PI * 2;
    UIBezierPath *path = [UIBezierPath bezierPathWithArcCenter:center radius:radius startAngle:startA endAngle:endA clockwise:YES];

    [path stroke];

}


@end

/******************** ProgressView*****************/
#import "ViewController.h"

#import "ProgressView.h"

@interface ViewController ()
@property (weak, nonatomic) IBOutlet UILabel *labelView;
@property (weak, nonatomic) IBOutlet ProgressView *progressView;

@end

@implementation ViewController
- (IBAction)valueChange:(UISlider *)sender {


    // %在stringWithFormat里面有特殊含义,需要转义 %% 相当于一个%
    _labelView.text = [NSString stringWithFormat:@"%.2f%%",sender.value * 100];
    _progressView.progress = sender.value;
}
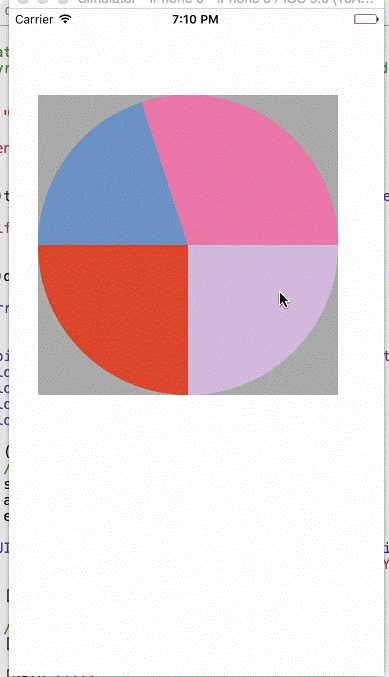
自定义view
#import "PieView.h"

@implementation PieView


- (void)touchesBegan:(NSSet *)touches withEvent:(UIEvent *)event
{
    [self setNeedsDisplay];
}

- (void)drawRect:(CGRect)rect {

    NSArray *data = @[@25,@25,@20,@30];


    CGPoint center = CGPointMake(self.bounds.size.width * 0.5, self.bounds.size.height * 0.5);
    CGFloat radius = self.bounds.size.width * 0.5;
    CGFloat startA = 0;
    CGFloat endA = 0;
    CGFloat angle = 0;

    for (NSNumber *num in data) {
        // 画一个扇形
        startA = endA;
        angle = [num intValue] / 100.0 * M_PI * 2;
        endA = startA + angle;

       UIBezierPath *path = [UIBezierPath bezierPathWithArcCenter:center radius:radius startAngle:startA endAngle:endA clockwise:YES];

        [path addLineToPoint:center];

        // set:同时设置描边和填充颜色
        [[self randomColor] set];

        [path fill];
    }
}

// 随机颜色
- (UIColor *)randomColor
{
    CGFloat r = arc4random_uniform(256) / 255.0;
    CGFloat g = arc4random_uniform(256) / 255.0;
    CGFloat b = arc4random_uniform(256) / 255.0;
    return [UIColor colorWithRed:r green:g blue:b alpha:1];
}


@end
1)画文字
NSString *str = @"hello!";

    // Attributes:属性
    // 给一个字符串添加属性,可以叫富文本,颜色,字体大小,空心,阴影

    // 利用这个属性字典给文本添加属性
    NSMutableDictionary *strAttr = [NSMutableDictionary dictionary];
    // key,value
    // 如何找到设置文本的属性key
    // 描述了字体
    strAttr[NSFontAttributeName] = [UIFont boldSystemFontOfSize:50];

    // 设置描边的颜色和宽度
    strAttr[NSStrokeWidthAttributeName] = @1;

    strAttr[NSStrokeColorAttributeName] = [UIColor redColor];

    NSShadow *shadow = [[NSShadow alloc] init];

    shadow.shadowColor = [UIColor yellowColor];

    shadow.shadowOffset = CGSizeMake(10, 10);

    shadow.shadowBlurRadius = 5;

    // 阴影
    strAttr[NSShadowAttributeName] = shadow;

    // 文字颜色
    strAttr[NSForegroundColorAttributeName] = [UIColor redColor];

    [str drawAtPoint:CGPointZero withAttributes:strAttr];
2)画图片,裁剪
- (void)drawRect:(CGRect)rect {

    // UIKit框架封装的方法绘制内容

    // 裁剪,rect裁剪的区域

    // 文字和图片
    UIImage *image = [UIImage imageNamed:@"001"];

    // 裁剪注意点:一定要放在绘图之前
    // 超出裁剪区域的内容会被裁剪掉
    UIRectClip(CGRectMake(0, 0, 50, 50));

    // 绘制的内容跟图片一样大
    [image drawAtPoint:CGPointZero];

    // 把绘制的内容控制到某个区域内
    [image drawInRect:CGRectMake(0, 0, 100, 100)];
//    [image drawAsPatternInRect:rect];
}

自定义SnowView
#import "SnowView.h"

@implementation SnowView


- (void)awakeFromNib
{
    // 设置定时器
//    [NSTimer scheduledTimerWithTimeInterval:.1 target:self selector:@selector(setNeedsDisplay) userInfo:nil repeats:YES];

    // 0.1 setNeedsDisplay 绑定一个标识,等待下次刷新的时候才会调用drawRect方法
    // 0.15 屏幕的刷新时间

    // 定时器
    // 每次屏幕刷新的时候就会调用,屏幕一秒刷新60次
    CADisplayLink *link = [CADisplayLink displayLinkWithTarget:self selector:@selector(setNeedsDisplay)];

    // 只要把定时器添加到主运行循环就能自动执行
    [link addToRunLoop:[NSRunLoop mainRunLoop] forMode:NSDefaultRunLoopMode];

    // setNeedsDisplay:底层并不会马上调用drawRect,只会给当前的控件绑定一个刷新的标识,每次屏幕刷新的时候,就会把绑定了刷新(重绘)标识的控件重新刷新(绘制)一次,就会调用drawRect去重绘

    // 如果以后每隔一段时间需要重绘,一般不使用NSTimer,使用CADisplayLink,不会刷新的时候有延迟
}

- (void)drawRect:(CGRect)rect {
    // Drawing code

    static CGFloat snowY = 0;

    UIImage *image = [UIImage imageNamed:@"雪花"];

    [image drawAtPoint:CGPointMake(0, snowY)];

    snowY += 10;

    if (snowY > rect.size.height) {
        snowY = 0;
    }

    NSLog(@"%f",snowY);
}
自定义DrawView
#import "DrawView.h"

@implementation DrawView

- (void)drawRect:(CGRect)rect {
    // 1.获取上下文
    CGContextRef ctx = UIGraphicsGetCurrentContext();

    // 2.拼接路径
    UIBezierPath *path = [UIBezierPath bezierPath];

    [path moveToPoint:CGPointMake(10, 125)];

    [path addLineToPoint:CGPointMake(240, 125)];

    // 3.把路径添加到上下文
    CGContextAddPath(ctx, path.CGPath);

    // 保存当前上下文的默认状态
    CGContextSaveGState(ctx);

    // 设置状态
    [[UIColor redColor] set];
    CGContextSetLineWidth(ctx, 20);

    // 渲染上下文
    CGContextStrokePath(ctx);

    // 创建第二根路径
    path = [UIBezierPath bezierPath];
    [path moveToPoint:CGPointMake(125, 10)];
    [path addLineToPoint:CGPointMake(125, 240)];

    // 添加到上下文
    CGContextAddPath(ctx, path.CGPath);

    // 恢复下上下文状态
    // 取出之前的保存的状态覆盖掉当前的状态
    CGContextRestoreGState(ctx);
//    [[UIColor blackColor] set];
//    CGContextSetLineWidth(ctx, 1);

    // 4.渲染上下文到view的layer
    // 在渲染之前,系统会查看下上下文的状态,根据状态去渲染
    CGContextStrokePath(ctx);
}
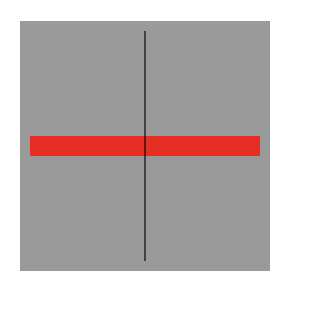
可以根据运行结果看到,恢复下上下文状态,就可以让第二条线和第一条线状态不一样,从而达到多样化
#import "DrawView.h"

@implementation DrawView

- (void)drawRect:(CGRect)rect {

    // 矩阵操作:上下文可以做平移,旋转,缩放,开发中用的比较多是旋转.
    // 获取跟view相关联的上下文
    CGContextRef ctx = UIGraphicsGetCurrentContext();

    // 平移
    CGContextTranslateCTM(ctx, 150, 200);

    // 旋转
    CGContextRotateCTM(ctx, M_PI_4);

    // 缩放
    CGContextScaleCTM(ctx, 0.5, 0.5);

    UIBezierPath *path = [UIBezierPath bezierPathWithOvalInRect:CGRectMake(-50, -100, 100, 200)];

    [[UIColor redColor] set];

    [path fill];

}
@end
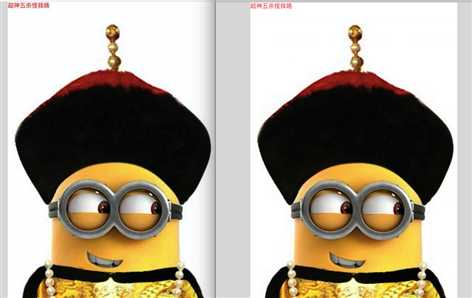
- (void)viewDidLoad {
    [super viewDidLoad];
    // 给一张图片添加文字或者Logo,生成一张新的带有文字或者Logo图片

    // 绘制图片到位图上下文,然后再利用位图上下文生成一张新的图片

    // 加载图片
    UIImage *image = [UIImage imageNamed:@"小黄人"];

    // 1.开启位图上下文
    // size:上下文的尺寸
    // opaque:不透明,总结:在上下文中一般都是设置不透明度,控件才是设置透明度
    // scale: 0表示不缩放

    UIGraphicsBeginImageContextWithOptions(image.size, NO, 0);
//    UIGraphicsBeginImageContextWithOptions(<#CGSize size#>, <#BOOL opaque#>, <#CGFloat scale#>)

    // 绘制图片
    [image drawAtPoint:CGPointZero];

    // 绘制文字
    NSString *str = @"超神五杀怪我咯";
    [str drawAtPoint:CGPointZero withAttributes:@{NSForegroundColorAttributeName : [UIColor redColor]}];

    // 从上下文内容中生成一张图片
    image = UIGraphicsGetImageFromCurrentImageContext();

    // 结束上下文
    UIGraphicsEndImageContext();

    // 把图片写入到桌面

    // image -> NSData
    // 把图片生成一个png格式的二进制数据
    // png已经高清图片格式
//    NSData *data = UIImagePNGRepresentation(image);
    // compressionQuality:图片质量

    // jpg 图片质量比 png 低
    NSData *data = UIImageJPEGRepresentation(image, 0.00001);

    [data writeToFile:@"/Users/chg/Desktop/image.jpg" atomically:YES];

}
两种格式的照片质量清晰度不一样
创建一个分类
指定一个图片名称,和圆环宽度和颜色,生成一张带有圆环的圆形图片
/**************UIImage+Image.h****************/
#import <UIKit/UIKit.h>

@interface UIImage (Image)

// 指定一个图片名称,和圆环宽度和颜色,生成一张带有圆环的圆形图片
+ (instancetype)imageCirCleWithCircleColor:(UIColor *)color CircleBorder:(CGFloat)border name:(NSString *)imageName;

@end

/**************UIImage+Image.m****************/
#import "UIImage+Image.h"

@implementation UIImage (Image)

+ (instancetype)imageCirCleWithCircleColor:(UIColor *)color CircleBorder:(CGFloat)border name:(NSString *)imageName
{
    // 裁剪带圆环的图片
    CGFloat borderWH = border;

    // 加载图片
    UIImage *image = [UIImage imageNamed:imageName];

    CGRect bigContextRect = CGRectMake(0, 0, image.size.width + 2 * borderWH, image.size.height + 2 * borderWH);

    // 1.开启位图上下文
    UIGraphicsBeginImageContextWithOptions(bigContextRect.size, NO, 0);

    // 2.画大圆
    UIBezierPath *bigCirclePath = [UIBezierPath bezierPathWithOvalInRect:bigContextRect];

    // 设置大圆颜色
    [color set];

    [bigCirclePath fill];

    // 3.设置裁剪区域
    // 3.1 先描述裁剪区域
    UIBezierPath *clipPath = [UIBezierPath bezierPathWithOvalInRect:CGRectMake(borderWH, borderWH, image.size.width, image.size.height)];
    [clipPath addClip];

    // 4.绘制图片
    [image drawAtPoint:CGPointMake(borderWH, borderWH)];

    // 5.从上下文内容中生成一张图片
    image = UIGraphicsGetImageFromCurrentImageContext();

    // 6.结束上下文
    UIGraphicsEndImageContext();

    return image;
}
@end

在storyboard随便拖些控件 截取屏幕
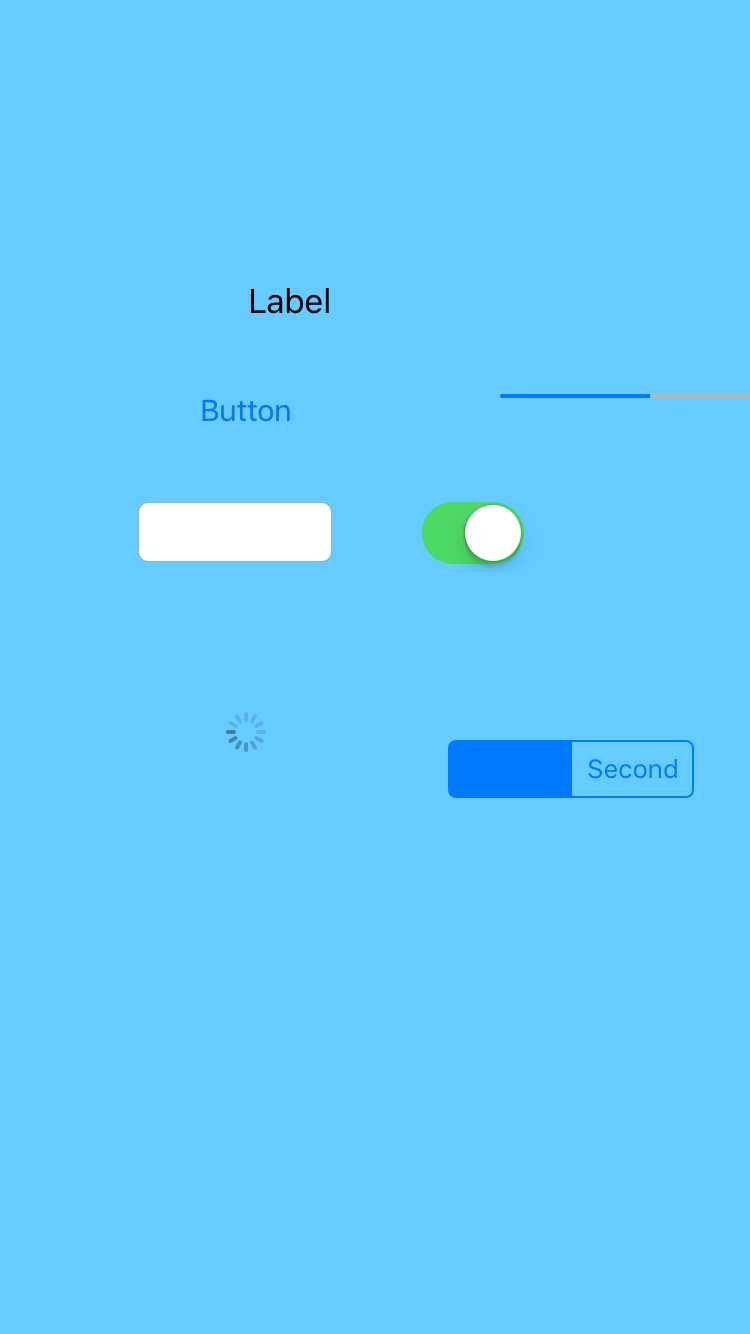
核心代码
- (void)viewDidLoad {
    [super viewDidLoad];

    // 1.开启位图上下文
    UIGraphicsBeginImageContextWithOptions(self.view.bounds.size, NO, 0);

    // 获取当前的位图上下文
   CGContextRef ctx =  UIGraphicsGetCurrentContext();

    // 2.往上下文中填充内容,把控制器的view的内容画上去,应该是把控制器view上的图层画到上下文上.
    // 获取控制器view的图层
    CALayer *layer = self.view.layer;

    // 把layer中内容渲染到上下文中,图层只能渲染,不能绘制
    [layer renderInContext:ctx];
//    [layer drawInContext:ctx];

    // 3.从上下文中取出图片
    UIImage *image = UIGraphicsGetImageFromCurrentImageContext();

    // 4.结束上下文
    UIGraphicsEndImageContext();

    NSData *data = UIImagePNGRepresentation(image);

    [data writeToFile:@"/Users/chg/Desktop/view.png" atomically:YES];

}
类似qq截图的功能
先用storyboard给控件(图片)添加手势
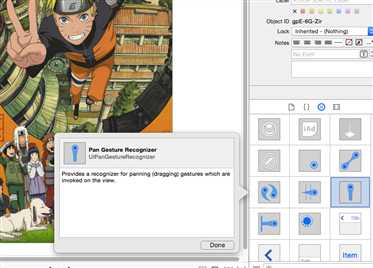
核心代码
// 蒙板
@property (nonatomic, weak) UIView *cover;
// 记录下截屏一开始的位置
@property (nonatomic, assign) CGPoint oriP;

@property (weak, nonatomic) IBOutlet UIImageView *imageView;

- (UIView *)cover
{
    if (_cover == nil) {
        UIView *view = [[UIView alloc] init];


        view.backgroundColor = [UIColor blackColor];
        view.alpha = 0.5;

        _cover = view;

        [self.view addSubview:view];

    }
    return _cover;
}

- (IBAction)pan:(UIPanGestureRecognizer *)sender {
    // 获取下当前的触摸
    CGPoint curP = [sender locationInView:_imageView];
    if (sender.state == UIGestureRecognizerStateBegan) {
        // 记录下一开始的位置
        _oriP = curP;
    }

    // 计算下黑色蒙版的frame
    CGFloat w = curP.x - _oriP.x;
    CGFloat h = curP.y - _oriP.y;

    self.cover.frame = CGRectMake(_oriP.x, _oriP.y, w, h);


    if (sender.state == UIGestureRecognizerStateEnded) { // 手指抬起

        // 裁剪图片,生成一张新图片

        // 开启位图上下文
        UIGraphicsBeginImageContextWithOptions(_imageView.bounds.size, NO, 0);

        // 设置裁剪区域
        UIBezierPath *path = [UIBezierPath bezierPathWithRect:self.cover.frame];
        [path addClip];


        // 绘制图片
        [_imageView.layer renderInContext:UIGraphicsGetCurrentContext()];

        // 生成图片
        UIImage *image = UIGraphicsGetImageFromCurrentImageContext();

        // 关闭上下文
        UIGraphicsEndImageContext();

        _imageView.image = image;

        [self.cover removeFromSuperview];
    }
}

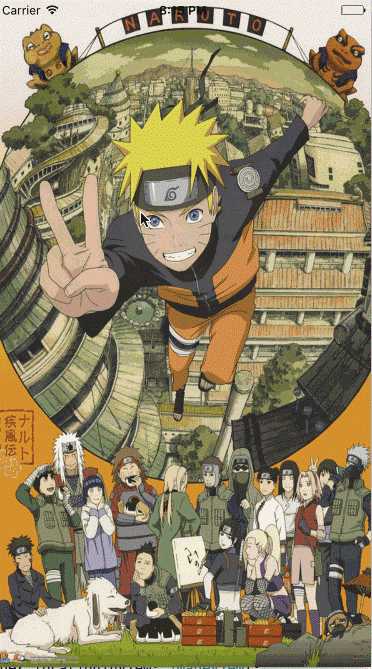
首先准备两张图片

用第一张盖住第二张
给上面的图片添加pan(拖拽)手势
核心代码
// 只要用户手指在图片上拖动.就会调用
- (IBAction)pan:(UIPanGestureRecognizer *)sender {
    // 拖动的时候,擦除图片的某一部分

    // 获取手指的触摸点
   CGPoint curP = [sender locationInView:sender.view];

    // 计算擦除的frame
    CGFloat wh = 30;
    CGFloat x = curP.x - wh * 0.5;
    CGFloat y = curP.y - wh * 0.5;

    CGRect frame = CGRectMake(x, y, wh, wh);

    // 开启位图上下文
    UIGraphicsBeginImageContextWithOptions(sender.view.bounds.size, NO, 0);

    // 获取当前的上下文
    CGContextRef ctx = UIGraphicsGetCurrentContext();

    // 把控件上的内容渲染到上下文
    [sender.view.layer renderInContext:ctx];

    // 清除上下文中某一部分的内容
    CGContextClearRect(ctx, frame);

    // 生成一张新的图片
    UIImage *image = UIGraphicsGetImageFromCurrentImageContext();

    // 关闭上下文
    UIGraphicsEndImageContext();

    // 重新显示到UIImageView
    UIImageView *imageV = (UIImageView *)sender.view;

    imageV.image = image;

}
标签:
原文地址:http://www.cnblogs.com/chglog/p/4703205.html