标签:
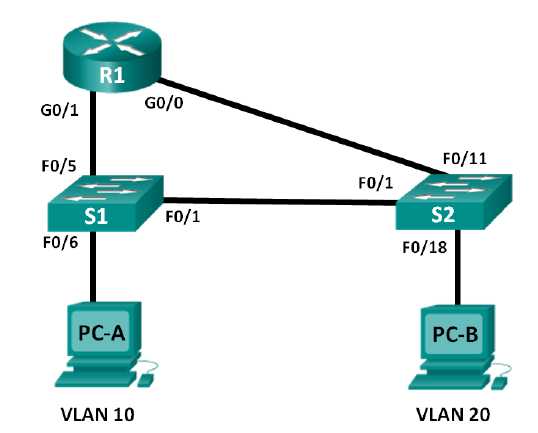
Topology
Addressing Table
| Device |
Interface |
IP address |
Subnet Mask |
Dfault Gateway |
| R1 |
G0/0 |
192.168.20.1 |
255.255.255.0 |
N/A |
| |
G0/1 |
192.168.10.1 |
255.255.255.0 |
N/A |
| S1 |
VLAN010 |
192.168.10.11 |
255.255.255.0 |
192.168.10.1 |
| S2 |
VLAN10 |
192.168.10.12 |
255.255.255.0 |
192.168.10.1 |
| PC-A |
NIC |
192.168.10.3 |
255.255.255.0 |
192.168.10.1 |
| PC-B |
NIC |
192.168.20.3 |
255.255.255.0 |
192.168.20.1 |
Objectives:
Part 1: Build the Network and Configure Basic Device Settings
Part 2: Configure Switches with VLAN and Trunking
Part 3: Verify Trunking, VLANs, Routing, and Connectivity
Background/scenario
Legacy inter-VLAN routing is seldom used in today‘s networks; However, it is helpful to configure and understand this type of routing before moving on to router-on-stick(Trunk-based)inter-VLAN routing or configuring Layer-3 switching. One of the benefits of Legacy inter-VLAN routing is ease of configuration.
Part 1: Build the Network and Configure Basic Device Settings
Step 1: Cable the network as shown in the topology.
Step 2: Initialize and reload the router and switches.
Step 3: Configure Basic Settings for R1.
- disable DNS lookup
- assign the device name.
- Assign the class as the privileged EXEC mode encrypted password.
- Assign the cisco as the console and vty line password and enable login.
- Configure addressing and enable both interfaces.
Step 4: Configure basic settings on S1 and S2.
- disable DNS lookup
- Assign the device name.
- Assign class as the privileged EXEC mode encrypted password.
- Assign cisco as the console and vty line password and enable login.
Step 5: Configure basic settings on PC-A and PC-B.
Part 2: Configure Switches with VLAN and Trunking
Step 1: Configure VLANs on S1.
- On S1, create VLAN 10. Assign Student as the VLAN name.
- Create VLAN 20. Assign Faculty-Admin as the VLAN name.
- Configure f0/1 as the trunk port.
- Assign ports f0/5 and f0/6 to VLAN 10 and configure both f0/5 and f0/6 as access ports.
- Assign an IP address to VLAN 10 and enable it. Refer to the Addressing Table.
- Configure the default gateway according to the Addressing Table.
Configure VLANs on S2.
- On S2, create VLAN 10. Assign Student as the VLAN name.
- Create VLAN 20. Assign Faculty-Admin as the VLAN name.
- Configure F0/1 as a trunk port.
- Assign ports F0/11 and F0/18 to VLAN 20 and configure both F0/11 and F0/18 as access ports.
- Assign an IP address to VLAN 10 and enable it. Refer to the Addressing Table.
- Configure the default gateway according to the Addressing Table.
Part 3: Verify Trunking, VLANs, Routing, and Connectivity
show ip route
show interface trunk
show vlan brief
ping
LAB - CCNA Configure Per-Interface Inter-VLAN Routng
标签:
原文地址:http://www.cnblogs.com/elewei/p/4733089.html