标签:demo ace 连接 应用 initial com 如何 tutorial examples
上文中,笔者系统的阐述了1602的两种驱动方式,并简单的提到了Arduino的LiquidCrystal库。本文紧接上文,对以下两个问题进行更加深入的探讨:如何能够使1602对Arduino的端口占用降到最少?LiquidCrystal库到底应该如何学习?在Arduino下LCD1602综合探究(下)中,笔者拟介绍一个1602的综合性实验,以期对前文的内容加以综合应用和总结。闲话少说,下面开始进入正文。
在上文中,笔者分别介绍八线和四线驱动的使用方法,给出了两种接线方式。接线图分别如下:
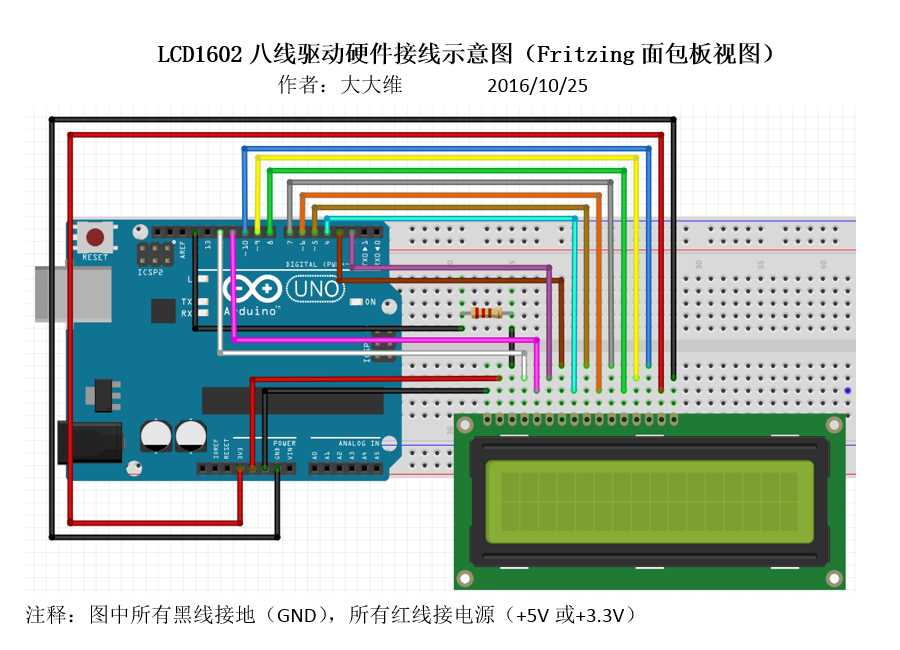
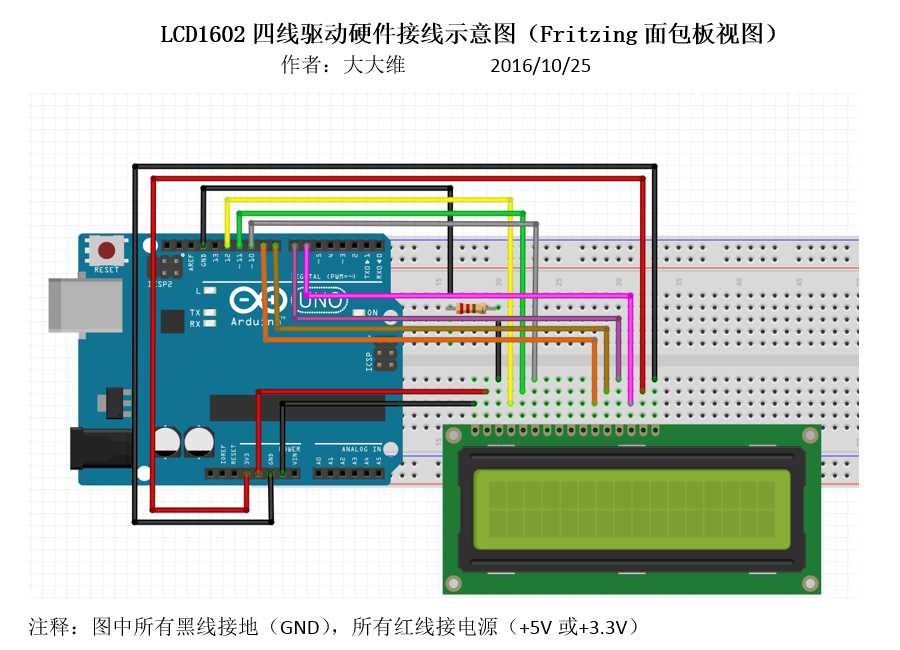
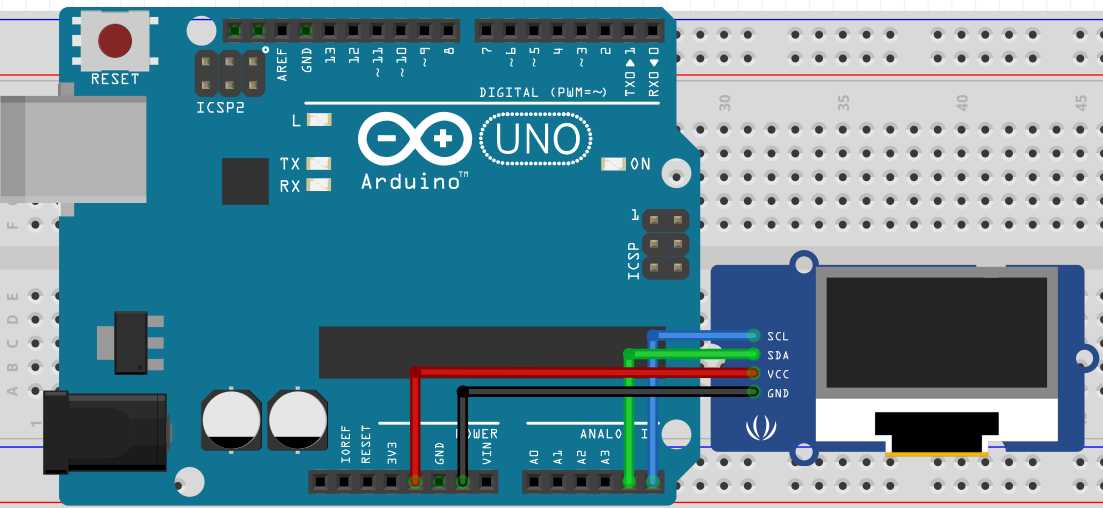
在八线驱动模式下,总共占掉了Arduino 16个端口,四线驱动模式虽然比八线驱动模式少了四个端口,但也达到了惊人的12个。如果实验只是用于驱动LCD1602还好,但在其他实际应用中,这是不能容忍的。为此,怎么能够使端口占用达到最少呢?在上面两张接线图中,我们使用了两种电源,+5V的VSS和+3.3V背光。其实,背光完全可以接到+5V,而且亮度还会更高。此为,我们在实际使用操作过程中,RW一般均为低电平写。没有什么特殊需求的话可以直接接地。另外,我们如果养成良好的接线习惯,将GND接在一起,这样,只用占用一个GND端口。由于我们下文要用到Arduino中自带的示例程序,为了与示例程序的电路连接相符,对相关引脚连线做了一定调整,调整后的连线图如下:
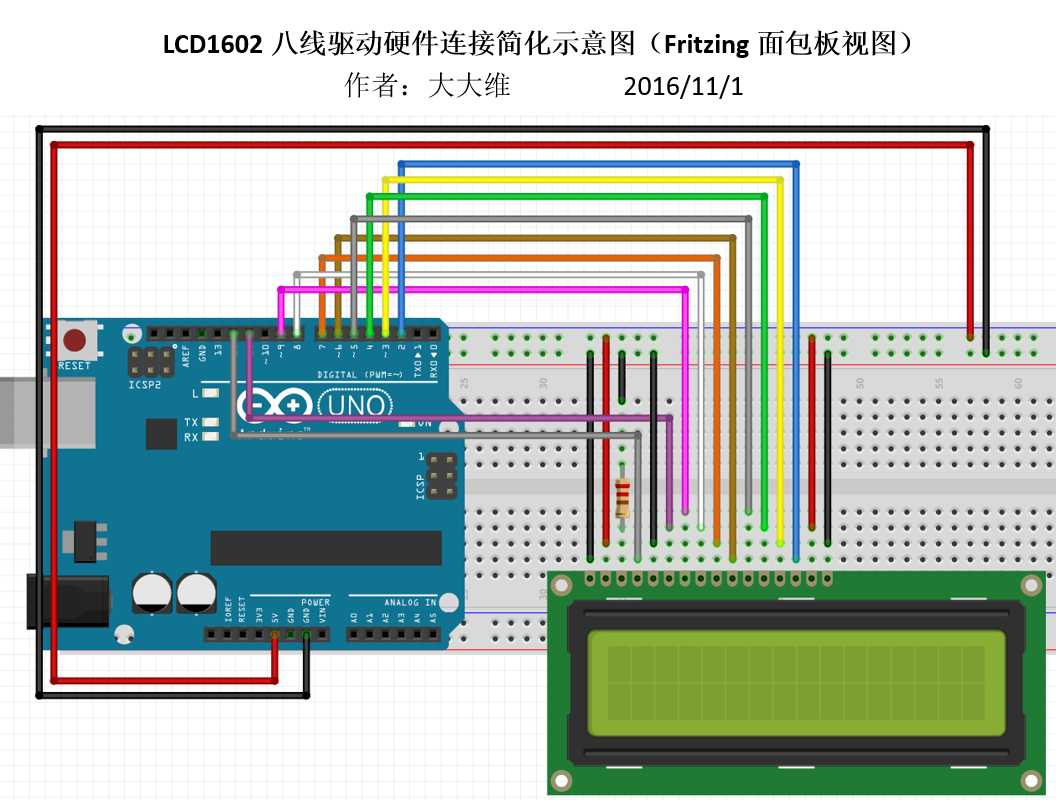
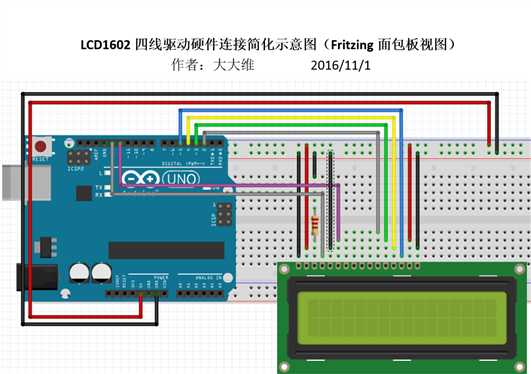
可以看到,这种接法下,Arduino端口的占用可以少去很多。尤其在四线驱动模式下,除去GND和+5V,LCD1602独占的端口只有6个。
I2C是由以前的PHILIPS(现在的NXP)公司开发的一种通信协议,其目的就是减少芯片之间的连线。在使用了I2C之后,连接到Arduino上的线总共只有四条,独占的端口只有两个!!!
但这种模式也有很多限制,罗列如下:
1.使用的LCD1602必须先焊接到LCD1602 I2C模块
2.I2C模块的SDA(串行数据)和SCL(串行时钟)不可以随便乱接。对于Arduino Uno来说,SDA必须接A4,SCL必须接A5
尽管有这些限制,但无疑,它的确在很大程度上减少了芯片之间的连线。
使用I2C需要遵循I2C协议。一般在Arduino中,通过导入LiquidCrystal_I2C库来完成控制。由于笔者手边没有LCD1602 I2C模块,因此,相关实验在此略过,等有机会再进行补充。
在Arduino IDE中,官方的示例程序足够让你完成对LiquidCrystal的学习,如下图:(所有这些程序的硬件连接与上文的LCD1602四线驱动硬件连接简化示意图相同)

此外,笔者分享一个不错的LiquidCrystal文档,可以当作LiquidCrystal说明手册使用。连接如下:
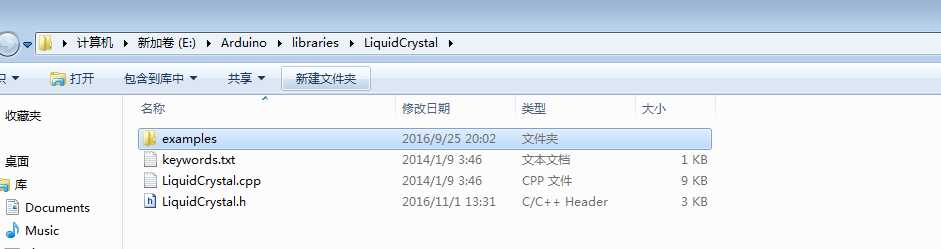
当然,你如果想深究,打开Arduino文件夹中的libraries文件夹,找到LiquidCrystal.cpp和头文件LiquidCrystal.h仔细研究(前提是你有良好的C++基础)。
笔者在学习LiquidCrystal库的过程中,发现一处LiquidCrystal库中的bug,记录如下:
示例程序LiquidCrystal->CustomCharacter无论如何也编译不过去,即使硬件一点毛病也没有,编译也还是报错。如下图:
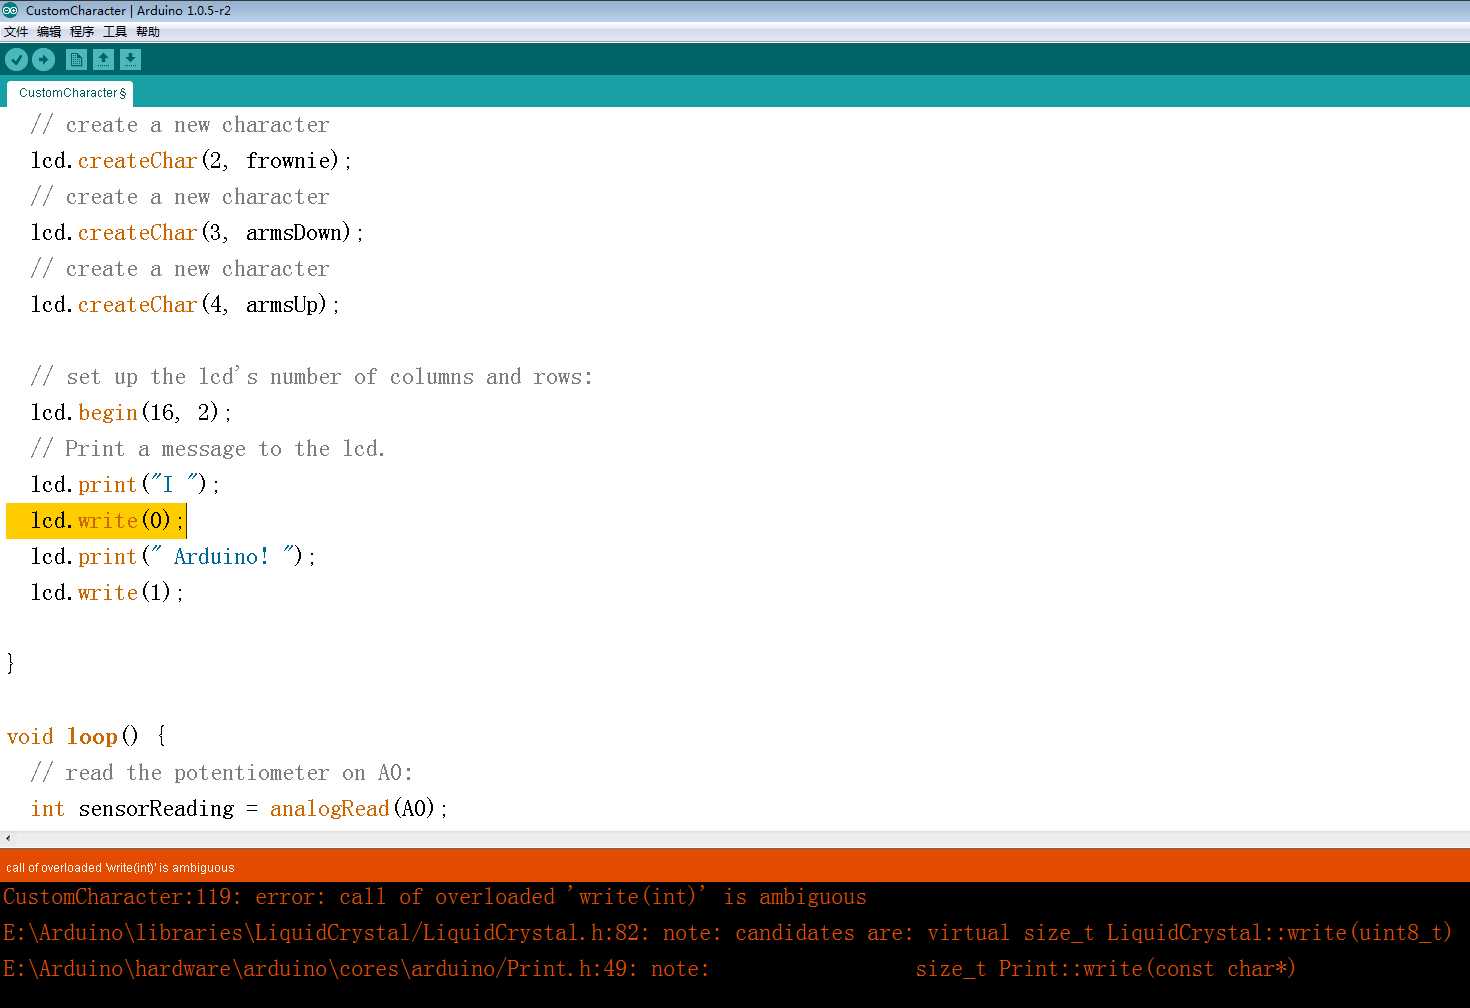
报错信息如下:
CustomCharacter.ino: In function ‘void setup()‘:
CustomCharacter:119: error: call of overloaded ‘write(int)‘ is ambiguous
E:\Arduino\libraries\LiquidCrystal/LiquidCrystal.h:82: note: candidates are: virtual size_t LiquidCrystal::write(uint8_t)
E:\Arduino\hardware\arduino\cores\arduino/Print.h:49: note:                 size_t Print::write(const char*)
error: call of overloaded ‘write(int)‘ is ambiguous
翻译:write的重载是不明确的。//明显是由于参数判断不清楚导致的错误。
后面的意思是问题在LiquidCrystal::write(uint8_t)和size_t Print::write(const char*)两个方法之间。
原文代码如下:
  1 #include <LiquidCrystal.h>
  2
  3 #include <LiquidCrystal.h>
  4
  5 /*
  6   LiquidCrystal Library - Custom Characters
  7
  8  Demonstrates how to add custom characters on an LCD  display.
  9  The LiquidCrystal library works with all LCD displays that are
 10  compatible with the  Hitachi HD44780 driver. There are many of
 11  them out there, and you can usually tell them by the 16-pin interface.
 12
 13  This sketch prints "I <heart> Arduino!" and a little dancing man
 14  to the LCD.
 15
 16   The circuit:
 17  * LCD RS pin to digital pin 12
 18  * LCD Enable pin to digital pin 11
 19  * LCD D4 pin to digital pin 5
 20  * LCD D5 pin to digital pin 4
 21  * LCD D6 pin to digital pin 3
 22  * LCD D7 pin to digital pin 2
 23  * LCD R/W pin to ground
 24  * 10K potentiometer:
 25  * ends to +5V and ground
 26  * wiper to LCD VO pin (pin 3)
 27  * 10K poterntiometer on pin A0
 28
 29  created21 Mar 2011
 30  by Tom Igoe
 31  Based on Adafruit‘s example at
 32  https://github.com/adafruit/SPI_VFD/blob/master/examples/createChar/createChar.pde
 33
 34  This example code is in the public domain.
 35  http://www.arduino.cc/en/Tutorial/LiquidCrystal
 36
 37  Also useful:
 38  http://icontexto.com/charactercreator/
 39
 40  */
 41
 42 // include the library code:
 43 #include <LiquidCrystal.h>
 44
 45 // initialize the library with the numbers of the interface pins
 46 LiquidCrystal lcd(12, 11, 5, 4, 3, 2);
 47
 48 // make some custom characters:
 49 byte heart[8] = {
 50   0b00000,
 51   0b01010,
 52   0b11111,
 53   0b11111,
 54   0b11111,
 55   0b01110,
 56   0b00100,
 57   0b00000
 58 };
 59
 60 byte smiley[8] = {
 61   0b00000,
 62   0b00000,
 63   0b01010,
 64   0b00000,
 65   0b00000,
 66   0b10001,
 67   0b01110,
 68   0b00000
 69 };
 70
 71 byte frownie[8] = {
 72   0b00000,
 73   0b00000,
 74   0b01010,
 75   0b00000,
 76   0b00000,
 77   0b00000,
 78   0b01110,
 79   0b10001
 80 };
 81
 82 byte armsDown[8] = {
 83   0b00100,
 84   0b01010,
 85   0b00100,
 86   0b00100,
 87   0b01110,
 88   0b10101,
 89   0b00100,
 90   0b01010
 91 };
 92
 93 byte armsUp[8] = {
 94   0b00100,
 95   0b01010,
 96   0b00100,
 97   0b10101,
 98   0b01110,
 99   0b00100,
100   0b00100,
101   0b01010
102 };
103 void setup() {
104   // create a new character
105   lcd.createChar(0, heart);//方法2:0改为5
106   // create a new character
107   lcd.createChar(1, smiley);
108   // create a new character
109   lcd.createChar(2, frownie);
110   // create a new character
111   lcd.createChar(3, armsDown);
112   // create a new character
113   lcd.createChar(4, armsUp);
114
115   // set up the lcd‘s number of columns and rows:
116   lcd.begin(16, 2);
117   // Print a message to the lcd.
118   lcd.print("I ");
119   lcd.write(0);//方法一:改作lcd.write(0.0);
            //方法2: 0改为5
120   lcd.print(" Arduino! ");
121   lcd.write(1);
122
123 }
124
125 void loop() {
126   // read the potentiometer on A0:
127   int sensorReading = analogRead(A0);
128   // map the result to 200 - 1000:
129   int delayTime = map(sensorReading, 0, 1023, 200, 1000);
130   // set the cursor to the bottom row, 5th position:
131   lcd.setCursor(4, 1);
132   // draw the little man, arms down:
133   lcd.write(3);
134   delay(delayTime);
135   lcd.setCursor(4, 1);
136   // draw him arms up:
137   lcd.write(4);
138   delay(delayTime);
139 }
笔者通过分析,和多处查阅资料。发现这是一个LiquidCrystal库中的bug。原因与LiquidCrystal.h中关于unit8_t的定义有关。
目前为止,笔者通过自己研究和多方查找资料,发现了三种可行的办法,分别介绍如下:
1.将示例程序中119行中的lcd.write(0)改作lcd.write(0.0),在上文的实验代码中用红字已经标注出。
2.将示例程序中lcd.createChar()函数构造自定义字符时,编码从1开始,放弃0编码。即将105行和119行的0改作5。同样在上文的实验代码中用蓝字已经标注出。
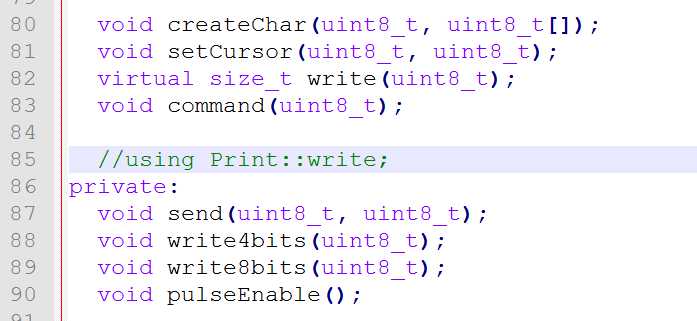
3.修改LiquidCrystal.h头文件。这种方法虽然比较麻烦,但修改彻底,一劳永逸!示例代码不用修改,实际应用也可直接从0开始编码,强烈推荐这种方法!!!修改方法如下:
打开LiquidCrystal.h头文件,注释掉第85行的using Print::write。
如下图所示:(笔者用NotePad++打开):
Arduino下LCD1602综合探究(中)——如何减少1602的连线,LiquidCrystal库,LiquidCrystal库中bug的解决方法
标签:demo ace 连接 应用 initial com 如何 tutorial examples
原文地址:http://www.cnblogs.com/liujw2114/p/6020372.html