标签:bsp int open function create 等等 font 成本 图像
Mat作为opencv中一种数据类型常常用来存储图像,相对与以前的IplImgae类型来说,Mat类型省去了人工的对内存的分配与释放,转而自动分配释放。Mat Class主要包括两部个数据部分:一个是matrix header(包括matrix的大小尺寸,储存方法,储存地址等等..),另一个是指向存储像素值的矩阵的指针。
Opencv中对Mat的复制分为两种,
Mat A, C;                                 // creates just the header parts
A = imread(argv[1], CV_LOAD_IMAGE_COLOR); // here we‘ll know the method used (allocate matrix)

Mat B(A);                                 // Use the copy constructor

C = A;                                    // Assignment operator
Mat D (A, Rect(10, 10, 100, 100) ); // using a rectangle
Mat E = A(Range::all(), Range(1,3)); // using row and column boundaries
上面一类仅仅新建了matrix header,对与像素矩阵A,B,C共有,修改其中一项的像素值,其他的也都会改变,可以理解为他们提供了对相同底层数据的不同读取方法。 这么做的好处是为了减少计算成本。
如果仅仅想操作其中的一部分像素,可以创建一个读取部分的header matrix
当然Opencv也提供深度复制的方法
Mat F = A.clone();
Mat G;
A.copyTo(G);
Mat的创建
cv::Mat::Mat Constructor:
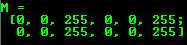
    Mat M(2,2, CV_8UC3, Scalar(0,0,255));
    cout << "M = " << endl << " " << M << endl << endl;
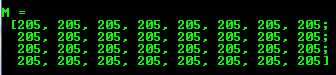
cv::Mat::create function:
    M.create(4,4, CV_8UC(2));
    cout << "M = "<< endl << " "  << M << endl << endl;
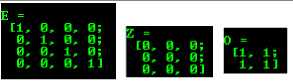
MATLAB style initializer: cv::Mat::zeros , cv::Mat::ones , cv::Mat::eye
    Mat E = Mat::eye(4, 4, CV_64F);
    cout << "E = " << endl << " " << E << endl << endl;
    Mat O = Mat::ones(2, 2, CV_32F);
    cout << "O = " << endl << " " << O << endl << endl;
    Mat Z = Mat::zeros(3,3, CV_8UC1);
    cout << "Z = " << endl << " " << Z << endl << endl;
对于一些小的kernel可以自定义如下:
    Mat C = (Mat_<double>(3,3) << 0, -1, 0, -1, 5, -1, 0, -1, 0);
    cout << "C = " << endl << " " << C << endl << endl;

在对图像进行分析及操作时往往需要进行遍历或对某一区域的像素值进行操作。总结了一下比较常用的有以下几种方法。
1.利用ptr指针访问Mat像素
for(int j = 1; j < myImage.rows - 1; ++j)
{
    const uchar* previous = myImage.ptr<uchar>(j - 1);
    const uchar* current  = myImage.ptr<uchar>(j    );
    const uchar* next     = myImage.ptr<uchar>(j + 1);

    uchar* output = Result.ptr<uchar>(j);

    for(int i = nChannels; i < nChannels * (myImage.cols - 1); ++i)
    {
        *output++ = saturate_cast<uchar>(5 * current[i]
                     -current[i - nChannels] - current[i + nChannels] - previous[i] - next[i]);
    }
}
2.使用 Mat::at 函数
int main()
{
    Mat img = imread("lena.jpg");
    imshow("Lena Original", img);
    if(img.channel() > 1)
   {
      for (int row = 0; row < img.rows; row++)
     {
        for (int col = 0; col < img.cols; col++)
        {
            /* 注意 Mat::at 函数是个模板函数, 需要指明参数类型, 因为这张图是具有红蓝绿三通道的图,
               所以它的参数类型可以传递一个 Vec3b, 这是一个存放 3 个 uchar 数据的 Vec(向量). 这里
               提供了索引重载, [2]表示的是返回第三个通道, 在这里是 Red 通道, 第一个通道(Blue)用[0]返回 */
            if(img.at<Vec3b>(row, col)[2] > 128)
                img.at<Vec3b>(row, col) = Vec3b(255, 255, 255);
        }
     }

   }
   else
  {
        for (int row = 0; row < img.rows; row++)
     {
        for (int col = 0; col < img.cols; col++)
        {

            if(img.at<Vec3b>(row, col) > 128)
                img.at<Vec3b>(row, col) = 255;
        }
     }

  }

    imshow("Lena Modified", img);
    cvWaitKey();
    return 0;
}
标签:bsp int open function create 等等 font 成本 图像
原文地址:http://www.cnblogs.com/klitech/p/6020491.html