标签:控制 view anim 上拉刷新 public net type ini finish
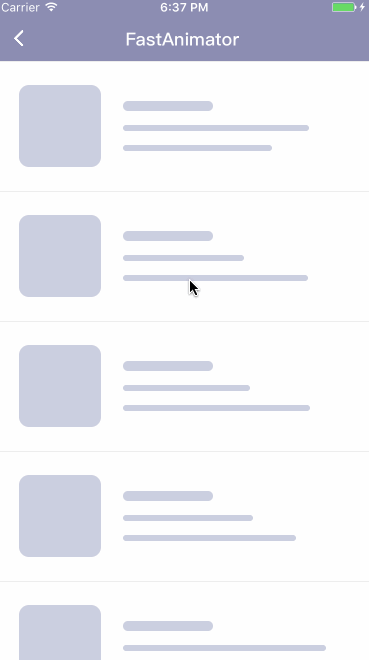
最近撸了一个上拉刷新的小轮子,只要遵循一个协议就能自定义自己动效的上拉刷新和加载,我自己也写了几个动效进去,下面是一个比较好的动效的实现过程
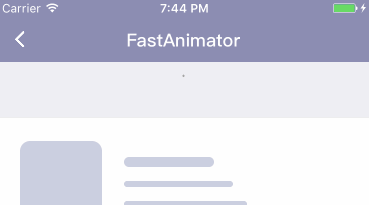
先上效果图和github地址,完整代码个demo和进入查看,有其他好的动效大家也可以学习交流~
写一个动效的第一步就应该仔细的去分析它,把它的每一帧展开来看,找一个最合适的方式来实现它,我们可以把以上动画分解成以下三个步骤:
以下是会用到主要的类:
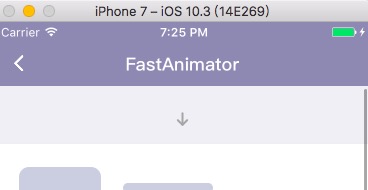
CAShapeLayerUIBezierPathCABasicAnimationCAKeyframeAnimationDispatchSourceTimer剪头的绘制我们用CAShapeLayer配合UIBezierPath来实现,把箭头分解成两个部分,一个是垂直的线和箭头头的部分,方便实现之后的动画效果,下面是绘制主要的代码和效果图:
// 绘制垂直的线
private func initLineLayer() {
    let width  = frame.size.width
    let height = frame.size.height
    let path = UIBezierPath()
    path.move(to: .init(x: width/2, y: 0))
    path.addLine(to: .init(x: width/2, y: height/2 + height/3))
    lineLayer = CAShapeLayer()
    lineLayer?.lineWidth   = lineWidth*2
    lineLayer?.strokeColor = color.cgColor
    lineLayer?.fillColor   = UIColor.clear.cgColor
    lineLayer?.lineCap     = kCALineCapRound
    lineLayer?.path        = path.cgPath
    lineLayer?.strokeStart = 0.5
    addSublayer(lineLayer!)
}

// 绘制箭头的头部
private func initArrowLayer() {
    let width  = frame.size.width
    let height = frame.size.height
    let path = UIBezierPath()
    path.move(to: .init(x: width/2 - height/6, y: height/2 + height/6))
    path.addLine(to: .init(x: width/2, y: height/2 + height/3))
    path.addLine(to: .init(x: width/2 + height/6, y: height/2 + height/6))
    arrowLayer = CAShapeLayer()
    arrowLayer?.lineWidth   = lineWidth*2
    arrowLayer?.strokeColor = color.cgColor
    arrowLayer?.lineCap     = kCALineCapRound
    arrowLayer?.lineJoin    = kCALineJoinRound
    arrowLayer?.fillColor   = UIColor.clear.cgColor
    arrowLayer?.path        = path.cgPath
    addSublayer(arrowLayer!)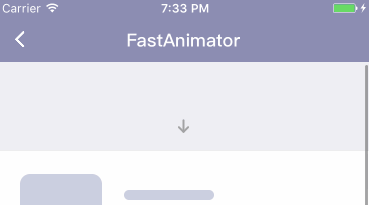
}然后是箭头动画实现,我们分别对线和箭头头部进行动画,通过CABasicAnimation对它们的strokeStart和strokeEnd进行控制来实现动画,下面是效果图和主要代码:
// 箭头的动画
public func startAnimation() -> Self {
    let start = CABasicAnimation(keyPath: "strokeStart")
    start.duration  = animationDuration
    start.fromValue = 0
    start.toValue   = 0.5
    start.isRemovedOnCompletion = false
    start.fillMode  = kCAFillModeForwards
    start.delegate    = self
    start.timingFunction = CAMediaTimingFunction(name: kCAMediaTimingFunctionEaseInEaseOut)

    let end = CABasicAnimation(keyPath: "strokeEnd")
    end.duration  = animationDuration
    end.fromValue = 1
    end.toValue   = 0.5
    end.isRemovedOnCompletion = false
    end.fillMode  = kCAFillModeForwards
    end.timingFunction = CAMediaTimingFunction(name: kCAMediaTimingFunctionEaseInEaseOut)

    arrowLayer?.add(start, forKey: "strokeStart")
    arrowLayer?.add(end, forKey: "strokeEnd")

    return self
}

// 线的动画
private func addLineAnimation() {
    let start = CABasicAnimation(keyPath: "strokeStart")
    start.fromValue = 0.5
    start.toValue = 0
    start.isRemovedOnCompletion = false
    start.fillMode  = kCAFillModeForwards
    start.timingFunction = CAMediaTimingFunction(name: kCAMediaTimingFunctionEaseInEaseOut)
    start.duration  = animationDuration/2
    lineLayer?.add(start, forKey: "strokeStart")

    let end = CABasicAnimation(keyPath: "strokeEnd")
    end.beginTime = CACurrentMediaTime() + animationDuration/3
    end.duration  = animationDuration/2
    end.fromValue = 1
    end.toValue   = 0.03
    end.isRemovedOnCompletion = false
    end.fillMode  = kCAFillModeForwards
    end.delegate  = self
    end.timingFunction = CAMediaTimingFunction(name: kCAMediaTimingFunctionEaseInEaseOut)
    lineLayer?.add(end, forKey: "strokeEnd")
}

// 通过delegate控制顺序
func animationDidStop(_ anim: CAAnimation, finished flag: Bool) {
    if flag {
        if let anim = anim as? CABasicAnimation {
            if anim.keyPath == "strokeStart" {
                arrowLayer?.isHidden = true
                addLineAnimation()
            }else {
                lineLayer?.isHidden = true
                animationEnd?()
            }
        }
    }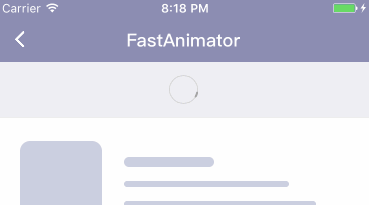
}同样的圆环和小店的绘制我们也可以用CAShapeLayer配合UIBezierPath来实现
,下面是效果图和主要代码:
// 绘制外环
private func drawCircle() {
    let width  = frame.size.width
    let height = frame.size.height
    let path = UIBezierPath()
    path.addArc(withCenter: .init(x: width/2, y: height/2), radius: height/2, startAngle: 0, endAngle: CGFloat(Double.pi * 2.0), clockwise: false)
    circle.lineWidth   = lineWidth
    circle.strokeColor = color.cgColor
    circle.fillColor   = UIColor.clear.cgColor
    circle.path        = path.cgPath
    addSublayer(circle)
    circle.isHidden = true
}

// 绘制小点
private func drawPoint() {
    let width  = frame.size.width
    let path = UIBezierPath()
    path.addArc(withCenter: .init(x: width/2, y: width/2), radius: width/2, startAngle: CGFloat(Double.pi * 1.5), endAngle: CGFloat((Double.pi * 1.5) - 0.1), clockwise: false)
    point.lineCap     = kCALineCapRound
    point.lineWidth   = lineWidth*2
    point.fillColor   = UIColor.clear.cgColor
    point.strokeColor = pointColor.cgColor
    point.path        = path.cgPath
    pointBack.addSublayer(point)
    point.isHidden = true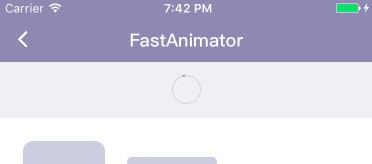
}旋转的实现,因为旋转的速度是有个加速的效果的,所以我们使用DispatchSourceTimer来控制选择的速度,下面是效果图和主要代码:
// 旋转的控制
public func startAnimation() {
    circle.isHidden = false
    point.isHidden  = false

    codeTimer = DispatchSource.makeTimerSource(queue: DispatchQueue.global())
    codeTimer?.scheduleRepeating(deadline: .now(), interval: .milliseconds(42))
    codeTimer?.setEventHandler(handler: { [weak self] in
        guard self != nil else {
            return
        }
        self!.rotated = self!.rotated - self!.rotatedSpeed
        if self!.stop {
            let count = Int(self!.rotated / CGFloat(Double.pi * 2))
            if (CGFloat(Double.pi * 2 * Double(count)) - self!.rotated) >= 1.1 {
                var transform = CGAffineTransform.identity
                transform = transform.rotated(by: -1.1)
                DispatchQueue.main.async {
                    self!.pointBack.setAffineTransform(transform)
                    self!.point.isHidden  = true
                    self!.check?.startAnimation()
                }
                self!.codeTimer?.cancel()
                return
            }
        }
        if self!.rotatedSpeed < 0.65 {
            if self!.speedInterval < 0.02 {
                self!.speedInterval = self!.speedInterval + 0.001
            }
            self!.rotatedSpeed = self!.rotatedSpeed + self!.speedInterval
        }
        var transform = CGAffineTransform.identity
        transform = transform.rotated(by: self!.rotated)
        DispatchQueue.main.async {
            self!.pointBack.setAffineTransform(transform)
        }
    })
    codeTimer?.resume()

    addPointAnimation()
}

// 点的变化
private func addPointAnimation() {
    let width  = frame.size.width
    let path = CABasicAnimation(keyPath: "path")
    path.beginTime = CACurrentMediaTime() + 1
    path.fromValue = point.path
    let toPath = UIBezierPath()
    toPath.addArc(withCenter: .init(x: width/2, y: width/2), radius: width/2, startAngle: CGFloat(Double.pi * 1.5), endAngle: CGFloat((Double.pi * 1.5) - 0.3), clockwise: false)
    path.toValue = toPath.cgPath
    path.timingFunction = CAMediaTimingFunction(name: kCAMediaTimingFunctionEaseOut)
    path.duration = 2
    path.isRemovedOnCompletion = false
    path.fillMode = kCAFillModeForwards
    point.add(path, forKey: "path")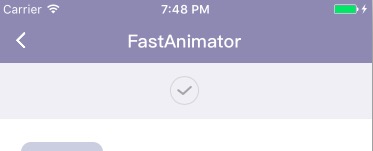
}对勾的绘制我们也是用CAShapeLayer配合UIBezierPath来绘制,下面是效果图和主要的代码:
// 绘制对号
private func drawCheck() {
    let width = Double(frame.size.width)
    check = CAShapeLayer()
    check?.lineCap   = kCALineCapRound
    check?.lineJoin  = kCALineJoinRound
    check?.lineWidth = lineWidth
    check?.fillColor = UIColor.clear.cgColor
    check?.strokeColor = color.cgColor
    check?.strokeStart = 0
    check?.strokeEnd = 0
    let path = UIBezierPath()
    let a = sin(0.4) * (width/2)
    let b = cos(0.4) * (width/2)
    path.move(to: CGPoint.init(x: width/2 - b, y: width/2 - a))
    path.addLine(to: CGPoint.init(x: width/2 - width/20 , y: width/2 + width/8))
    path.addLine(to: CGPoint.init(x: width - width/5, y: width/2 - a))
    check?.path = path.cgPath
    addSublayer(check!)
}对勾的动画我们通过CAKeyframeAnimation来控制对勾的strokeStart和strokeEnd来实现对勾的动画,下面是效果图和主要代码:
// 对勾的动画
func startAnimation() {
    let start = CAKeyframeAnimation(keyPath: "strokeStart")
    start.values = [0, 0.4, 0.3]
    start.isRemovedOnCompletion = false
    start.fillMode = kCAFillModeForwards
    start.duration = 0.2
    start.timingFunction = CAMediaTimingFunction(name: kCAMediaTimingFunctionEaseInEaseOut)

    let end = CAKeyframeAnimation(keyPath: "strokeEnd")
    end.values = [0, 1, 0.9]

    end.isRemovedOnCompletion = false
    end.fillMode = kCAFillModeForwards
    end.duration = 0.3
    end.timingFunction = CAMediaTimingFunction(name: kCAMediaTimingFunctionEaseInEaseOut)

    check?.add(start, forKey: "start")
    check?.add(end, forKey: "end")
}关于小球的旋转我没有选择CADisplayLink而是选择的DispatchSourceTimer,是因为CADisplayLink会受到UITableview的影响,关于动画的实现需要耐心去调细节,实现方式也各种各样,大家如果有什么更好的建议或者建议大家可以提出来~
完整的代码,大家可以去github地址去下载,欢迎大家star和发表意见和贡献代码,有好的动效的话也可以提供,最后谢谢大家的阅读
标签:控制 view anim 上拉刷新 public net type ini finish
原文地址:http://blog.csdn.net/wang631106979/article/details/70878119