标签:linear new pat min cti encoding googl oncreate override
Material Design的一个很重要的特点就是拟扁平化,通过使用Material Design中的阴影和光线,配合完美的动画效果,模拟出一个动感十足有美丽大胆的视觉效果。
1.阴影效果
以往的Android版本中,View通常只有两个属性--X和Y,而在Android 5.X中,Google为其增加了一个新的属性--Z,对应垂直上方向上的高度变化。在Android 5.X中,View的Z值由两部分构成,elevation和translationZ(它们都是Android 5.X新引入的属性)。elevation是静态的成员,translationZ可以在代码中使用来实现动画效果,它们的关系如下
Z = elevation + translationZ
我们通过在XMl布局中使用如下属性来设置View的高度
android:elevation = ""
 1 <?xml version="1.0" encoding="utf-8"?>
 2 <LinearLayout xmlns:android="http://schemas.android.com/apk/res/android"
 3     android:layout_width="match_parent"
 4     android:layout_height="match_parent"
 5     android:orientation="vertical">
 6     <TextView
 7         android:elevation="20dp"
 8         android:id="@+id/id_textView"
 9         android:background="#5FF"
10         android:layout_width="300dp"
11         android:layout_height="300dp" />
12 </LinearLayout>
效果如图
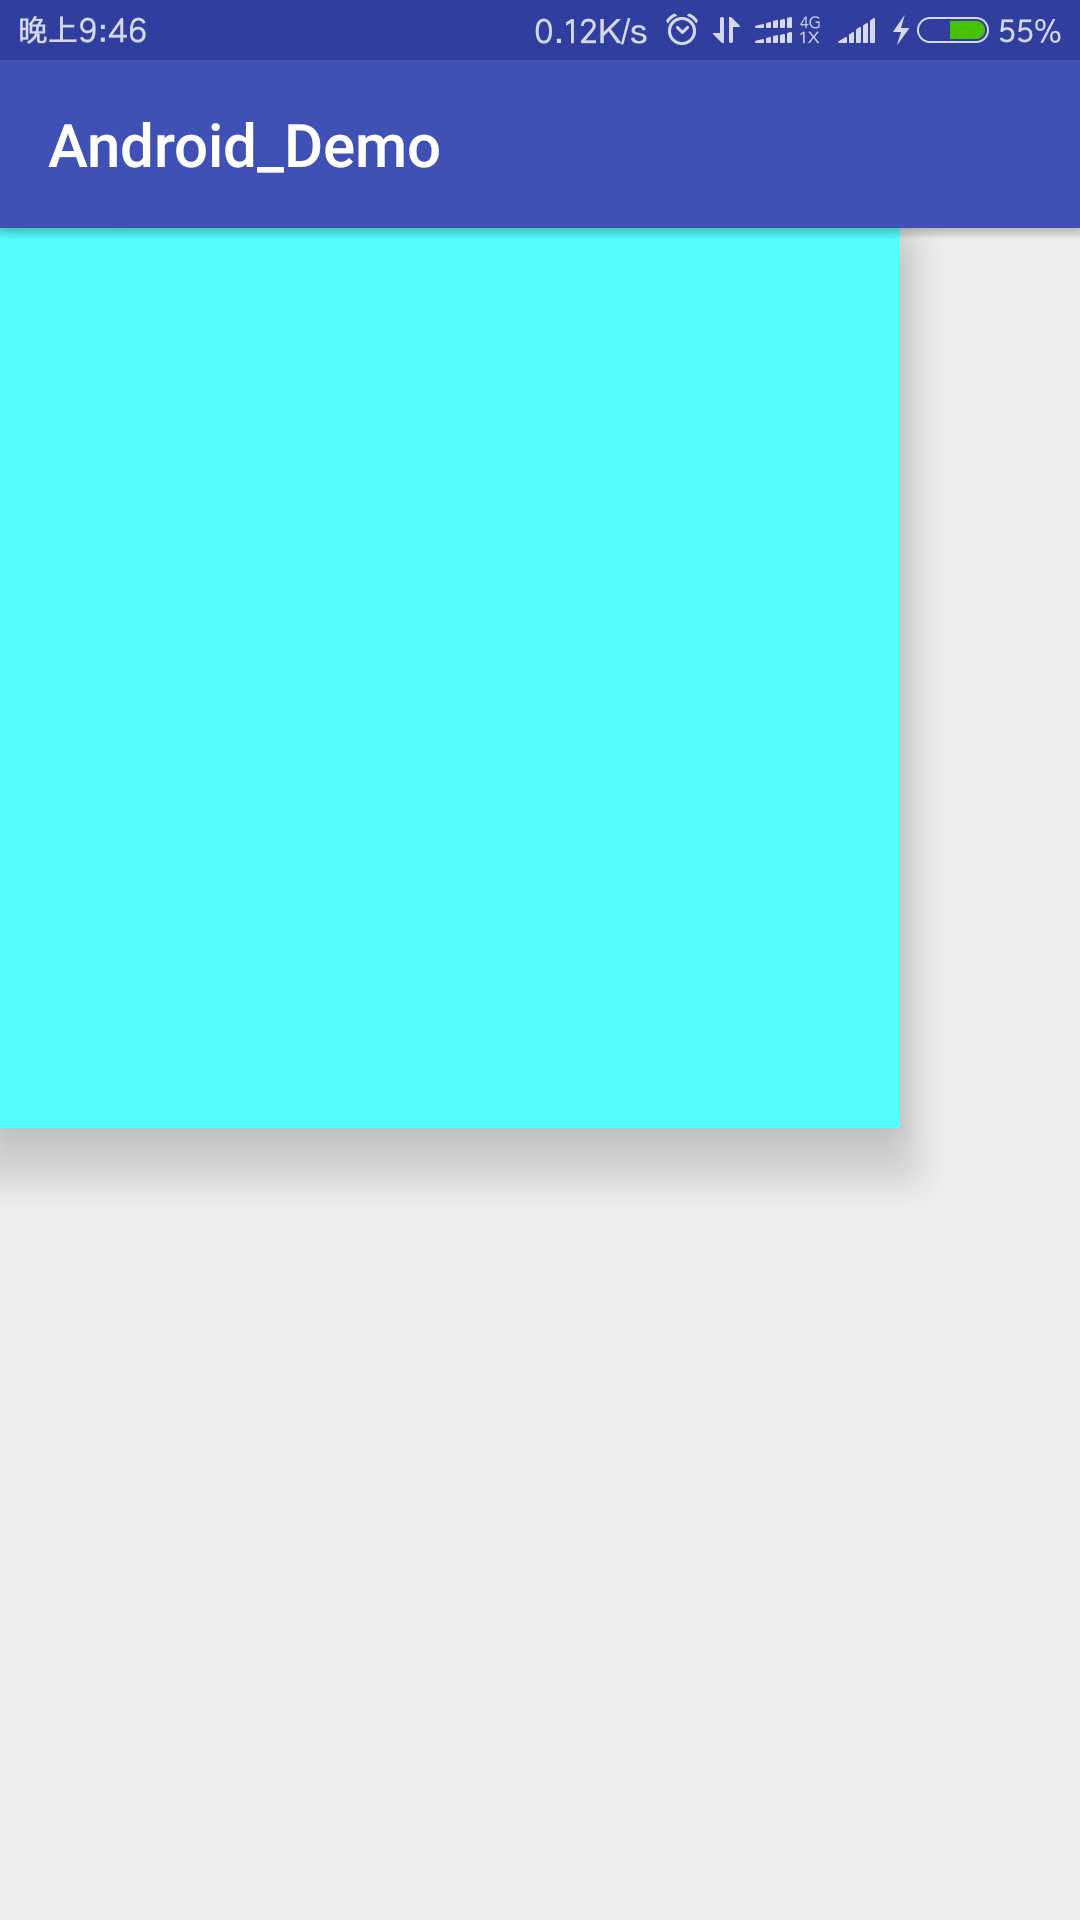
仔细的看一下图片,会发现TextView背后有一部分阴影。
同样,我们还可在使用Java代码来动态更改TextView的高度。
view.setTranslationZ();
2.Tinting和Clipping
Android 5.X 在对图像的操作上有了更多的功能。下面来看看Android 5.X 的两个操作图像的新功能--Tinting(着色)和Clipping(裁剪)。
(1)Tinting(着色)
Tint的使用非常的简单,只要在XML代码中配置好Tint和TintMode就可以了。
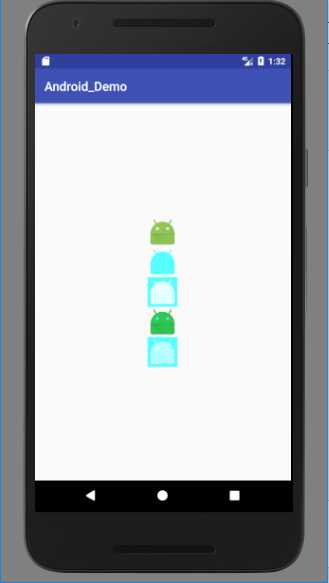
 1 <?xml version="1.0" encoding="utf-8"?>
 2 <LinearLayout xmlns:android="http://schemas.android.com/apk/res/android"
 3     android:layout_width="match_parent"
 4     android:layout_height="match_parent"
 5     android:gravity="center"
 6     android:orientation="vertical">
 7     <ImageView
 8         android:src="@mipmap/ic_launcher"
 9         android:layout_width="wrap_content"
10         android:layout_height="wrap_content" />
11     <ImageView
12         android:tint="#5FF"
13         android:src="@mipmap/ic_launcher"
14         android:layout_width="wrap_content"
15         android:layout_height="wrap_content" />
16     <ImageView
17         android:tintMode="add"
18         android:tint="#5FF"
19         android:src="@mipmap/ic_launcher"
20         android:layout_width="wrap_content"
21         android:layout_height="wrap_content" />
22     <ImageView
23         android:tintMode="multiply"
24         android:tint="#5FF"
25         android:src="@mipmap/ic_launcher"
26         android:layout_width="wrap_content"
27         android:layout_height="wrap_content" />
28     <ImageView
29         android:tintMode="screen"
30         android:tint="#5FF"
31         android:src="@mipmap/ic_launcher"
32         android:layout_width="wrap_content"
33         android:layout_height="wrap_content" />
34
35 </LinearLayout>
效果如图
(2)Cliping(裁剪)
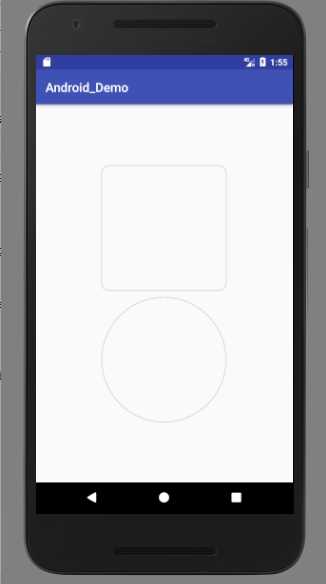
Clipping可以让我们改变一个视图的外形。要使用Clipping,首先需要使用ViewOutlineProvider来修改outline,然后通过setOutlineProvider将outline作用到视图上去
 1 <?xml version="1.0" encoding="utf-8"?>
 2 <LinearLayout xmlns:android="http://schemas.android.com/apk/res/android"
 3     android:layout_width="match_parent"
 4     android:layout_height="match_parent"
 5     android:gravity="center"
 6     android:orientation="vertical">
 7
 8     <TextView
 9         android:id="@+id/id_textView1"
10         android:elevation="1dp"
11         android:layout_width="200dp"
12         android:layout_height="200dp"
13         />
14
15     <TextView
16         android:id="@+id/id_textView2"
17         android:elevation="1dp"
18         android:layout_width="200dp"
19         android:layout_height="200dp"
20         android:layout_marginTop="10dp"
21         />
22 </LinearLayout>
 1 public class MainActivity extends AppCompatActivity {
 2     private TextView mTextView1 = null;
 3     private TextView mTextView2 = null;
 4
 5     @Override
 6     protected void onCreate(@Nullable Bundle savedInstanceState) {
 7         super.onCreate(savedInstanceState);
 8         setContentView(R.layout.activity_main);
 9         mTextView1 = (TextView) findViewById(R.id.id_textView1);
10         mTextView2 = (TextView) findViewById(R.id.id_textView2);
11         ViewOutlineProvider viewOutlineProvider = new ViewOutlineProvider() {
12             @Override
13             public void getOutline(View view, Outline outline) {
14                 //裁剪为圆角矩形
15                 outline.setRoundRect(0, 0, view.getWidth(), view.getHeight(), 30);
16             }
17         };
18         ViewOutlineProvider viewOutlineProvider1 = new ViewOutlineProvider() {
19             @Override
20             public void getOutline(View view, Outline outline) {
21                 //裁剪为圆形
22                 outline.setOval(0, 0, view.getWidth(), view.getHeight());
23             }
24         };
25         mTextView1.setOutlineProvider(viewOutlineProvider);
26         mTextView2.setOutlineProvider(viewOutlineProvider1);
27     }
28 }
效果如图
注意一下,如果使用如上方法不能成功裁剪的话,试着把min api改为21及其以上,这样再尝试一下
标签:linear new pat min cti encoding googl oncreate override
原文地址:http://www.cnblogs.com/Stay-Hungry-Stay-Foolish/p/6851709.html