标签:tab span sql 配置文件 int users ble and ges
OS:Linux Centos 6.9 x86_x64
PPPOE : ppp-2.4.7.tar.gz rp-pppoe-3.12.tar.gz
FreeRadius : V3.0.X
Mysql : mysql-server-5.1.73-8.el6_8.x86_64
下载地址:
wget https://download.samba.org/pub/ppp/ppp-2.4.7.tar.gz
wget https://www.roaringpenguin.com/files/download/rp-pppoe-3.12.tar.gz
git clone https://github.com/FreeRADIUS/freeradius-server.git
1、PPPOE
 1 wget https://download.samba.org/pub/ppp/ppp-2.4.7.tar.gz
 2 wget https://www.roaringpenguin.com/files/download/rp-pppoe-3.12.tar.gz
 3 tar zxvf ppp-2.4.7.tar.gz
 4 tar zxvf rp-pppoe-3.12.tar.gz
 5 cd ppp-2.4.7
 6 ./configure
 7 make && make install
 8 cd ..
 9 cd rp-pppoe-3.12/src/
10 ./configure --prefix=/usr/local --enable-plugin=../../ppp-2.4.7
11 make && make install
12 cd
13 mkdir /etc/ppp/radius
14 cp -rf /usr/local/lib/pppd/2.4.7/* /etc/ppp/plugins/
15 cp -rf /root/ppoe/ppp-2.4.7/pppd/plugins/radius/etc/* /etc/ppp/radius/
16 cp -rf /root/ppoe/ppp-2.4.7/etc.ppp/* /etc/ppp/
2、安装MYSQL (这里没有采用原码安装)
1 yum install -y mysql mysql-server mysql-devel mysql-libs
3、安装FreeRadius
组件安装:
1、openssl
1 yum install -y openssl openssl-devel
2、talloc-2.1.10
1 wget https://www.samba.org/ftp/talloc/talloc-2.1.10.tar.gz
2 tar zxvf talloc-2.1.10.tar.gz
3 cd talloc-2.1.10
4 ls
5 ./configure --prefix=/usr
6 make
7 make install
3、gcc-4.8.1 ,支持C11
 1 wget http://ftp.gnu.org/gnu/gcc/gcc-4.8.1/gcc-4.8.1.tar.gz
 2 tar -xvzf gcc-4.8.1.tar.gz
 3 cd gcc-4.8.1
 4 ./contrib/download_prerequisites
 5 cd ..
 6 mkdir build_gcc_4.8.1
 7 cd build_gcc_4.8.1
 8 ../gcc-4.8.1/configure --enable-checking=release --enable-languages=c,c++ --disable-multilib
 9 make -j23
10 make install
11 ls /usr/local/bin | grep gcc
12 /usr/sbin/update-alternatives --install  /usr/bin/gcc gcc /usr/local/bin/x86_64-unknown-linux-gnu-gcc-4.8.1 40
13 gcc --version
14 /usr/sbin/update-alternatives --install /usr/bin/g++ g++ /usr/local/bin/g++ 40
15 g++ --version
注:摘自http://blog.csdn.net/abcd1f2/article/details/49760365
4、 安装FreeRadius
1 git clone https://github.com/FreeRADIUS/freeradius-server.git
2 cd freeradius-server
3 git checkout v3.0.x
4 ./configure
5 make
6 make install
1、 配置PPPOE,拷贝文件并配置pppoe-server-options
 1 mkdir /etc/ppp/radius
 2 cp -rf /usr/local/lib/pppd/2.4.7/* /etc/ppp/plugins/
 3 cp -rf /root/ppoe/ppp-2.4.7/pppd/plugins/radius/etc/* /etc/ppp/radius/
 4 cp -rf /root/ppoe/ppp-2.4.7/etc.ppp/* /etc/ppp/
 5 #编辑pppoe-server-options 配置文件
 6 /////文件内容如下:
 7 auth
 8 lock
 9 login
10 mru 1480
11 mtu 1480
12 proxyarp
13 require-pap
14 require-chap
15 lcp-echo-interval 10
16 lcp-echo-failure 2
17 chap-interval 5
18 chap-max-challenge 20
19 chap-restart 3
20 ms-dns 114.114.114.114
21 ms-dns 8.8.8.8
22 logfile /var/log/pppd.log
23 plugin /etc/ppp/plugins/radius.so
24 radius-config-file /etc/ppp/radius/radiusclient.conf
25 //////   radius.so和radiusclient.conf 路径根据实际情况设置
配置/etc/ppp/radius/radiusclient.conf文件,注意路径
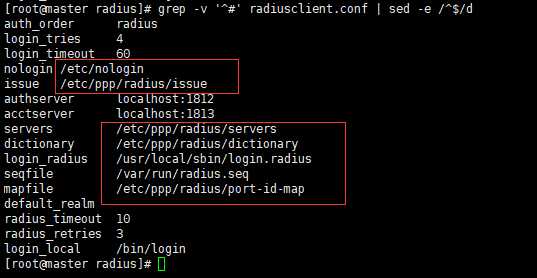
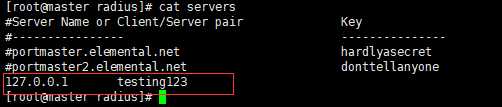
配置/etc/ppp/radius/server文件,testing123为默认密码
修改dictionary文件,注意里面包含的配置文件位置

2、 配置mysql
 1 mysql -uroot -p
 2 mysql>update user set password=password(‘123456‘) where user="root";
 3 mysql>flush privileges;
 4 mysql>create database radius;
 5 mysql> GRANT ALL ON radius.* TO radius@localhost IDENTIFIED BY "radpass";
 6 # cd /usr/local/etc/raddb/mods-config/sql/main/mysql
 7 ##创建数据表schema.sql脚本
 8 #mysql -uroot -p radius <schema.sql
 9 #mysql -uroot -p
10 mysql> use radius;
11 mysql> insert into radcheck(id,username,attribute,op,value) values(‘2‘,‘test‘,‘Cleartext-Password‘,‘:=‘,‘test123‘);
3、 配置FreeRadius
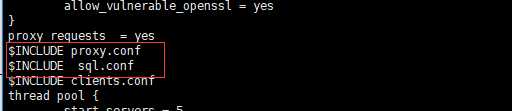
配置/usr/local/etc/raddb/radiusd.conf,增加一条 $INCLUDE sql.conf
创建sql.conf,vi sql.conf ,增加内容 database = "mysql"

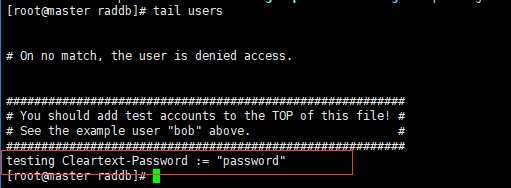
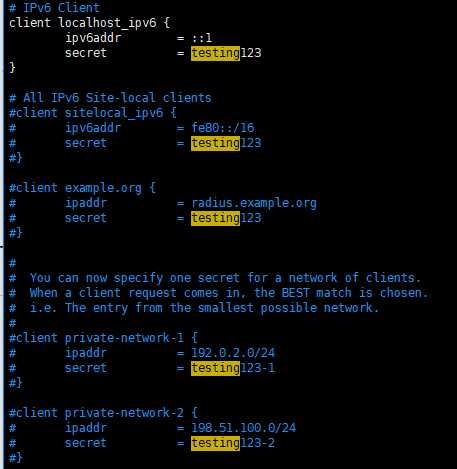
在users 文件创建一个本地用户测试
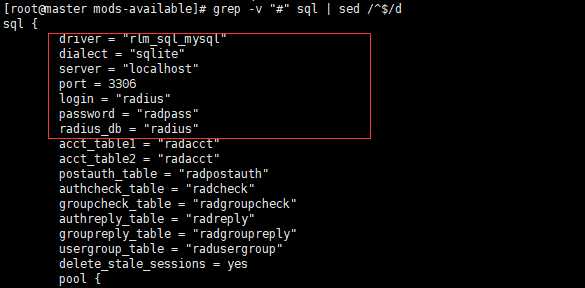
配置/usr/local/etc/raddb/mods-available/sql 文件(这里有用户名密码是上面授权的使用输入的,即数据库里的GRANT语句)
创建sql 连接到mods-enable中(enable中的文件代表开启这项功能)

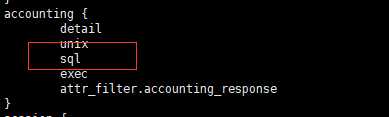
配置/usr/local/etc/raddb/sites-enabled/default,开启sql 禁用files ,files 在本地测试的时候是需要开启的,mysql 测试可以关闭(可选)
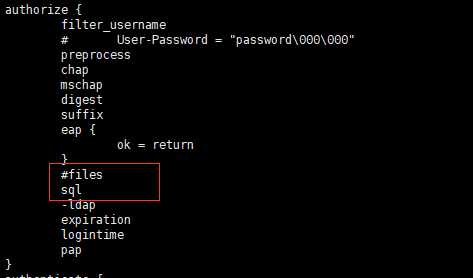
一个authorize{ },一个accounting{ },其它选项暂时未涉及,应该也可以操作post-auth { },session { }
使用openssl的时候需要修改:
1 vim /usr/local/etc/raddb/radiusd.conf

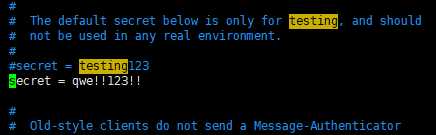
配置FreeRadius连接认证密码,其它程序需要需要使用radius 配置的连接密码必须与此相同
细化配置
4、 配置Linux
 1 iptables -F
 2 iptables -x
 3 #ISP直接外网IP
 4 echo ‘net.ipv4.conf.eth0.proxy_arp = 1‘ >>/etc/sysctl.conf
 5 echo 1 > /proc/sys/net/ipv4/conf/eth0/proxy_arp
 6 #内网转外网
 7 echo 1 > /proc/sys/net/ipv4/ip_forward
 8 sed -i /net.ipv4.ip_forward/s/0/1/g /etc/sysctl.conf
 9 iptables -t nat -A POSTROUTING -s 192.168.1.0/24 -o eth0 -j MASQUERADE     eth0为外国端口,192.168.1.0 为分配的地址段
10 iptables -A POSTROUTING -t nat -s 192.168.1.0/24 -j MASQUERADE
11 # 不指定出口
12 sysctl -w "net.ipv4.conf.eth0.proxy_arp=1"
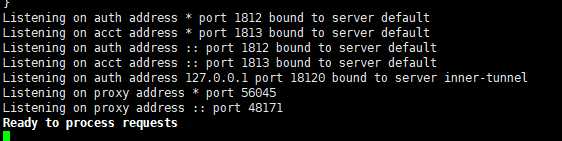
radius 本地本地用户测试(本地测试需要开启authorize {} 选项中的file),开一个窗口输入radiusd -X 启动debug 模式
1 radius -X
新开一个窗口输入:
1 radtest testing password 127.0.0.1 0 testing123

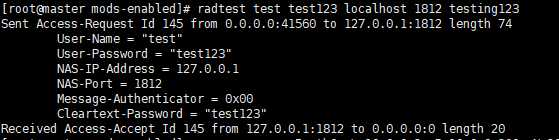
数据库用户测试
1 radtest test test123 localhost 1812 testing123
开启PPPOE服务
1 pppoe-server -I eth0 -L 10.0.0.48 -p /etc/ppp/fname.txt  指定IP列表文件
2 pppoe-server -I eth0 -L 10.0.0.2 -R 10.0.0.240 -N 20
3 #   -L 指定公网的网关地址
4 #   -p 指定对应的IP列表
5 #   -R -N 指定地址段
相关服务开启命令
1 iptables -F
2 iptables -X
3 radiusd
4 service mysqld start/stop/restart
5 pppoe-server -I eth0 -L 10.0.0.2 -R 10.0.0.100 -N 10
感谢:
http://blog.csdn.net/name_kongkong/article/details/53010377
http://blog.csdn.net/abcd1f2/article/details/49760365
http://www.linuxfromscratch.org/blfs/view/cvs/general/talloc.html
http://blog.csdn.net/shanshanhi/article/details/51851444
http://blog.csdn.net/chinasanduo/article/details/46630567
标签:tab span sql 配置文件 int users ble and ges
原文地址:http://www.cnblogs.com/changelee/p/7533469.html