【组件化开发】前端进阶篇之如何编写可维护可升级的代码
前言
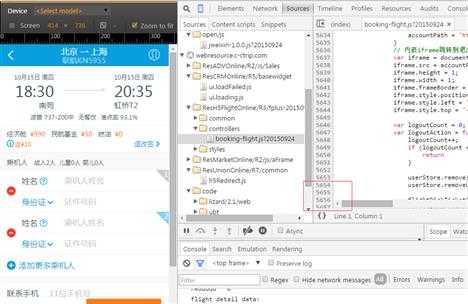
我还在携程的做业务的时候,每个看似简单的移动页面背后往往会隐藏5个以上的数据请求,其中最过复杂的当属机票与酒店的订单填写业务代码
这里先看看比较“简单”的机票代码:
然后看看稍微复杂的酒店业务逻辑:
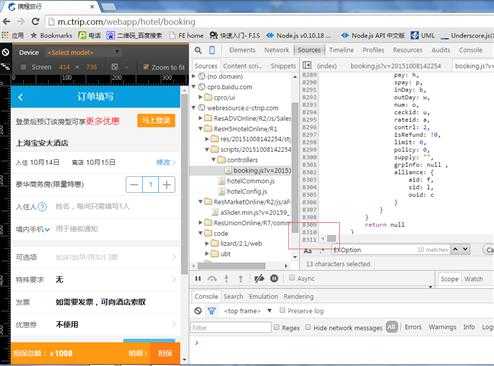
机票一个页面的代码量达到了5000行代码,而酒店的代码竟然超过了8000行,这里还不包括模板(html)文件!!!
然后初略看了机票的代码,就该页面可能发生的接口请求有19个之多!!!而酒店的的交互DOM事件基本多到了令人发指的地步:
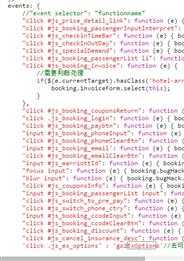
当然,机票团队的交互DOM事件已经多到了我笔记本不能截图了:


 1 events: {
 2 ‘click .js_check_invoice_type‘: ‘checkInvoiceType‘, //切换发票类型
 3 ‘click .flight-hxtipshd‘: ‘huiXuanDesc‘, //惠选说明
 4 ‘click .js_ListReload‘: ‘hideNetError‘,
 5 ‘click #js_return‘: ‘backAction‘, //返回列表页
 6 ‘click div[data-rbtType]‘: ‘showRebate‘, //插烂返现说明
 7 ‘click #paybtn .j_btn‘: ‘beforePayAction‘, //提交订单                        //flightDetailsStore, passengerQueryStore, mdStore, postAddressStorage, userStore, flightDeliveryStore
 8 ‘click .flight-loginbtn2‘: ‘bookLogin‘, //登录
 9 ‘input #linkTel‘: ‘setContact‘, //保存用户输入的联系人
10 ‘click #addPassenger .flight-labq‘: ‘readmeAction‘,//姓名帮助
11 ‘click .jsDelivery‘: ‘selDelivery‘, //选择配送方式
12 ‘click #jsViewCoupons‘: ‘viewCoupons‘, //查看消费券使用说明                                                  //flightDetailsStore
13 // ‘click .j_refundPolicy‘: ‘fanBoxAction‘, //查看返现信息
14 //‘click .flight-bkinfo-tgq .f-r‘: ‘tgBoxAction‘, //查看退改签
15 ‘click .js_del_tab‘: ‘showDelListUI‘, //配送方式
16 //            ‘click .js_del_cost .flight-psf i‘: ‘selectPaymentType‘, // 选择快递费用方式
17 ‘click #js_addrList‘: ‘AddrListAction‘, //选择地址
18 ‘click #date-picker‘: ‘calendarAction‘, //取票日期                                                                    //airportDeliveryStore
19 ‘click #done-address‘: ‘zqinairselect‘, //取票柜台
20 ‘click #selectCity‘: ‘selectCityAction‘, //选择城市
21 ‘click #date-zqtime‘: ‘showZqTimeUI‘, //取票时间                                                                        //airportDeliveryStore
22 ‘click #jsinsure‘: ‘viewInsure‘, //保险说明
23 ‘click #js_invoice_title‘: ‘inTitleChangeWrp‘, //发票抬头更改                // userStore, flightOrderInfoInviceStore, flightOrderStore    //don‘t move outside
24 ‘click #js_invoice_title_div‘: ‘inTitleChangeWrp‘,
25 ‘click .flight-icon-arrrht‘: ‘showinTitleList‘, //‘+’号,跳转发票抬头列表                 //userStore, invoiceURLStore
26 ‘focusin #linkTel‘: ‘telInput‘,
27 ‘focusout #linkTel‘: ‘telInputFinish‘,
28 ‘touchstart input‘: ‘touchStartAction‘, // 处理Android手机上点击不灵敏问题
29 ‘click #package .flight-arrrht‘: ‘packageSelect‘,
30 ‘focusin input‘: ‘hideErrorTips‘,
31 ‘click #dist_text_div‘: ‘hideErrorTips‘,
32 ‘click .j_PackageNotice‘: ‘toggletips‘,
33 ‘click .j_AnnouncementNotice‘: ‘toggleNotice‘,
34 ‘click #travalPackageDesc‘: ‘forwardToTravalPackage‘,       //don‘t move into child modules
35 ‘click #airInsureDesc‘: ‘showAirInsureDesc‘,
36 ‘click #paybtn‘: ‘orderDetailAction‘,//价格明细
37 ‘click .J_retriveVerifyCodeBtn‘: ‘getVerifyCode‘,
38 ‘click .J_toPay‘: ‘toPayAction‘,
39 ‘click .J_closeVerifyCode‘: ‘closeVerifyCodePopup‘,
40 ‘keyup .J_verifyCodePopup input‘: ‘setToPayBtnStatus‘,
41 ‘click .js_flight_seat‘: ‘selectRecommendCabin‘, // 选择推荐仓位
42 ‘click .j_changeFlight‘: ‘changeFlightAction‘, // 推荐航班弹层中更改航班
43 ‘focusin input:not([type=tel])‘: ‘adjustInputPosition‘, // iphone5/5s ios8搜狗输入法遮住input
44 ‘click .js_addr,#js_addr_div‘: ‘editDeliverAddress‘,//报销凭证,详细地址编辑
45 ‘click .js_showUserInfo‘: ‘showUserInfo‘, // add by hkhu v2.5.9
46 ‘click #logout‘: ‘logout‘, // add by hkhu v2.5.9
47 ‘click #gotoMyOrder‘: ‘gotoMyOrder‘, // add by hkhu v2.5.9
48 ‘touchstart #logout‘: function (e) { $(e.currentTarget).addClass(‘current‘); },
49 ‘touchstart #gotoMyOrder‘: function (e) { $(e.currentTarget).addClass(‘current‘); },
50 ‘click .js_buddypayConfirm‘: ‘buddypayConfirmed‘,
51 ‘click .js_pickupTicket‘: ‘viewPickUp‘, //261接送机券说明
52 ‘click .flt-bking-logintips‘: ‘closelogintips‘//关闭接送机券提示
53 },
就这种体量的页面,如果需要迭代需求、打BUG补丁的话,我敢肯定的说,一个BUG的修复很容易引起其它BUG,而上面还仅仅是其中一个业务页面,后面还有强大而复杂的前端框架呢!如此复杂的前端代码维护工作可不是开玩笑的!
PS:说道此处,不得不为携程的前端水平点个赞,业内少有的单页应用,一套代码H5&Hybrid同时运行不说,还解决了SEO问题,嗯,很赞。
如何维护这种页面,如何设计这种页面是我们今天讨论的重点,而上述是携程合并后的代码,他们两个团队的设计思路不便在此处展开。
今天,我这里提供一个思路,认真阅读此文可能在以下方面对你有所帮助:
1 ① 如何将一个复杂的页面拆分为一个个独立的页面组件模块
2 ② 如何将分拆后的业务组件模块重新合为一个完整的页面
3 ③ 从重构角度看组件化开发带来的好处
4 ④ 从前端优化的角度看待组件化开发
文中是我个人的一些框架&业务开发经验,希望对各位有用,也希望各位多多支持讨论,指出文中不足以及提出您的一些建议。
由于该项目涉及到了项目拆分与合并,基本属于一个完整的前端工程化案例了,所以将之放到了github上:https://github.com/yexiaochai/mvc
其中工程化一块的代码,后续会由另一位小伙伴持续更新,如果该文对各位有所帮助的话请各位给项目点个赞、加颗星:)
我相信如果是中级水平的前端,认真阅读此文一定会对你有一点帮助滴。
一个实际的场景
演示地址
http://yexiaochai.github.io/mvc/webapp/bus/list.html
代码仓促,可能会有BUG哦:)
代码地址:https://github.com/yexiaochai/mvc/
页面基本构成
因为订单填写页一般有密度,我这里挑选相对复杂而又没有密度的产品列表页来做说明,其中框架以及业务代码已经做过抽离,不会包含敏感信息,一些优化后续会同步到开源blade框架中去。
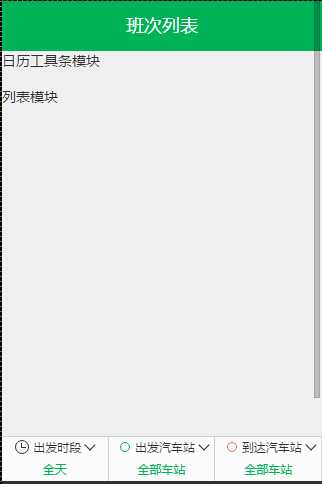
我们这里列表页的首屏页面如下:
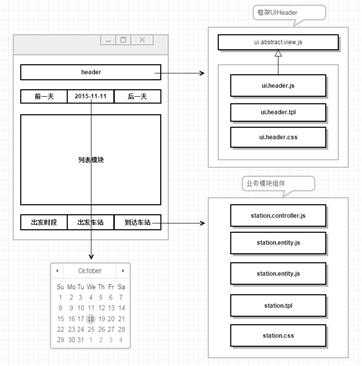
简单来说组成如下:
① 框架级别UI组件UIHeader,头部组件
② 点击日期会出框架级别UI,日历组件UICalendar
③ 点击出发时段、出发汽车站、到达汽车站,皆会出框架级别UI
④ header下面的日期工具栏需要作为独立的业务模块
⑤ 列表区域可以作为独立的业务模块,但是与主业务靠太近,不太适合
⑥ 出发时段、出发汽车站、到达汽车站皆是独立的业务模块
一个页面被我们拆分成了若干个小模块,我们只需要关注模块内部的交互实现,而包括业务模块的通信,业务模块的样式,业务模块的重用,暂时有以下约定:
① 单个页面的样式全部写在一个文件中,比如list里面所有模块对应的是list.css
② 模块之间采用观察者模式观察数据实体变化,以数据为媒介通信
③ 一般来说业务模块不可重用,如果有重用的模块,需要分离到common目录中,因为我们今天不考虑common重用,这块暂时不予理睬
这里有些朋友可能认为单个模块的CSS以及image也应该参与独立,我这里不太同意,业务页面样式粒度太细的话会给设计带来不小的麻烦,这里再以通俗的话来说:尼玛,我CSS功底一般,拆分的太细,对我来说难度太高......
不好的做法
不好的这个事情其实是相对的,因为不好的做法一般是比较简单的做法,对于一次性项目或者业务比较简单的页面来说反而是好的做法,比如这里的业务逻辑可以这样写:
 1 define([‘AbstractView‘, ‘list.layout.html‘, ‘list.html‘, ‘BusModel‘, ‘BusStore‘, ‘UICalendarBox‘, ‘UILayerList‘, ‘cUser‘, ‘UIToast‘],
 2 function (AbstractView, layoutHtml, listTpl, BusModel, BusStore, UICalendarBox, UILayerList, cUser, UIToast) {
 3     return _.inherit(AbstractView, {
 4         propertys: function ($super) {
 5             $super();
 6             //一堆基础属性定义
 7             //......
 8             //交互业务逻辑
 9             this.events = {
10                 ‘click .js_pre_day‘: ‘preAction‘, //点击前一天触发
11                 ‘click .js_next_day‘: ‘nextAction‘, //点击后一天触发
12                 ‘click .js_bus_list li‘: ‘toBooking‘, //点击列表项目触发
13                 ‘click .js_show_calendar‘: ‘showCalendar‘, //点击日期项出日历组件
14                 ‘click .js_show_setoutdate‘: ‘showSetoutDate‘, //筛选出发时段
15                 ‘click .js_show_setstation‘: ‘showStation‘, //筛选出发站
16                 ‘click .js_show_arrivalstation‘: ‘showArrivalStation‘, //筛选到达站
17                 //迭代需求,增加其它频道入口
18                 ‘click .js-list-tip‘: function () {}
19             };
20         },
21         //初始化头部标题栏
22         initHeader: function (t) { },
23         //首次dom渲染后,初始化后续会用到的所有dom元素,以免重复获取
24         initElement: function () {},
25         showSetoutDate: function () {},
26         showStation: function () {},
27         showArrivalStation: function () {},
28         showCalendar: function () {},
29         preAction: function (e) {},
30         nextAction: function () {},
31         toBooking: function (e) {},
32         listInit: function () {},
33         bindScrollEvent: function () {},
34         unbindScrollEvent: function () { },
35         addEvent: function () {
36             this.on(‘onShow‘, function () {
37                 //当页面渲染结束,需要做的初始化操作,比如渲染页面
38                 this.listInit();
39                 //......
40             });
41             this.on(‘onHide‘, function () {
42                 this.unbindScrollEvent();
43             });
44         }
45     });
46 });
根据之前的经验,如果仅仅包含这些业务逻辑,这样写代码问题不是非常大,代码量预计在800行左右,但是为了完成完整的业务逻辑,我们这里马上产生了新的需求。
需求迭代
因为我这里的班次列表,最初是没有URL参数,所以根本无法产出班次列表,页面上所有组件模块都是摆设,于是这里新增一个需求:
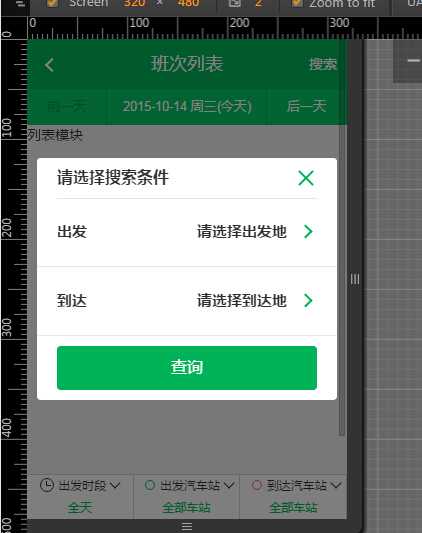
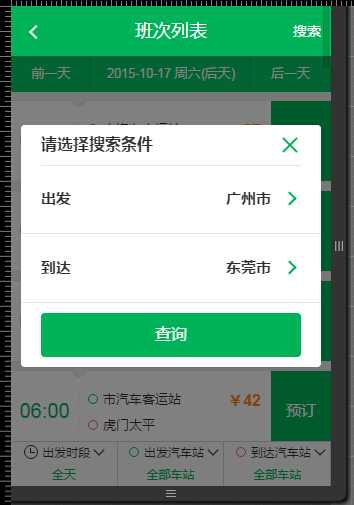
当url没有出发-到达相关参数信息时,默认弹出出发城市到达城市选择框
于是,我们这里会新增一个简单的弹出层:
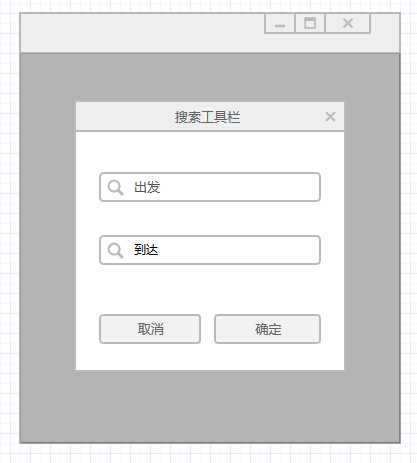
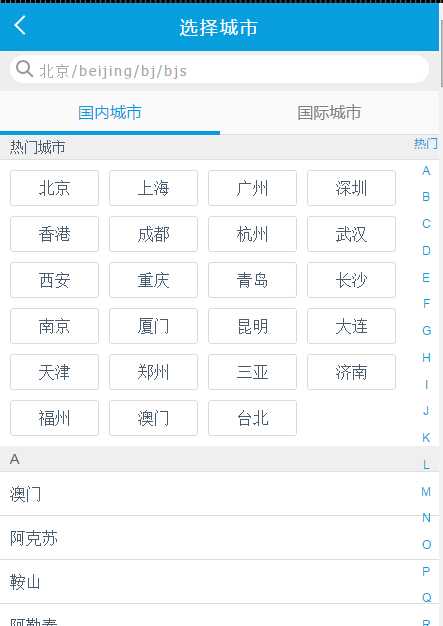
这个看似简单的弹出层,背后却隐藏了一个巨大的陷阱,因为点击出发或者到达时会出城市列表,而城市列表本身就是一个比较复杂的业务:
于是页面的组成发生了改变:
① 本身业务逻辑约800行代码
② 新增出发到达筛选弹出层
③ 出发城市页面,预计300行代码
而弹出层的新增对业务本身造成了深远的影响,本来url是不带有业务参数的,但是点击了弹出层的确定按钮,需要改变URL参数,并且刷新本身页面的数据,于是简单的一个弹出层新增直接将页面的复杂程度提升了一倍。
于是该页面代码轻轻松松破千了,后续需求迭代js代码量破2000仅仅是时间问题,到时候维护便复杂了,页面复杂无规律的DOM操作将会令你焦头烂额,这个时候组件化开发的优势便得以体现了,于是下面进入组件化开发的设计。
准备工作
总体架构
这次的代码依赖于blade骨架,包括:
① MVC模块,完成通过url获取正确的page控制器,从而通过view.js完成渲染页面的功能
② 数据请求模块,完成接口请求
全站依赖于javascript的继承功能,详情见:【一次面试】再谈javascript中的继承,如果不太了解面向对象编程,文中代码可能会有点吃力,也请各位多多了解。
总体业务架构如图:
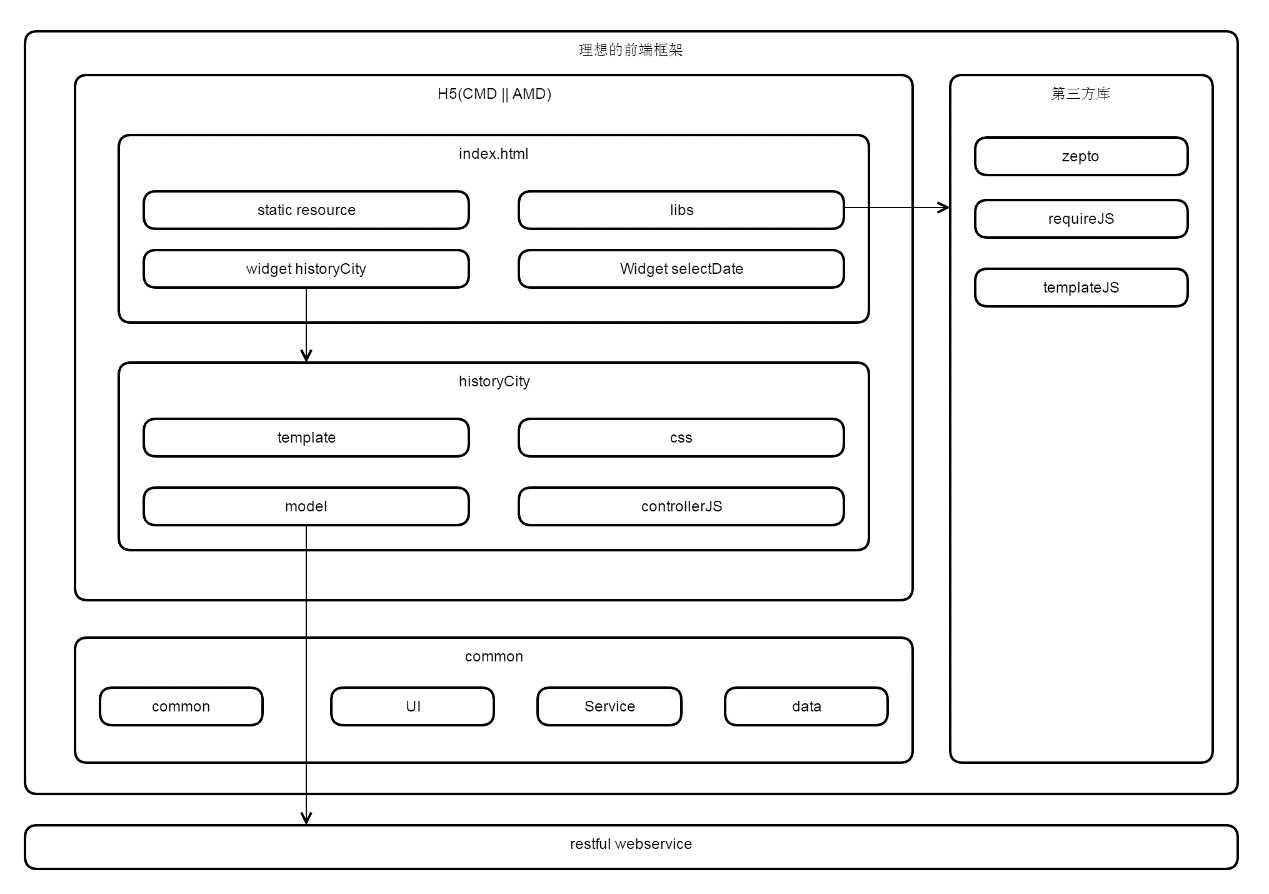
框架架构图:
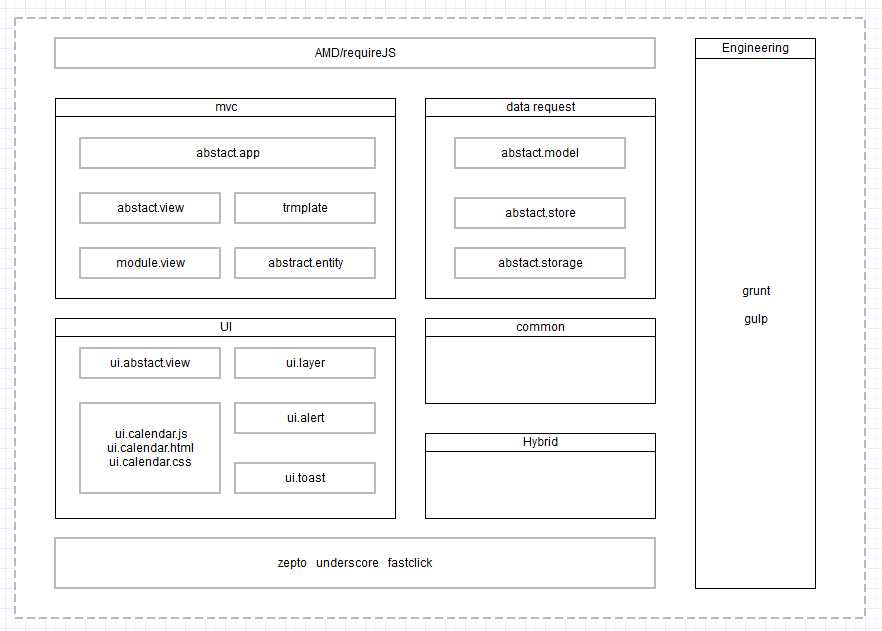
下面分别介绍下各个模块,帮助各位在下文中能更好的了解代码,首先是基本MVC的介绍,这里请参考我这篇文章:简单的MVC介绍
全局控制器
其实控制器可谓是变化万千的一个对象,对于服务器端来说,控制器完成的功能是将本次请求分发到具体的代码模块,由代码模块处理后返回字符串给前端;
对于请求已经来到浏览器的前端来说,根据这次请求URL(或者其它判断条件),判断该次请求应该由哪个前端js控制器执行,这是前端控制器干的事情;
当真的这次处理逻辑进入一个具体的page后,这个page事实上也可以作为一个控制器存在......
我们这里的控制器,主要完成根据当前请求实例化View的功能,并且会提供一些view级别希望单例使用的接口:
  1 define([
  2   ‘UIHeader‘,
  3   ‘UIToast‘,
  4   ‘UILoading‘,
  5   ‘UIPageView‘,
  6   ‘UIAlert‘
  7 ], function (UIHeader, UIToast, UILoading, UIPageView, UIAlert) {
  8
  9     return _.inherit({
 10         propertys: function () {
 11             //view搜索目录
 12             this.viewRootPath = ‘views/‘;
 13
 14             //默认view
 15             this.defaultView = ‘index‘;
 16
 17             //当前视图路径
 18             this.viewId;
 19             this.viewUrl;
 20
 21             //视图集
 22             this.views = {};
 23
 24             //是否开启单页应用
 25             //      this.isOpenWebapp = _.getHybridInfo().platform == ‘baidubox‘ ? true : false;
 26             this.isOpenWebapp = false;
 27
 28             this.viewMapping = {};
 29
 30             //UIHeader需要释放出来
 31             this.UIHeader = UIHeader;
 32
 33             this.interface = [
 34                 ‘forward‘,
 35                 ‘back‘,
 36                 ‘jump‘,
 37                 ‘showPageView‘,
 38                 ‘hidePageView‘,
 39                 ‘showLoading‘,
 40                 ‘hideLoading‘,
 41                 ‘showToast‘,
 42                 ‘hideToast‘,
 43                 ‘showMessage‘,
 44                 ‘hideMessage‘,
 45                 ‘showConfirm‘,
 46                 ‘hideConfirm‘,
 47                 ‘openWebapp‘,
 48                 ‘closeWebapp‘
 49             ];
 50
 51         },
 52
 53         initialize: function (options) {
 54             this.propertys();
 55             this.setOption(options);
 56             this.initViewPort();
 57             this.initAppMapping();
 58
 59             //开启fastclick
 60             $.bindFastClick && $.bindFastClick();
 61
 62         },
 63
 64         setOption: function (options) {
 65             _.extend(this, options);
 66         },
 67
 68         //创建dom结构
 69         initViewPort: function () {
 70
 71             this.d_header = $(‘#headerview‘);
 72             this.d_state = $(‘#js_page_state‘);
 73             this.d_viewport = $(‘#main‘);
 74
 75             //实例化全局使用的header,这里好像有点不对
 76             this.header = new this.UIHeader({
 77                 wrapper: this.d_header
 78             });
 79
 80             //非共享资源,这里应该引入app概念了
 81             this.pageviews = {};
 82             this.toast = new UIToast();
 83             this.loading = new UILoading();
 84             this.alert = new UIAlert();
 85             this.confirm = new UIAlert();
 86         },
 87
 88         openWebapp: function () {
 89             this.isOpenWebapp = true;
 90         },
 91
 92         closeWebapp: function () {
 93             this.isOpenWebapp = false;
 94         },
 95
 96         showPageView: function (name, _viewdata_, id) {
 97             var view = null, k, scope = this.curViewIns || this;
 98             if (!id) id = name;
 99             if (!_.isString(name)) return;
100             //    for (k in _viewdata_) {
101             //      if (_.isFunction(_viewdata_[k])) _viewdata_[k] = $.proxy(_viewdata_[k], scope);
102             //    }
103             view = this.pageviews[id];
104             var arr = name.split(‘/‘);
105             var getViewPath = window.getViewPath || window.GetViewPath;
106             if (!view) {
107                 view = new UIPageView({
108                     // bug fixed by zzx
109                     viewId: arr[arr.length - 1] || name,
110                     viewPath: getViewPath ? getViewPath(name) : name,
111                     _viewdata_: _viewdata_,
112                     onHide: function () {
113                         scope.initHeader();
114                     }
115                 });
116                 this.pageviews[id] = view;
117             } else {
118                 view.setViewData(_viewdata_);
119             }
120             view.show();
121
122         },
123
124         hidePageView: function (name) {
125             if (name) {
126                 if (this.pageviews[name]) this.pageviews[name].hide();
127             } else {
128                 for (var k in this.pageviews) this.pageviews[k].hide();
129             }
130         },
131
132         showLoading: function () {
133             this.loading.show();
134         },
135
136         hideLoading: function () {
137             this.loading.hide();
138         },
139
140         showToast: function (msg, callback) {
141             this.toast.resetDefaultProperty();
142             this.toast.content = msg;
143             if (callback) this.toast.hideAction = callback;
144             this.toast.refresh();
145             this.toast.show();
146         },
147
148         hideToast: function () {
149             this.toast.hide();
150         },
151
152         showMessage: function (param) {
153             if (_.isString(param)) {
154                 param = { content: param };
155             }
156
157             this.alert.resetDefaultProperty();
158             this.alert.setOption(param);
159             this.alert.refresh();
160             this.alert.show();
161         },
162
163         hideMessage: function () {
164             this.alert.hide();
165         },
166
167         showConfirm: function (params) {
168             if (!params) params = {};
169             if (typeof params == ‘string‘) {
170                 params = {
171                     content: params
172                 };
173             }
174
175             this.confirm.resetDefaultProperty();
176
177             //与showMessage不一样的地方
178             this.confirm.btns = [
179               { name: ‘取消‘, className: ‘cm-btns-cancel js_cancel‘ },
180               { name: ‘确定‘, className: ‘cm-btns-ok js_ok‘ }
181             ];
182             this.confirm.setOption(params);
183             this.confirm.refresh();
184             this.confirm.show();
185         },
186
187         hideConfirm: function () {
188             this.confirm.hide();
189         },
190
191         //初始化app
192         initApp: function () {
193
194             //首次加载不需要走路由控制
195             this.loadViewByUrl();
196
197             //后面的加载全部要经过路由处理
198             if (this.isOpenWebapp === true)
199                 $(window).on(‘popstate.app‘, $.proxy(this.loadViewByUrl, this));
200
201         },
202
203         loadViewByUrl: function (e) {
204             this.hidePageView();
205
206             var url = decodeURIComponent(location.href).toLowerCase();
207             var viewId = this.getViewIdRule(url);
208
209             viewId = viewId || this.defaultView;
210             this.viewId = viewId;
211             this.viewUrl = url;
212             this.switchView(this.viewId);
213
214         },
215
216         //@override
217         getViewIdRule: function (url) {
218             var viewId = ‘‘, hash = ‘‘;
219             var reg = /webapp\/.+\/(.+)\.html/;
220
221             var match = url.match(reg);
222             if (match && match[1]) viewId = match[1];
223
224             return viewId;
225         },
226
227         //@override
228         setUrlRule: function (viewId, param, replace, project) {
229             var reg = /(webapp\/.+\/)(.+)\.html/;
230             var url = window.location.href;
231             var match = url.match(reg);
232             var proj = project ? ‘webapp/‘ + project : match[1];
233             var preUrl = ‘‘, str = ‘‘, i = 0, _k, _v;
234             //这里这样做有点过于业务了 *bug*
235             var keepParam = [
236               ‘us‘
237             ], p;
238             if (!viewId) return;
239             if (!match || !match[1]) {
240                 preUrl = url + ‘/webapp/bus/‘ + viewId + ‘.html‘;
241             } else {
242                 preUrl = url.substr(0, url.indexOf(match[1])) + proj + viewId + ‘.html‘; ;
243             }
244
245             //特定的参数将会一直带上去,渠道、来源等标志
246             for (i = 0; i < keepParam.length; i++) {
247                 p = keepParam[i];
248                 if (_.getUrlParam()[p]) {
249                     if (!param) param = {};
250                     param[p] = _.getUrlParam()[p];
251                 }
252             }
253
254             i = 0;
255
256             for (k in param) {
257                 _k = encodeURIComponent(_.removeAllSpace(k));
258                 _v = encodeURIComponent(_.removeAllSpace(param[k]));
259                 if (i === 0) {
260                     str += ‘?‘ + _k + ‘=‘ + _v;
261                     i++;
262                 } else {
263                     str += ‘&‘ + _k + ‘=‘ + _v;
264                 }
265             }
266
267             url = preUrl + str;
268
269             if (this.isOpenWebapp === false) {
270                 window.location = url;
271                 return;
272             }
273
274             if (replace) {
275                 history.replaceState(‘‘, {}, url);
276             } else {
277                 history.pushState(‘‘, {}, url);
278             }
279
280         },
281
282         switchView: function (id) {
283
284             var curView = this.views[id];
285
286             //切换前的当前view,马上会隐藏
287             var tmpView = this.curView;
288
289             if (tmpView && tmpView != curView) {
290                 this.lastView = tmpView;
291             }
292
293             //加载view样式,权宜之计
294             //      this.loadViewStyle(id);
295
296             //如果当前view存在,则执行请onload事件
297             if (curView) {
298
299                 //如果当前要跳转的view就是当前view的话便不予处理
300                 //这里具体处理逻辑要改*************************************
301                 if (curView == this.curView) {
302                     return;
303                 }
304
305                 this.curView = curView;
306                 this.curView.show();
307                 this.lastView && this.lastView.hide();
308             } else {
309
310                 //        this.showLoading();
311                 this.loadView(id, function (View) {
312                     //每次加载结束将状态栏隐藏,这个代码要改
313                     //          this.hideLoading();
314
315                     this.curView = new View({
316                         viewId: id,
317                         refer: this.lastView ? this.lastView.viewId : null,
318                         APP: this,
319                         wrapper: this.d_viewport
320                     });
321
322                     //设置网页上的view标志
323                     this.curView.$el.attr(‘page-url‘, id);
324
325                     //保存至队列
326                     this.views[id] = this.curView;
327
328                     this.curView.show();
329                     this.lastView && this.lastView.hide();
330
331                 });
332             }
333         },
334
335         //加载view
336         loadView: function (path, callback) {
337             var self = this;
338             requirejs([this.buildUrl(path)], function (View) {
339                 callback && callback.call(self, View);
340             });
341         },
342
343         //override
344         //配置可能会有的路径扩展,为Hybrid与各个渠道做适配
345         initAppMapping: function () {
346             //            console.log(‘该方法必须被重写‘);
347         },
348
349         //@override
350         buildUrl: function (path) {
351             var mappingPath = this.viewMapping[path];
352             return mappingPath ? mappingPath : this.viewRootPath + ‘/‘ + path + ‘/‘ + path;
353         },
354
355         //此处需要一个更新逻辑,比如在index view再点击到index view不会有反应,下次改**************************
356         forward: function (viewId, param, replace) {
357             if (!viewId) return;
358             viewId = viewId.toLowerCase();
359
360             this.setUrlRule(viewId, param, replace);
361             this.loadViewByUrl();
362         },
363         jump: function (path, param, replace) {
364             var viewId;
365             var project;
366             if (!path) {
367                 return;
368             }
369             path = path.toLowerCase().split(‘/‘);
370             if (path.length <= 0) {
371                 return;
372             }
373             viewId = path.pop();
374             project = path.length === 1 ? path.join(‘‘) + ‘/‘ : path.join(‘‘);
375             this.setUrlRule(viewId, param, replace, project);
376             this.loadViewByUrl();
377         },
378         back: function (viewId, param, replace) {
379             if (viewId) {
380                 this.forward(viewId, param, replace)
381             } else {
382                 if (window.history.length == 1) {
383                     this.forward(this.defaultView, param, replace)
384                 } else {
385                     history.back();
386                 }
387             }
388         }
389
390     });
391
392 });
这里属于框架控制器层面的代码,与今天的主题不是非常相关,有兴趣的朋友可以详细读读。
页面基类
这里的核心是页面级别的处理,这里会做比较多的介绍,首先我们为所有的业务级View提供了一个继承的View:
  1 define([], function () {
  2     ‘use strict‘;
  3
  4     return _.inherit({
  5
  6         _propertys: function () {
  7             this.APP = this.APP || window.APP;
  8             var i = 0, len = 0, k;
  9             if (this.APP && this.APP.interface) {
 10                 for (i = 0, len = this.APP.interface.length; i < len; i++) {
 11                     k = this.APP.interface[i];
 12                     if (k == ‘showPageView‘) continue;
 13
 14                     if (_.isFunction(this.APP[k])) {
 15                         this[k] = $.proxy(this.APP[k], this.APP);
 16                     }
 17                     else this[k] = this.APP[k];
 18                 }
 19             }
 20
 21             this.header = this.APP.header;
 22         },
 23
 24         showPageView: function (name, _viewdata, id) {
 25             this.APP.curViewIns = this;
 26             this.APP.showPageView(name, _viewdata, id)
 27         },
 28         propertys: function () {
 29             //这里设置UI的根节点所处包裹层
 30             this.wrapper = $(‘#main‘);
 31             this.id = _.uniqueId(‘page-view-‘);
 32             this.classname = ‘‘;
 33
 34             this.viewId = null;
 35             this.refer = null;
 36
 37             //模板字符串,各个组件不同,现在加入预编译机制
 38             this.template = ‘‘;
 39             //事件机制
 40             this.events = {};
 41
 42             //自定义事件
 43             //此处需要注意mask 绑定事件前后问题,考虑scroll.radio插件类型的mask应用,考虑组件通信
 44             this.eventArr = {};
 45
 46             //初始状态为实例化
 47             this.status = ‘init‘;
 48
 49             this._propertys();
 50         },
 51
 52         getViewModel: function () {
 53             //假如有datamodel的话,便直接返回,不然便重写,这里基本为了兼容
 54             if (_.isObject(this.datamodel)) return this.datamodel;
 55             return {};
 56         },
 57
 58         //子类事件绑定若想保留父级的,应该使用该方法
 59         addEvents: function (events) {
 60             if (_.isObject(events)) _.extend(this.events, events);
 61         },
 62
 63         on: function (type, fn, insert) {
 64             if (!this.eventArr[type]) this.eventArr[type] = [];
 65
 66             //头部插入
 67             if (insert) {
 68                 this.eventArr[type].splice(0, 0, fn);
 69             } else {
 70                 this.eventArr[type].push(fn);
 71             }
 72         },
 73
 74         off: function (type, fn) {
 75             if (!this.eventArr[type]) return;
 76             if (fn) {
 77                 this.eventArr[type] = _.without(this.eventArr[type], fn);
 78             } else {
 79                 this.eventArr[type] = [];
 80             }
 81         },
 82
 83         trigger: function (type) {
 84             var _slice = Array.prototype.slice;
 85             var args = _slice.call(arguments, 1);
 86             var events = this.eventArr;
 87             var results = [], i, l;
 88
 89             if (events[type]) {
 90                 for (i = 0, l = events[type].length; i < l; i++) {
 91                     results[results.length] = events[type][i].apply(this, args);
 92                 }
 93             }
 94             return results;
 95         },
 96
 97         createRoot: function (html) {
 98
 99             //如果存在style节点,并且style节点不存在的时候需要处理
100             if (this.style && !$(‘#page_‘ + this.viewId)[0]) {
101                 $(‘head‘).append($(‘<style id="page_‘ + this.viewId + ‘" class="page-style">‘ + this.style + ‘</style>‘))
102             }
103
104             //如果具有fake节点,需要移除
105             $(‘#fake-page‘).remove();
106
107             //UI的根节点
108             this.$el = $(‘<div class="cm-view page-‘ + this.viewId + ‘ ‘ + this.classname + ‘" style="display: none; " id="‘ + this.id + ‘">‘ + html + ‘</div>‘);
109             if (this.wrapper.find(‘.cm-view‘)[0]) {
110                 this.wrapper.append(this.$el);
111             } else {
112                 this.wrapper.html(‘‘).append(this.$el);
113             }
114
115         },
116
117         _isAddEvent: function (key) {
118             if (key == ‘onCreate‘ || key == ‘onPreShow‘ || key == ‘onShow‘ || key == ‘onRefresh‘ || key == ‘onHide‘)
119                 return true;
120             return false;
121         },
122
123         setOption: function (options) {
124             //这里可以写成switch,开始没有想到有这么多分支
125             for (var k in options) {
126                 if (k == ‘events‘) {
127                     _.extend(this[k], options[k]);
128                     continue;
129                 } else if (this._isAddEvent(k)) {
130                     this.on(k, options[k])
131                     continue;
132                 }
133                 this[k] = options[k];
134             }
135             //      _.extend(this, options);
136         },
137
138         initialize: function (opts) {
139             //这种默认属性
140             this.propertys();
141             //根据参数重置属性
142             this.setOption(opts);
143             //检测不合理属性,修正为正确数据
144             this.resetPropery();
145
146             this.addEvent();
147             this.create();
148
149             this.initElement();
150
151             window.sss = this;
152
153         },
154
155         $: function (selector) {
156             return this.$el.find(selector);
157         },
158
159         //提供属性重置功能,对属性做检查
160         resetPropery: function () { },
161
162         //各事件注册点,用于被继承override
163         addEvent: function () {
164         },
165
166         create: function () {
167             this.trigger(‘onPreCreate‘);
168             //如果没有传入模板,说明html结构已经存在
169             this.createRoot(this.render());
170
171             this.status = ‘create‘;
172             this.trigger(‘onCreate‘);
173         },
174
175         //实例化需要用到到dom元素
176         initElement: function () { },
177
178         render: function (callback) {
179             var data = this.getViewModel() || {};
180             var html = this.template;
181             if (!this.template) return ‘‘;
182             //引入预编译机制
183             if (_.isFunction(this.template)) {
184                 html = this.template(data);
185             } else {
186                 html = _.template(this.template)(data);
187             }
188             typeof callback == ‘function‘ && callback.call(this);
189             return html;
190         },
191
192         refresh: function (needRecreate) {
193             this.resetPropery();
194             if (needRecreate) {
195                 this.create();
196             } else {
197                 this.$el.html(this.render());
198             }
199             this.initElement();
200             if (this.status != ‘hide‘) this.show();
201             this.trigger(‘onRefresh‘);
202         },
203
204         /**
205         * @description 组件显示方法,首次显示会将ui对象实际由内存插入包裹层
206         * @method initialize
207         * @param {Object} opts
208         */
209         show: function () {
210             this.trigger(‘onPreShow‘);
211             //      //如果包含就不要乱搞了
212             //      if (!$.contains(this.wrapper[0], this.$el[0])) {
213             //        //如果需要清空容器的话便清空
214             //        if (this.needEmptyWrapper) this.wrapper.html(‘‘);
215             //        this.wrapper.append(this.$el);
216             //      }
217
218             this.$el.show();
219             this.status = ‘show‘;
220
221             this.bindEvents();
222
223             this.initHeader();
224             this.trigger(‘onShow‘);
225         },
226
227         initHeader: function () { },
228
229         hide: function () {
230             if (!this.$el || this.status !== ‘show‘) return;
231
232             this.trigger(‘onPreHide‘);
233             this.$el.hide();
234
235             this.status = ‘hide‘;
236             this.unBindEvents();
237             this.trigger(‘onHide‘);
238         },
239
240         destroy: function () {
241             this.status = ‘destroy‘;
242             this.unBindEvents();
243             this.$root.remove();
244             this.trigger(‘onDestroy‘);
245             delete this;
246         },
247
248         bindEvents: function () {
249             var events = this.events;
250
251             if (!(events || (events = _.result(this, ‘events‘)))) return this;
252             this.unBindEvents();
253
254             // 解析event参数的正则
255             var delegateEventSplitter = /^(\S+)\s*(.*)$/;
256             var key, method, match, eventName, selector;
257
258             // 做简单的字符串数据解析
259             for (key in events) {
260                 method = events[key];
261                 if (!_.isFunction(method)) method = this[events[key]];
262                 if (!method) continue;
263
264                 match = key.match(delegateEventSplitter);
265                 eventName = match[1], selector = match[2];
266                 method = _.bind(method, this);
267                 eventName += ‘.delegateUIEvents‘ + this.id;
268
269                 if (selector === ‘‘) {
270                     this.$el.on(eventName, method);
271                 } else {
272                     this.$el.on(eventName, selector, method);
273                 }
274             }
275
276             return this;
277         },
278
279         unBindEvents: function () {
280             this.$el.off(‘.delegateUIEvents‘ + this.id);
281             return this;
282         },
283
284         getParam: function (key) {
285             return _.getUrlParam(window.location.href, key)
286         },
287
288         renderTpl: function (tpl, data) {
289             if (!_.isFunction(tpl)) tpl = _.template(tpl);
290             return tpl(data);
291         }
292
293
294     });
295
296 });
一个Page级别的View会有以下几个关键属性&方法:
① template,html字符串,不包含请求的基础模块,会构成页面的html骨架层
② events,所有的DOM事件定义处,以事件代理的方式定义,所以不必担心执行顺序
③ addEvent,用于页面级别各个阶段的监控事件注册点,一般来说用户只需要关注很少几个事件,比如:
1 //写法
2 addEvent: function () {
3    //页面渲染结束,并显示时候触发的事件
4     this.on(‘onShow‘, function () {
5     });
6     //离开页面,页面隐藏时候触发的事件
7     this.on(‘onHide‘, function () {
8     });
9 }
一个页面的基本写法:
 1 define([‘AbstractView‘], function (AbstractView) {
 2     return _.inherit(AbstractView, {
 3         propertys: function ($super) {
 4             $super();
 5             //一堆基础属性定义
 6             //......
 7             //交互业务逻辑
 8             this.events = {
 9                 ‘click .js_pre_day‘: ‘preAction‘
10             };
11         },
12         preAction: function (e) { },
13         addEvent: function () {
14             this.on(‘onShow‘, function () {
15                 //当页面渲染结束,需要做的初始化操作,比如渲染页面
16                 //......
17             });
18             this.on(‘onHide‘, function () {
19             });
20         }
21     });
22 });
只要按照这种规则写,便能展示页面,并且具备DOM交互事件。
页面模块类
所谓页面模块类,便是用于拆分一个页面为单个组件模块所用类,这里有这些约定:
① 一个模块类实例一定会依赖一个Page的基类实例
② 模块类实例通过this.view可以访问到依赖类的一切资源
③ 模块类实例与模块之间通过数据entity做通信
这里代码可以再优化,但不是我们这里关注的重点:
  1 define([], function () {
  2     ‘use strict‘;
  3
  4     return _.inherit({
  5
  6         propertys: function () {
  7             //这里设置UI的根节点所处包裹层,必须设置
  8             this.$el = null;
  9
 10             //用于定位dom的选择器
 11             this.selector = ‘‘;
 12
 13             //每个moduleView必须有一个父view,页面级容器
 14             this.view = null;
 15
 16             //模板字符串,各个组件不同,现在加入预编译机制
 17             this.template = ‘‘;
 18
 19             //事件机制
 20             this.events = {};
 21
 22             //实体model,跨模块通信的桥梁
 23             this.entity = null;
 24         },
 25
 26         setOption: function (options) {
 27             //这里可以写成switch,开始没有想到有这么多分支
 28             for (var k in options) {
 29                 if (k == ‘events‘) {
 30                     _.extend(this[k], options[k]);
 31                     continue;
 32                 }
 33                 this[k] = options[k];
 34             }
 35             //      _.extend(this, options);
 36         },
 37
 38         //@override
 39         initData: function () {
 40         },
 41
 42         //如果传入了dom便
 43         initWrapper: function (el) {
 44             if (el && el[0]) {
 45                 this.$el = el;
 46                 return;
 47             }
 48             this.$el = this.view.$(this.selector);
 49         },
 50
 51         initialize: function (opts) {
 52
 53             //这种默认属性
 54             this.propertys();
 55             //根据参数重置属性
 56             this.setOption(opts);
 57             this.initData();
 58
 59             this.initWithoutRender();
 60
 61         },
 62
 63         //处理dom已经存在,不需要渲染的情况
 64         initWithoutRender: function () {
 65             if (this.template) return;
 66             var scope = this;
 67             this.view.on(‘onShow‘, function () {
 68                 scope.initWrapper();
 69                 if (!scope.$el[0]) return;
 70                 //如果没有父view则不能继续
 71                 if (!scope.view) return;
 72                 scope.initElement();
 73                 scope.bindEvents();
 74             });
 75         },
 76
 77         $: function (selector) {
 78             return this.$el.find(selector);
 79         },
 80
 81         //实例化需要用到到dom元素
 82         initElement: function () { },
 83
 84         //@override
 85         //收集来自各方的实体组成view渲染需要的数据,需要重写
 86         getViewModel: function () {
 87             throw ‘必须重写‘;
 88         },
 89
 90         _render: function (callback) {
 91             var data = this.getViewModel() || {};
 92             var html = this.template;
 93             if (!this.template) return ‘‘;
 94             //引入预编译机制
 95             if (_.isFunction(this.template)) {
 96                 html = this.template(data);
 97             } else {
 98                 html = _.template(this.template)(data);
 99             }
100             typeof callback == ‘function‘ && callback.call(this);
101             return html;
102         },
103
104         //渲染时必须传入dom映射
105         render: function () {
106             this.initWrapper();
107             if (!this.$el[0]) return;
108
109             //如果没有父view则不能继续
110             if (!this.view) return;
111
112             var html = this._render();
113             this.$el.html(html);
114             this.initElement();
115             this.bindEvents();
116
117         },
118
119         bindEvents: function () {
120             var events = this.events;
121
122             if (!(events || (events = _.result(this, ‘events‘)))) return this;
123             this.unBindEvents();
124
125             // 解析event参数的正则
126             var delegateEventSplitter = /^(\S+)\s*(.*)$/;
127             var key, method, match, eventName, selector;
128
129             // 做简单的字符串数据解析
130             for (key in events) {
131                 method = events[key];
132                 if (!_.isFunction(method)) method = this[events[key]];
133                 if (!method) continue;
134
135                 match = key.match(delegateEventSplitter);
136                 eventName = match[1], selector = match[2];
137                 method = _.bind(method, this);
138                 eventName += ‘.delegateUIEvents‘ + this.id;
139
140                 if (selector === ‘‘) {
141                     this.$el.on(eventName, method);
142                 } else {
143                     this.$el.on(eventName, selector, method);
144                 }
145             }
146
147             return this;
148         },
149
150         unBindEvents: function () {
151             this.$el.off(‘.delegateUIEvents‘ + this.id);
152             return this;
153         }
154     });
155
156 });
数据实体类
这里的数据实体对应着,MVC中的Model,因为之前已经使用model用作了数据请求相关的命名,这里便使用Entity做该工作:
  1 define([], function () {
  2     /*
  3     一些原则:
  4     init方法时,不可引起其它字段update
  5     */
  6     var Entity = _.inherit({
  7         initialize: function (opts) {
  8             this.propertys();
  9             this.setOption(opts);
 10         },
 11
 12         propertys: function () {
 13             //只取页面展示需要数据
 14             this.data = {};
 15
 16             //局部数据改变对应的响应程序,暂定为一个方法
 17             //可以是一个类的实例,如果是实例必须有render方法
 18             this.controllers = {};
 19
 20             this.scope = null;
 21
 22         },
 23
 24         subscribe: function (namespace, callback, scope) {
 25             if (typeof namespace === ‘function‘) {
 26                 scope = callback;
 27                 callback = namespace;
 28                 namespace = ‘update‘;
 29             }
 30             if (!namespace || !callback) return;
 31             if (scope) callback = $.proxy(callback, scope);
 32             if (!this.controllers[namespace]) this.controllers[namespace] = [];
 33             this.controllers[namespace].push(callback);
 34         },
 35
 36         unsubscribe: function (namespace) {
 37             if (!namespace) this.controllers = {};
 38             if (this.controllers[namespace]) this.controllers[namespace] = [];
 39         },
 40
 41         publish: function (namespace, data) {
 42             if (!namespace) return;
 43             if (!this.controllers[namespace]) return;
 44             var arr = this.controllers[namespace];
 45             var i, len = arr.length;
 46             for (i = 0; i < len; i++) {
 47                 arr[i](data);
 48             }
 49         },
 50
 51         setOption: function (opts) {
 52             for (var k in opts) {
 53                 this[k] = opts[k];
 54             }
 55         },
 56
 57         //首次初始化时,需要矫正数据,比如做服务器适配
 58         //@override
 59         handleData: function () { },
 60
 61         //一般用于首次根据服务器数据源填充数据
 62         initData: function (data) {
 63             var k;
 64             if (!data) return;
 65
 66             //如果默认数据没有被覆盖可能有误
 67             for (k in this.data) {
 68                 if (data[k]) this.data[k] = data[k];
 69             }
 70
 71             this.handleData();
 72             this.publish(‘init‘, this.get());
 73         },
 74
 75         //验证data的有效性,如果无效的话,不应该进行以下逻辑,并且应该报警
 76         //@override
 77         validateData: function () {
 78             return true;
 79         },
 80
 81         //获取数据前,可以进行格式化
 82         //@override
 83         formatData: function (data) {
 84             return data;
 85         },
 86
 87         //获取数据
 88         get: function () {
 89             if (!this.validateData()) {
 90                 //需要log
 91                 return {};
 92             }
 93             return this.formatData(this.data);
 94         },
 95
 96         //数据跟新后需要做的动作,执行对应的controller改变dom
 97         //@override
 98         update: function (key) {
 99             key = key || ‘update‘;
100             var data = this.get();
101             this.publish(key, data);
102         }
103
104     });
105
106     return Entity;
107 });
这里的数据实体会以实例的方式注入给模块类实例,他的工作是起一个中枢左右,完成模块之间的通信,反正非常重要就是了
其它
数据请求统一使用abstract.model,数据前端缓存使用abstract.store,这里因为目标是做页面拆分,请求模块不是关键,各位可以把这段代码看层一个简单的ajax即可:
1 this.model.setParam({});
2 this.model.execute(function (data) {
3 });
业务入口
最后简单说下业务入口文件:
 1 (function () {
 2     var project = ‘./‘;
 3     var viewRoot = ‘pages‘;
 4     require.config({
 5         paths: {
 6             //BUS相关模板根目录
 7             IndexPath: project + ‘pages/index‘,
 8             ListPath: project + ‘pages/list‘,
 9
10             BusStore: project + ‘model/bus.store‘,
11             BusModel: project + ‘model/bus.model‘
12         }
13     });
14     require([‘AbstractApp‘, ‘UIHeader‘], function (APP, UIHeader) {
15         window.APP = new APP({
16             UIHeader: UIHeader,
17             viewRootPath: viewRoot
18         });
19         window.APP.initApp();
20     });
21 })();
很简单的代码,指定了下require的path配置,最后我们看看入口页面的调用:
 1 <!doctype html>
 2 <html>
 3 <head>
 4   <meta charset="UTF-8">
 5   <meta name="viewport" content="width=device-width, initial-scale=1, user-scalable=no, minimal-ui" />
 6   <meta content="yes" name="apple-mobile-web-app-capable" />
 7   <meta content="black" name="apple-mobile-web-app-status-bar-style" />
 8   <meta name="format-detection" content="telephone=no" />
 9   <link href="../static/css/global.css" rel="stylesheet" type="text/css" />
10   <title>班次列表</title>
11 </head>
12 <body>
13   <div id="headerview">
14     <div class="cm-header">
15       <h1 class="cm-page-title js_title">
16         正在加载...
17       </h1>
18     </div>
19   </div>
20   <div class="cm-page-wrap">
21     <div class="cm-state" id="js_page_state">
22     </div>
23     <article class="cm-page" id="main">
24     </article>
25   </div>
26   <script type="text/javascript" src="../blade/libs/zepto.js"></script>
27   <script src="../blade/libs/fastclick.js" type="text/javascript"></script>
28   <script type="text/javascript" src="../blade/libs/underscore.js"></script>
29   <script src="../blade/libs/underscore.extend.js" type="text/javascript"></script>
30   <script type="text/javascript" src="../blade/libs/require.js"></script>
31   <script type="text/javascript" src="../blade/common.js"></script>
32   <script type="text/javascript" src="main.js"></script>
33 </body>
34 </html>
35
36 list.html
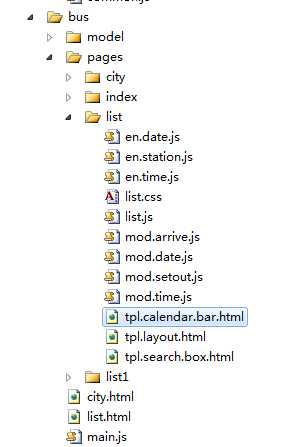
webapp
├─blade //框架目录
│  ├─data
│  ├─libs
│  ├─mvc
│  └─ui
├─bus
│  ├─model //数据请求模块,完全可以使用zepto ajax替换
│  └─pages
│      ├─booking
│      ├─index
│      └─list //demo代码模块
└─static
接下来,让我们真实的开始拆分页面吧。
组件式编程
骨架设计
首先,我们进行最简单的骨架设计,这里依次是其js代码与模板代码:
 1 define([‘AbstractView‘, ‘text!ListPath/list.css‘, ‘text!ListPath/tpl.layout.html‘], function (AbstractView, style, layoutHtml) {
 2     return _.inherit(AbstractView, {
 3         propertys: function ($super) {
 4             $super();
 5             this.style = style;
 6             this.template = layoutHtml;
 7         },
 8
 9         initHeader: function (name) {
10             var title = ‘班次列表‘;
11             this.header.set({
12                 view: this,
13                 title: title
14             });
15         },
16
17         addEvent: function () {
18             this.on(‘onShow‘, function () {
19                 console.log(‘页面渲染结束‘);
20             });
21         }
22     });
23 });
 1 <div class="calendar-bar-wrapper js_calendar_wrapper">
 2     日历工具条模块
 3 </div>
 4 <div class="none-data js_none_data" style="display: none;">
 5     当前暂无班次可预订</div>
 6 <div class="js_list_wrapper">
 7     列表模块
 8 </div>
 9 <div class="js_list_loading" style="display: none; text-align: center; padding: 10px 0;">
10     正在加载...</div>
11 <ul class="bus-tabs list-filter">
12     <li class="tabs-item js_show_setoutdate">
13         <div class="line">
14             <i class="icon-time"></i>出发时段<i class="icon-sec"></i></div>
15         <div class="line js_day_sec">
16             全天</div>
17     </li>
18     <li class="tabs-item js_show_setstation">
19         <div class="line">
20             <i class="icon-circle icon-setout "></i>出发汽车站<i class="icon-sec"></i></div>
21         <div class="line js_start_sec">
22             全部车站</div>
23     </li>
24     <li class="tabs-item js_show_arrivalstation">
25         <div class="line">
26             <i class="icon-circle icon-arrival "></i>到达汽车站<i class="icon-sec"></i></div>
27         <div class="line js_arrival_sec">
28             全部车站</div>
29     </li>
30 </ul>
页面展示如图:
日历工具栏的实现
这里要做的第一步是将日历工具栏模块实现,以数据为先的思考,我们先实现了一个与日历业务有关的数据实体:
 1 define([‘AbstractEntity‘], function (AbstractEntity) {
 2
 3     var Entity = _.inherit(AbstractEntity, {
 4         propertys: function ($super) {
 5             $super();
 6             var n = new Date();
 7             var curTime = new Date(n.getFullYear(), n.getMonth(), n.getDate()).getTime();
 8             this.data = {
 9                 date: curTime,
10                 title: ‘当前日期‘
11             };
12         },
13
14         set: function (date) {
15             if (!date) return;
16             if (_.isDate(date)) date = date.getTime();
17             if (typeof date === ‘string‘) date = parseInt(date);
18             this.data.date = date;
19             this.update();
20         },
21
22         getDateStr: function () {
23             var date = new Date();
24             date.setTime(this.data.date);
25             var dateDetail = _.dateUtil.getDetail(date);
26             var name = dateDetail.year + ‘-‘ + dateDetail.month + ‘-‘ + dateDetail.day + ‘ ‘ + dateDetail.weekday + (dateDetail.day1 ? ‘(‘ + dateDetail.day1 + ‘)‘ : ‘‘);
27             return name;
28         },
29
30         nextDay: function () {
31             this.set(this.getDate() + 86400000);
32             return true;
33         },
34
35         getDate: function () {
36             return parseInt(this.data.date);
37         },
38
39         //是否能够再往前一天
40         canPreDay: function () {
41             var n = new Date();
42             var curTime = new Date(n.getFullYear(), n.getMonth(), n.getDate()).getTime();
43
44             //如果当前日期已经是第一天,则不可预订
45             if (curTime <= this.getDate() - 86400000) {
46                 return true;
47             }
48             return false;
49         },
50
51         preDay: function () {
52             if (!this.canPreDay()) return false;
53             this.set(this.getDate() - 86400000);
54             return true;
55         }
56
57     });
58
59     return Entity;
60 });
里面完成日期工具栏所有相关数据操作,并且不包含实际的业务逻辑。
然后这里开始设计日期工具栏的模块View:
 1 define([‘ModuleView‘, ‘UICalendarBox‘, ‘text!ListPath/tpl.calendar.bar.html‘], function (ModuleView, UICalendarBox, tpl) {
 2     return _.inherit(ModuleView, {
 3
 4         //此处若是要使用model,处实例化时候一定要保证entity的存在,如果不存在便是业务BUG
 5         initData: function () {
 6
 7             this.template = tpl;
 8             this.events = {
 9                 ‘click .js_pre_day‘: ‘preAction‘,
10                 ‘click .js_next_day‘: ‘nextAction‘,
11                 ‘click .js_show_calendar‘: ‘showCalendar‘
12             };
13
14             //初始化时候需要执行的回调
15             this.dateEntity.subscribe(‘init‘, this.render, this);
16             this.dateEntity.subscribe(this.render, this);
17
18         },
19
20         initDate: function () {
21             var t = new Date().getTime();
22             //默认情况下获取当前日期,也有过了18.00就设置为第二天日期
23             //当时一旦url上有startdatetime参数的话,便需要使用之
24             if (_.getUrlParam().startdatetime) t = _.getUrlParam().startdatetime;
25             this.dateEntity.initData({
26                 date: t
27             });
28         },
29
30         getViewModel: function () {
31             var data = this.dateEntity.get();
32             data.formatStr = this.dateEntity.getDateStr();
33             data.canPreDay = this.dateEntity.canPreDay();
34             return data;
35         },
36
37         preAction: function () {
38             if (this.dateEntity.preDay()) return;
39             this.view.showToast(‘前一天不可预订‘);
40         },
41
42         nextAction: function () {
43             this.dateEntity.nextDay();
44         },
45
46         showCalendar: function () {
47             var scope = this, endDate = new Date();
48             var secDate = new Date();
49             secDate.setTime(this.dateEntity.getDate());
50
51             endDate.setTime(new Date().getTime() + 2592000000);
52
53             if (!this.calendar) {
54                 this.calendar = new UICalendarBox({
55                     endTime: endDate,
56                     selectDate: secDate,
57                     onItemClick: function (date, el, e) {
58                         scope.dateEntity.set(date);
59                         this.hide();
60                     }
61                 });
62             } else {
63                 this.calendar.calendar.selectDate = secDate;
64                 this.calendar.calendar.refresh();
65             }
66             this.calendar.show();
67         }
68
69     });
70
71 });
这个组件模块干了几个事情:
① 首先,dateEntity实体需要由list.js这个主view注入
② 这里为dateEntity注册了两个数据响应事件:
1 this.dateEntity.subscribe(‘init‘, this.render, this);
2 this.dateEntity.subscribe(this.render, this);
render方法继承至基类,使用template与数据生成html,其中数据产生必须重写父类一个方法:
1 getViewModel: function () {
2     var data = this.dateEntity.get();
3     data.formatStr = this.dateEntity.getDateStr();
4     data.canPreDay = this.dateEntity.canPreDay();
5     return data;
6 },
因为这里的日历数据,默认取当前时间,但是url参数可能传递日期参数,所以定义了一个数据初始化方法:
1 initDate: function () {
2     var t = new Date().getTime();
3     //默认情况下获取当前日期,也有过了18.00就设置为第二天日期
4     //当时一旦url上有startdatetime参数的话,便需要使用之
5     if (_.getUrlParam().startdatetime) t = _.getUrlParam().startdatetime;
6     this.dateEntity.initData({
7         date: t
8     });
9 },
该方法在主页面渲染结束后会第一时间调用,这个时候日历工具栏便渲染出来,其中日历组件的使用便不予理睬了,主控制器的代码改变如下:
 1 define([
 2     ‘AbstractView‘,
 3     ‘text!ListPath/list.css‘,
 4
 5     ‘ListPath/en.date‘,
 6
 7
 8     ‘ListPath/mod.date‘,
 9
10     ‘text!ListPath/tpl.layout.html‘
11 ], function (
12     AbstractView,
13     style,
14
15     DateEntity,
16
17     DateModule,
18
19     layoutHtml
20 ) {
21     return _.inherit(AbstractView, {
22
23         _initEntity: function () {
24             this.dateEntity = new DateEntity();
25         },
26
27         _initModule: function () {
28             this.dateModule = new DateModule({
29                 view: this,
30                 selector: ‘.js_calendar_wrapper‘,
31                 dateEntity: this.dateEntity
32             });
33         },
34
35         propertys: function ($super) {
36             $super();
37
38             this._initEntity();
39             this._initModule();
40
41             this.style = style;
42             this.template = layoutHtml;
43         },
44
45         initHeader: function (name) {
46             var title = ‘班次列表‘;
47             this.header.set({
48                 view: this,
49                 title: title
50             });
51         },
52
53         addEvent: function () {
54             this.on(‘onShow‘, function () {
55
56                 //初始化date数据
57                 this.dateModule.initDate();
58
59
60             });
61         }
62     });
63
64 });
 1 _initEntity: function () {
 2     this.dateEntity = new DateEntity();
 3 },
 4
 5 _initModule: function () {
 6     this.dateModule = new DateModule({
 7         view: this,
 8         selector: ‘.js_calendar_wrapper‘,
 9         dateEntity: this.dateEntity
10     });
11 },
1 addEvent: function () {
2     this.on(‘onShow‘, function () {
3         //初始化date数据
4         this.dateModule.initDate();
5
6     });
7 }
于是,整个界面变成了这个样子:
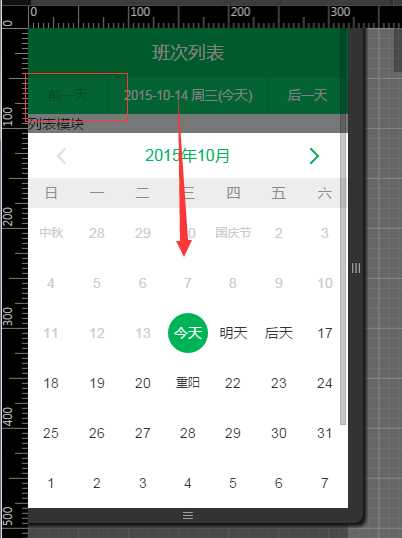
这里是对应的日历工具模板文件tpl.calendar.html:
1 <ul class="bus-tabs calendar-bar">
2     <li class="tabs-item  js_pre_day <%=!canPreDay ? ‘disabled‘ : ‘‘ %>">前一天</li>
3     <li class="tabs-item js_show_calendar" style="-webkit-flex: 2; flex: 2;"><%=formatStr %></li>
4     <li class="tabs-item js_next_day">后一天</li>
5 </ul>
搜索工具栏的实现
我们现在的页面,就算不传任何URL参数,已经能渲染出部分页面了,但是下面出发站汽车等业务数据必须等待班次列表数据请求结束才能替换数据,但是这些数据如果没有出发城市和到达城市是不能发起请求的,所以这里先实现搜索工具栏功能:
在出发城市或者到达城市不存在的话便弹出搜索工具栏,引导用户选择城市,这里新增弹出层需要在主页面控制器(检测主控制器)中使用一个UI组件:
  1 define([
  2     ‘AbstractView‘,
  3     ‘text!ListPath/list.css‘,
  4
  5     ‘ListPath/en.date‘,
  6
  7
  8     ‘ListPath/mod.date‘,
  9
 10     ‘text!ListPath/tpl.layout.html‘,
 11     ‘text!ListPath/tpl.search.box.html‘,
 12     ‘UIScrollLayer‘
 13 ], function (
 14     AbstractView,
 15     style,
 16
 17     DateEntity,
 18
 19     DateModule,
 20
 21     layoutHtml,
 22     searchBoxHtml,
 23     UIScrollLayer
 24 ) {
 25     return _.inherit(AbstractView, {
 26
 27         _initEntity: function () {
 28             this.dateEntity = new DateEntity();
 29         },
 30
 31         _initModule: function () {
 32             this.dateModule = new DateModule({
 33                 view: this,
 34                 selector: ‘.js_calendar_wrapper‘,
 35                 dateEntity: this.dateEntity
 36             });
 37         },
 38
 39         propertys: function ($super) {
 40             $super();
 41
 42             this._initEntity();
 43             this._initModule();
 44
 45             this.style = style;
 46             this.template = layoutHtml;
 47         },
 48
 49         initHeader: function (name) {
 50             var title = ‘班次列表‘;
 51             this.header.set({
 52                 view: this,
 53                 title: title,
 54                 back: function () {
 55                     console.log(‘回退‘);
 56                 },
 57                 right: [
 58                     {
 59                         tagname: ‘search-bar‘,
 60                         value: ‘搜索‘,
 61                         callback: function () {
 62                             console.log(‘弹出搜索框‘);
 63                             this.showSearchBox();
 64                         }
 65                     }
 66                 ]
 67             });
 68         },
 69
 70
 71
 72         //搜索工具弹出层
 73         showSearchBox: function () {
 74             var scope = this;
 75             if (!this.searchBox) {
 76                 this.searchBox = new UIScrollLayer({
 77                     title: ‘请选择搜索条件‘,
 78                     html: searchBoxHtml,
 79                     events: {
 80                         ‘click .js-start‘: function () {
 81
 82                         },
 83                         ‘click .js-arrive‘: function () {
 84
 85                         },
 86                         ‘click .js_search_list‘: function () {
 87
 88                             console.log(‘查询列表‘);
 89                         }
 90                     }
 91                 });
 92             }
 93             this.searchBox.show();
 94         },
 95
 96         addEvent: function () {
 97             this.on(‘onShow‘, function () {
 98                 //初始化date数据
 99                 this.dateModule.initDate();
100
101                 //这里判断是否需要弹出搜索弹出层
102                 if (!_.getUrlParam().startcityid || !_.getUrlParam().arrivalcityid) {
103                     this.showSearchBox();
104                     return;
105                 }
106
107
108             });
109         }
110     });
111
112 });
对应搜索弹出层html模板:
 1 <div class="c-row search-line" data-flag="start">
 2     <div class="c-span3">
 3         出发</div>
 4     <div class="c-span9 js-start search-line-txt">
 5         请选择出发地</div>
 6 </div>
 7 <div class="c-row search-line" data-flag="arrive">
 8     <div class="c-span3">
 9         到达</div>
10     <div class="c-span9 js-arrive search-line-txt">
11         请选择到达地</div>
12 </div>
13 <div class="c-row " data-flag="arrive">
14     <span class="btn-primary full-width js_search_list">查询</span>
15 </div>
这里核心代码是:
 1 //搜索工具弹出层
 2 showSearchBox: function () {
 3     var scope = this;
 4     if (!this.searchBox) {
 5         this.searchBox = new UIScrollLayer({
 6             title: ‘请选择搜索条件‘,
 7             html: searchBoxHtml,
 8             events: {
 9                 ‘click .js-start‘: function () {
10
11                 },
12                 ‘click .js-arrive‘: function () {
13
14                 },
15                 ‘click .js_search_list‘: function () {
16
17                     console.log(‘查询列表‘);
18                 }
19             }
20         });
21     }
22     this.searchBox.show();
23 },
于是当URL什么参数都没有的时候,就会弹出这个搜索框
这里也迎来了一个难点,因为城市列表事实上应该是一个独立的可访问的页面,但是这里是想用弹出层的方式调用他,所以我在APP层实现了一个方法可以用弹出层的方式调起一个独立的页面。
注意:
这里city城市列表未完全采用组件化的方式开发,有兴趣的朋友可以自己尝试着开发
这里有一个不同的地方是,因为我们点击查询的时候才会做实体数据更新,这里是单纯的做DOM操作了,这里不设置数据实体一个原因就是:
这个搜索弹出层是一个页面级DOM之外的部分,数据实体变化一般只应该影响Page级别的DOM,除非真的有两个页面级View会公用一个数据实体。
  1 define([
  2     ‘AbstractView‘,
  3     ‘text!ListPath/list.css‘,
  4
  5     ‘ListPath/en.date‘,
  6
  7
  8     ‘ListPath/mod.date‘,
  9
 10     ‘text!ListPath/tpl.layout.html‘,
 11     ‘text!ListPath/tpl.search.box.html‘,
 12     ‘UIScrollLayer‘
 13 ], function (
 14     AbstractView,
 15     style,
 16
 17     DateEntity,
 18
 19     DateModule,
 20
 21     layoutHtml,
 22     searchBoxHtml,
 23     UIScrollLayer
 24 ) {
 25     return _.inherit(AbstractView, {
 26
 27         _initEntity: function () {
 28             this.dateEntity = new DateEntity();
 29
 30
 31         },
 32
 33         _initModule: function () {
 34             this.dateModule = new DateModule({
 35                 view: this,
 36                 selector: ‘.js_calendar_wrapper‘,
 37                 dateEntity: this.dateEntity
 38             });
 39
 40         },
 41
 42         propertys: function ($super) {
 43             $super();
 44
 45             this._initEntity();
 46             this._initModule();
 47
 48             this.style = style;
 49             this.template = layoutHtml;
 50
 51             //主控制器业务属性
 52             this.urlData = {
 53                 start: {},
 54                 end: {}
 55             };
 56
 57
 58         },
 59
 60         initHeader: function (name) {
 61             var title = ‘班次列表‘;
 62             this.header.set({
 63                 view: this,
 64                 title: title,
 65                 back: function () {
 66                     console.log(‘回退‘);
 67                 },
 68                 right: [
 69                     {
 70                         tagname: ‘search-bar‘,
 71                         value: ‘搜索‘,
 72                         callback: function () {
 73                             console.log(‘弹出搜索框‘);
 74                             this.showSearchBox();
 75                         }
 76                     }
 77                 ]
 78             });
 79         },
 80
 81         //搜索工具弹出层
 82         showSearchBox: function () {
 83             var scope = this;
 84             if (!this.searchBox) {
 85                 this.searchBox = new UIScrollLayer({
 86                     title: ‘请选择搜索条件‘,
 87                     html: searchBoxHtml,
 88                     events: {
 89                         ‘click .js-start‘: function (e) {
 90                             scope._showCityView(‘start‘, $(e.currentTarget));
 91                         },
 92                         ‘click .js-arrive‘: function (e) {
 93                             scope._showCityView(‘end‘, $(e.currentTarget));
 94                         },
 95                         ‘click .js_search_list‘: function () {
 96                             var param = {};
 97
 98                             if (!scope.urlData.start.id) {
 99                                 scope.showToast(‘请先选择出发城市‘);
100                                 return;
101                             }
102
103                             if (!scope.urlData.end.id) {
104                                 scope.showToast(‘请先选择到达城市‘);
105                                 return;
106                             }
107
108                             //这里一定会有出发城市与到达城市等数据
109                             param.startcityid = scope.urlData.start.id;
110                             param.arrivalcityid = scope.urlData.end.id;
111                             param.startdatetime = scope.dateEntity.getDate();
112                             param.startname = scope.urlData.start.name;
113                             param.arrivename = scope.urlData.end.name;
114
115                             if (scope.urlData.start.station) {
116                                 param.startstationid = scope.urlData.start.station
117                             }
118
119                             if (scope.urlData.end.station) {
120                                 param.arrivalstationid = end_station
121                             }
122
123                             scope.forward(‘list‘, param);
124                             this.hide();
125                         }
126                     }
127                 });
128             }
129             this.searchBox.show();
130         },
131
132         _showCityView: function (key, el) {
133             var scope = this;
134
135             if (key == ‘end‘) {
136                 //因为到达车站会依赖出发车站的数据,所以这里得先做判断
137                 if (!this.urlData.start.id) {
138                     this.showToast(‘请先选择出发城市‘);
139                     return;
140                 }
141             }
142
143             this.showPageView(‘city‘, {
144                 flag: key,
145                 startId: this.urlData.start.id,
146                 type: this.urlData.start.type,
147                 onCityItemClick: function (id, name, station, type) {
148                     scope.urlData[key] = {};
149                     scope.urlData[key][‘id‘] = id;
150                     scope.urlData[key][‘type‘] = type;
151                     scope.urlData[key][‘name‘] = name;
152                     if (station) scope.urlData[key][‘name‘] = station;
153                     el.text(name);
154                     scope.hidePageView();
155                 },
156                 onBackAction: function () {
157                     scope.hidePageView();
158                 }
159             });
160         },
161
162         addEvent: function () {
163             this.on(‘onShow‘, function () {
164                 //初始化date数据
165                 this.dateModule.initDate();
166
167                 //这里判断是否需要弹出搜索弹出层
168                 if (!_.getUrlParam().startcityid || !_.getUrlParam().arrivalcityid) {
169                     this.showSearchBox();
170                     return;
171                 }
172
173             });
174         }
175     });
176
177 });
搜索功能完成后,我们这里便可以进入真正的数据请求功能渲染列表了。
其余模块
在实现数据请求之前,我按照日期模块的方式将下面三个模块的功能也一并完成了,这里唯一不同的是,这些模块的DOM已经存在,我们不需要渲染了,完成后的代码大概是这样的:
  1 define([
  2     ‘AbstractView‘,
  3     ‘text!ListPath/list.css‘,
  4
  5     ‘ListPath/en.station‘,
  6     ‘ListPath/en.date‘,
  7     ‘ListPath/en.time‘,
  8
  9     ‘ListPath/mod.date‘,
 10     ‘ListPath/mod.time‘,
 11     ‘ListPath/mod.setout‘,
 12     ‘ListPath/mod.arrive‘,
 13
 14     ‘text!ListPath/tpl.layout.html‘,
 15     ‘text!ListPath/tpl.search.box.html‘,
 16     ‘UIScrollLayer‘
 17 ], function (
 18     AbstractView,
 19     style,
 20
 21     StationEntity,
 22     DateEntity,
 23     TimeEntity,
 24
 25     DateModule,
 26     TimeModule,
 27     SetoutModule,
 28     ArriveModule,
 29
 30     layoutHtml,
 31     searchBoxHtml,
 32     UIScrollLayer
 33 ) {
 34     return _.inherit(AbstractView, {
 35
 36         _initEntity: function () {
 37             this.dateEntity = new DateEntity();
 38
 39             this.timeEntity = new TimeEntity();
 40             this.timeEntity.subscribe(‘init‘, this.renderTime, this);
 41             this.timeEntity.subscribe(this.renderTime, this);
 42
 43             this.setoutEntity = new StationEntity();
 44             this.setoutEntity.subscribe(‘init‘, this.renderSetout, this);
 45             this.setoutEntity.subscribe(this.renderSetout, this);
 46
 47             this.arriveEntity = new StationEntity();
 48             this.arriveEntity.subscribe(‘init‘, this.renderArrive, this);
 49             this.arriveEntity.subscribe(this.renderArrive, this);
 50
 51         },
 52
 53         _initModule: function () {
 54             this.dateModule = new DateModule({
 55                 view: this,
 56                 selector: ‘.js_calendar_wrapper‘,
 57                 dateEntity: this.dateEntity
 58             });
 59
 60             this.timeModule = new TimeModule({
 61                 view: this,
 62                 selector: ‘.js_show_setoutdate‘,
 63                 timeEntity: this.timeEntity
 64             });
 65
 66             this.setOutModule = new SetoutModule({
 67                 view: this,
 68                 selector: ‘.js_show_setstation‘,
 69                 setoutEntity: this.setoutEntity
 70             });
 71
 72             this.arriveModule = new ArriveModule({
 73                 view: this,
 74                 selector: ‘.js_show_arrivalstation‘,
 75                 arriveEntity: this.arriveEntity
 76             });
 77
 78         },
 79
 80         propertys: function ($super) {
 81             $super();
 82
 83             this._initEntity();
 84             this._initModule();
 85
 86             this.style = style;
 87             this.template = layoutHtml;
 88
 89             //主控制器业务属性
 90             this.urlData = {
 91                 start: {},
 92                 end: {}
 93             };
 94
 95
 96         },
 97
 98         initHeader: function (name) {
 99             var title = ‘班次列表‘;
100             this.header.set({
101                 view: this,
102                 title: title,
103                 back: function () {
104                     console.log(‘回退‘);
105                 },
106                 right: [
107                     {
108                         tagname: ‘search-bar‘,
109                         value: ‘搜索‘,
110                         callback: function () {
111                             console.log(‘弹出搜索框‘);
112                             this.showSearchBox();
113                         }
114                     }
115                 ]
116             });
117         },
118
119         initElement: function () {
120             this.d_list_wrapper = this.$(‘.js_list_wrapper‘);
121             this.d_none_data = this.$(‘.js_none_data‘);
122
123             this.d_js_show_setoutdate = this.$(‘.js_show_setoutdate‘);
124             this.d_js_show_setstation = this.$(‘.js_show_setstation‘);
125             this.d_js_show_arrivalstation = this.$(‘.js_show_arrivalstation‘);
126             this.d_js_list_loading = this.$(‘.js_list_loading‘);
127             this.d_js_tabs = this.$(‘.js_tabs‘);
128
129             this.d_js_day_sec = this.$(‘.js_day_sec‘);
130             this.d_js_start_sec = this.$(‘.js_start_sec‘);
131             this.d_js_arrival_sec = this.$(‘.js_arrival_sec‘);
132         },
133
134         //搜索工具弹出层
135         showSearchBox: function () {
136             var scope = this;
137             if (!this.searchBox) {
138                 this.searchBox = new UIScrollLayer({
139                     title: ‘请选择搜索条件‘,
140                     html: searchBoxHtml,
141                     events: {
142                         ‘click .js-start‘: function (e) {
143                             scope._showCityView(‘start‘, $(e.currentTarget));
144                         },
145                         ‘click .js-arrive‘: function (e) {
146                             scope._showCityView(‘end‘, $(e.currentTarget));
147                         },
148                         ‘click .js_search_list‘: function () {
149                             var param = {};
150
151                             if (!scope.urlData.start.id) {
152                                 scope.showToast(‘请先选择出发城市‘);
153                                 return;
154                             }
155
156                             if (!scope.urlData.end.id) {
157                                 scope.showToast(‘请先选择到达城市‘);
158                                 return;
159                             }
160
161                             //这里一定会有出发城市与到达城市等数据
162                             param.startcityid = scope.urlData.start.id;
163                             param.arrivalcityid = scope.urlData.end.id;
164                             param.startdatetime = scope.dateEntity.getDate();
165                             param.startname = scope.urlData.start.name;
166                             param.arrivename = scope.urlData.end.name;
167
168                             if (scope.urlData.start.station) {
169                                 param.startstationid = scope.urlData.start.station
170                             }
171
172                             if (scope.urlData.end.station) {
173                                 param.arrivalstationid = end_station
174                             }
175
176                             scope.forward(‘list‘, param);
177                             this.hide();
178                         }
179                     }
180                 });
181             }
182             this.searchBox.show();
183         },
184
185         _showCityView: function (key, el) {
186             var scope = this;
187
188             if (key == ‘end‘) {
189                 //因为到达车站会依赖出发车站的数据,所以这里得先做判断
190                 if (!this.urlData.start.id) {
191                     this.showToast(‘请先选择出发城市‘);
192                     return;
193                 }
194             }
195
196             this.showPageView(‘city‘, {
197                 flag: key,
198                 startId: this.urlData.start.id,
199                 type: this.urlData.start.type,
200                 onCityItemClick: function (id, name, station, type) {
201                     scope.urlData[key] = {};
202                     scope.urlData[key][‘id‘] = id;
203                     scope.urlData[key][‘type‘] = type;
204                     scope.urlData[key][‘name‘] = name;
205                     if (station) scope.urlData[key][‘name‘] = station;
206                     el.text(name);
207                     scope.hidePageView();
208                 },
209                 onBackAction: function () {
210                     scope.hidePageView();
211                 }
212             });
213         },
214
215         //初始化出发车站,该数据会随着数据加载结束而变化
216         //如果url具有出发站名称以及id,需要特殊处理
217         initSetoutEntity: function () {
218             var data = {};
219             if (_.getUrlParam().startstationid) {
220                 //出发车站可能并没有传,兼容老代码
221                 data.name = _.getUrlParam().startname || ‘全部车站‘;
222                 data.id = _.getUrlParam().startstationid;
223             }
224
225             this.setoutEntity.initData(data, data.id);
226         },
227
228         //初始化到达站
229         initArriveEntity: function () {
230
231             var data = {};
232             if (_.getUrlParam().arrivalstationid) {
233                 //出发车站可能并没有传,兼容老代码
234                 data.name = _.getUrlParam().arrivename || ‘全部车站‘;
235                 data.id = _.getUrlParam().arrivalstationid;
236             }
237
238             this.arriveEntity.initData(data, data.id);
239         },
240
241         //时段只有变化时候才具有显示状态
242         renderTime: function () {
243             var name = this.timeEntity.getName();
244             this.d_js_day_sec.html(name);
245         },
246
247         renderSetout: function () {
248             var name = this.setoutEntity.getName();
249             this.d_js_start_sec.html(name);
250         },
251
252         renderArrive: function () {
253             var name = this.arriveEntity.getName();
254             this.d_js_arrival_sec.html(name);
255         },
256
257         addEvent: function () {
258             this.on(‘onShow‘, function () {
259                 //初始化date数据
260                 this.dateModule.initDate();
261
262                 //这里判断是否需要弹出搜索弹出层
263                 if (!_.getUrlParam().startcityid || !_.getUrlParam().arrivalcityid) {
264                     this.showSearchBox();
265                     return;
266                 }
267
268                 //初始化时段选择
269                 this.timeEntity.initData();
270                 this.initSetoutEntity();
271                 this.initArriveEntity();
272
273             });
274         }
275     });
276
277 });
这个时候整个逻辑结构大概出来了:
注意:
因为该文耗时过长,导致我现在体力有点虚脱,所以这里的代码不一定最优
最后功能:
到此,demo结束了,最后形成的目录:
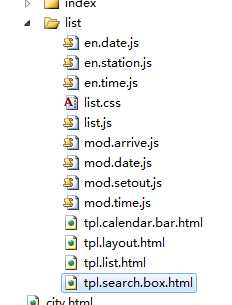
一个js便可以拆分成这么多的小组件模块,如果是更加复杂的页面,这里的文件会很多,比如订单填写页的组件模块是这里的三倍。
组件化的优缺点
组件化带来的几个优点十分明显:
① 组件化拆分,使得主控制业务逻辑清晰简单
② 各个业务组件模块功能相对独立,可维护性可测试性大大提升
③ 组件之间可以任意组合,有一定可重用性
④ 增删模块不会怕打断骨头连着筋
⑤ 一个业务模块所需代码全部在一个目录,比较好操作(有点凑数嫌疑)
缺点
事实上,组件化不会带来什么不足,对于不了解的朋友可能会认为代码复杂度有所增加,其实不这样做代码才真正叫一个难呢!
真正的美中不足的要挑一个毛病的话,这种分拆可能会比单个文件代码量稍大
从性能优化角度看组件化
无论什么前端优化,最后的瓶颈一定是在请求量上做文章:压缩、缓存、仅仅做首屏渲染、将jQuery缓存zepto......
说都会说,但是很多场景由不得你那样做,项目足够复杂,而UI又提供给了不同团队使用的话,有一天前端做了一次UI优化,而如何将这次UI优化反应到线上才是考验架构设计的时候,如果是不好的设计的话,想将这次优化推上线,会发生两个事情:
① 业务团队大改代码
② 框架资源(js&css)膨胀
这种头疼的问题是一般人做优化考虑不到的,而业务团队不会因为你的更新而去修改代码,所以一般会以代码膨胀为代价将这次优化强推上线,那往往会让情况更加复杂:
新老代码融合,半年后你根本不知道哪些代码可以删,哪些代码可以留,很大时候这个问题会体现在具有公共特性的CSS中
如果你的CSS同时服务于多个团队,而各个团队的框架版本不一致,那么UI升级对你来说可能是一个噩梦!
如果你想做第三轮的UI升级,那还是算了吧......
事实上,我评价一个前端是否足够厉害,往往就会从这里考虑:
当一个项目足够复杂后,你私下做好了优化,但是你的优化代码不能无缝的让业务团队使用,而需要业务团队做很多改变,你如何解决这种问题
很多前端做一个优化,便是重新做了一个东西,刚开始肯定比线上的好,但半年后,那个代码质量还未必有以前的好呢,所以我们这里应该解决的是:
如何设计一个机制,让业务团队以最小的修改,而可以用上新的UI(样式、特性),而不会增加CSS(JS)体积
这个可能是组件化真正要解决的事情!
理想情况下,一个H5的资源组成情况是这样的:
① 公共核心CSS文件(200行左右)
② 框架核心文件(包含框架核心和第三方库)
③ UI组件(有很多独立的UI组件组成,每个UI组件又包含完整的HTML&CSS)
④ 公共业务模块(提供业务级别公共服务,比如登录、城市列表等业务相关功能)
⑤ 业务频道一个页面,也就是我们这里的list页的代码
因为框架核心一般来说是不经常改变的,就算改变也是对表现层透明的,UI采用增量与预加载机制,这样做会对后续样式升级,UI升级有莫大的好处,而业务组件化后本身要做什么滚动加载也是轻而易举
好的前端架构设计应该满足不停的UI升级需求,而不增加业务团队下载量
结语
本文就如何分解复杂的前端页面提出了一些自己的想法,并且给予了实现,希望对各位有所帮助。
关于合并
前端代码有分拆就有合并,因为最终一个完整的页面需要所有资源才能运行,但考虑到此文已经很长了,关于合并一块的工作留待下文分析吧
关于代码
为了方便各位理解组件化开发的思想,我这里写了一个完整的demo帮助各位分析,由于精力有限,代码难免会有BUG,各位多多包涵:
https://github.com/yexiaochai/mvc
可能会浏览的代码:
https://github.com/yexiaochai/blade
重要的事情
最后,我的微博粉丝及其少,如果您觉得这篇博客对您哪怕有一丝丝的帮助,微博求粉博客求赞!!!