标签:activity 效果 cti layerlist image 利用 lis blog sch
https://blog.csdn.net/u014695188/article/details/52815444
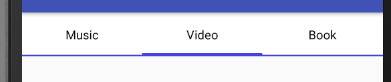
使用layer-list可以将多个drawable按照顺序层叠在一起显示,默认情况下,所有的item中的drawable都会自动根据它附上view的大小而进行缩放。巧妙的利用此Drawable,我们可以实现丰富的效果。
TabDrawable
<?xml version="1.0" encoding="utf-8"?>
<selector xmlns:android="http://schemas.android.com/apk/res/android">
    <!--非选中状态下的Drawable-->
    <item android:state_checked="false">
        <!--蓝色衬底-->
        <layer-list>
            <item>
                <color android:color="#4144d6" />
            </item>
            <!--白色覆盖蓝色衬底,同时向上偏移一些,漏出下面的蓝色衬底-->
            <item android:bottom="2dp">
                <color android:color="#FFF" />
            </item>
        </layer-list>
    </item>
    <!--选中状态下的Drawable-->
    <item android:state_checked="true">
        <layer-list>
            <!--蓝色衬底-->
            <item>
                <color android:color="#4144d6" />
            </item>
            <!--
            白色覆盖蓝色衬底,
            同时向上偏移一些,漏出下面的蓝色衬底
            选中状态下的蓝色衬底要比非选中状态下的蓝色衬底要多一些
            以视区别
            -->
            <item android:bottom="4dp">
                <color android:color="#FFF" />
            </item>
        </layer-list>
    </item>

</selector>
Activity的布局文件
<?xml version="1.0" encoding="utf-8"?>
<LinearLayout xmlns:android="http://schemas.android.com/apk/res/android"
    xmlns:app="http://schemas.android.com/apk/res-auto"
    xmlns:tools="http://schemas.android.com/tools"
    android:layout_width="match_parent"
    android:layout_height="match_parent"
    android:orientation="horizontal"
    tools:context="com.example.it.studynotification.MainActivity">

    <RadioGroup
        android:layout_width="match_parent"
        android:layout_height="wrap_content"
        android:orientation="horizontal">

        <RadioButton
            android:layout_width="0dp"
            android:layout_height="50dp"
            android:layout_weight="1"
            android:background="@drawable/tab"
            android:button="@null"
            android:checked="false"
            android:gravity="center"
            android:text="Music" />

        <RadioButton
            android:layout_width="0dp"
            android:layout_height="50dp"
            android:layout_weight="1"
            android:background="@drawable/tab"
            android:button="@null"
            android:checked="false"
            android:gravity="center"
            android:text="Video" />

        <RadioButton
            android:layout_width="0dp"
            android:layout_height="50dp"
            android:layout_weight="1"
            android:background="@drawable/tab"
            android:button="@null"
            android:checked="false"
            android:gravity="center"
            android:text="Book" />
    </RadioGroup>
</LinearLayout>

<?xml version="1.0" encoding="utf-8"?>
<layer-list xmlns:android="http://schemas.android.com/apk/res/android">
    <!--灰色的衬底,用来当做阴影-->
    <item>
        <shape>
            <corners android:radius="10dp" />
            <solid android:color="#eddfdf" />
        </shape>
    </item>
    <!--
    使用粉色将灰色覆盖的同时露出一点灰色
    形成阴影效果
    -->
    <item android:bottom="5dp">
        <shape>
            <corners android:radius="10dp" />
            <solid android:color="#efbcbc" />
        </shape>
    </item>
</layer-list>
系统的Drawable(四)-LayerListDrawable
标签:activity 效果 cti layerlist image 利用 lis blog sch
原文地址:https://www.cnblogs.com/slyfox/p/9331105.html