标签:更改 root systemctl 团队 inux ble google content 就是
目录[TOC]
Linus在1991年创建了开源的Linux,从此全世界的工程师参与了Linux的开发,期初Linus是通过手动diff的方式进行代码审核和合并的,后来BitKeeper的东家BitMover公司出于人道主义精神,授权Linux社区免费使用这个版本控制系统。安定团结的大好局面在2005年就被打破了,原因是Linux社区牛人聚集,不免沾染了一些梁山好汉的江湖习气。开发Samba的Andrew试图破解BitKeeper的协议(这么干的其实也不只他一个),被BitMover公司发现了(监控工作做得不错!),于是BitMover公司怒了,要收回Linux社区的免费使用权。Linus花了两周时间自己用C写了一个分布式版本控制系统,这就是Git!一个月之内,Linux系统的源码已经由Git管理了!如果当时BitMover公司专门为Linux发布一个社区版,也许这家公司也就名垂青史了,可是当时这家公司思想境界没那么高而且Linus也那么牛!
niko@niko-notebook:~$ sudo apt install git -y基本就是一路Next最后Finsh。
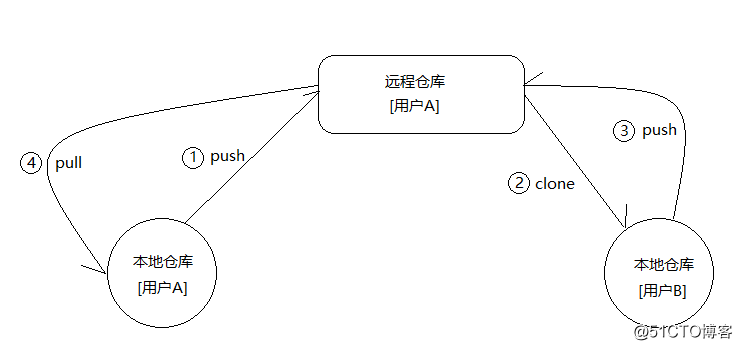
假定存在用户A和用户B,用户A创建了一个远程仓库,然后远程仓库clone到本地,进行开发完成以后push到远程仓库。同时用户B也在开发这个项目,首先用户B将远程仓库clone到本地进行开发,完成后push到远程仓库,同时用户A再pull远程仓库代码同步项目。
假定存在两个开发团队A和B,开发团队A的每个成员都拥有一个本地版本库,但是需要开发团队B协助开发,那么开发团队会先fork一个远程仓库,接着开发团队B的成员分别clone副本远程仓库到本地进行开发,然后push到副本远程仓库。完成后,开发团队B向开发团队A发出一个pull request请求,项目通过审核之后开发团队A再merge副本库到原始远程库,完成功能合并。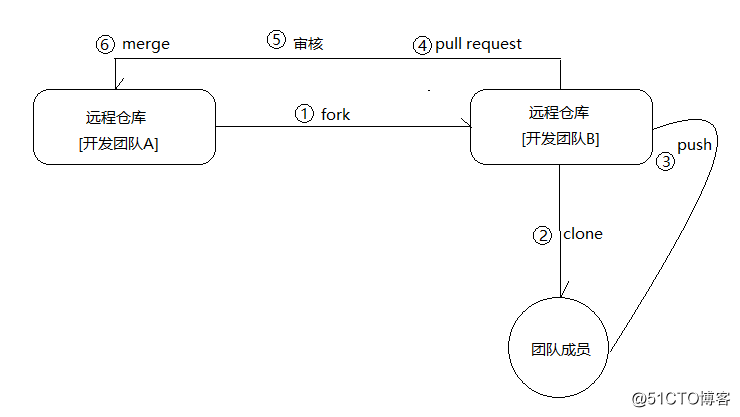
使用git init命令初始化一个新的项目
niko@niko-notebook:~$ git init StudyGit
Initialized empty Git repository in /home/niko/StudyGit/.git/使用git init命令开始管理一个现有的项目
niko@niko-notebook:~$ mkdir StydyGit
niko@niko-notebook:~$ cd StydyGit/
niko@niko-notebook:~/StydyGit$ git init
Initialized empty Git repository in /home/niko/StydyGit/.git/
使用Git管理一个项目的时候会创建一下文件和目录
niko@niko-notebook:~$ tree StudyGit -a
StudyGit
└── .git
  ├── HEAD
  ├── branches
  ├── config
  ├── description
  ├── hooks
  │?? ├── applypatch-msg.sample
  │?? ├── commit-msg.sample
  │?? ├── fsmonitor-watchman.sample
  │?? ├── post-update.sample
  │?? ├── pre-applypatch.sample
  │?? ├── pre-commit.sample
  │?? ├── pre-push.sample
  │?? ├── pre-rebase.sample
  │?? ├── pre-receive.sample
  │?? ├── prepare-commit-msg.sample
  │?? └── update.sample
  ├── info
  │?? └── exclude
  ├── objects
  │?? ├── info
  │?? └── pack
  └── refs
      ├── heads
      └── tags

10 directories, 15 files在Git中有4个区,分别是工作区、暂存区、本地库、远程库。我们项目开发就是在工作区工作,然后使用git add命令将工作区的代码提交到暂存区,使用git commit命令将暂存区的文件提交到本地库。Git的有一个代码托管中心是GitHub,同样国内还有Google Code,码云等。
设置Git签名
项目级别(本地)
niko@niko-notebook:~/StydyGit$ git config user.name niko
niko@niko-notebook:~/StydyGit$ git config user.email niko@163.com
系统级别(全局)
niko@niko-notebook:~/StydyGit$ git config --global user.name xvge
niko@niko-notebook:~/StydyGit$ git config --global user.email xvge@163.com
签名优先级
就近原则:项目优先级高于系统优先级项目级别的配置信息存放到项目目录的.git/config文件中:
niko@niko-notebook:~/StydyGit$ cat .git/config[core]
repositoryformatversion = 0
filemode = true
bare = false
logallrefupdates = true
[user]
name = niko
email = niko@163.com项目级别的配置信息存放到系统用户目录的.gitconfig文件中:
niko@niko-notebook:~/StydyGit$ cat ~/.gitconfig[user]
name = xvge
email = xvge@163.com查看当前工作区的状态(git status)
niko@niko-notebook:~/StydyGit$ git status
On branch master   # 当前所处的分支

No commits yet

nothing to commit (create/copy files and use "git add" to track)
当创建一个新文件的时候,这个新的文件处于未被跟踪的状态:
niko@niko-notebook:~/StydyGit$ echo "Hello, Git." > file.txt  # 创建一个文件
niko@niko-notebook:~/StydyGit$ git status
On branch master

No commits yet

Untracked files:   # 列出未被追踪的文件
(use "git add <file>..." to include in what will be committed)

      file.txt

nothing added to commit but untracked files present (use "git add" to track)将工作区的文件提交到暂存区,使得Git可以跟踪新文件(git add)
niko@niko-notebook:~/StydyGit$ git add .
niko@niko-notebook:~/StydyGit$ git status
On branch master

No commits yet

Changes to be committed:    # 列出更改的文件
(use "git rm --cached <file>..." to unstage)

new file: file.txt将暂存区的文件提交到本地库(git commit)
niko@niko-notebook:~/StydyGit$ git commit -m "add file.txt"
[master (root-commit) 5f9adfe] add file.txt
 1 file changed, 1 insertion(+)
create mode 100644 file.txt查看提交日志(git log)
niko@niko-notebook:~/StydyGit$ git log
commit e6442a41c339e0fd6d01656cbea24775471ee1ed (HEAD -> master)  # HEAD表示当前版本
Author: niko <niko@163.com>
Date:   Mon Sep 24 12:34:38 2018 +0800

    modifiy file.txt  # 提交的注释信息

commit 5f9adfeade857255ef647f855899965274a5fe95   # 40为16进制SHA-256值
Author: niko <niko@163.com>
Date:   Mon Sep 24 12:16:20 2018 +0800

add file.txt查看提交日志(git log)
多次修改后的
git log
niko@niko-notebook:~/StydyGit$ git log
commit b4a54420dcea8d480b80797e032d8ed74b430a97 (HEAD -> master)
Author: niko <niko@163.com>
Date:   Mon Sep 24 12:40:27 2018 +0800

    modifiy file.txt

commit 17acb2424f04c7ec0298e0c59039d19bce8369b6
Author: niko <niko@163.com>
Date:   Mon Sep 24 12:39:08 2018 +0800

    add file3.txt

commit 80cbf7f5c44e0507439bd97a8976d28b746f4f45
Author: niko <niko@163.com>
Date:   Mon Sep 24 12:38:26 2018 +0800

    add file2.txt

commit e6442a41c339e0fd6d01656cbea24775471ee1ed
Author: niko <niko@163.com>
Date:   Mon Sep 24 12:34:38 2018 +0800

    modifiy file.txt

commit 5f9adfeade857255ef647f855899965274a5fe95
Author: niko <niko@163.com>
Date:   Mon Sep 24 12:16:20 2018 +0800

    add file.txt
使用
git log --pretty=oneline
niko@niko-notebook:~/StydyGit$ git log --pretty=oneline
b4a54420dcea8d480b80797e032d8ed74b430a97 (HEAD -> master) modifiy file.txt
17acb2424f04c7ec0298e0c59039d19bce8369b6 add file3.txt
80cbf7f5c44e0507439bd97a8976d28b746f4f45 add file2.txt
e6442a41c339e0fd6d01656cbea24775471ee1ed modifiy file.txt
5f9adfeade857255ef647f855899965274a5fe95 add file.txt
使用
git log --oneline
niko@niko-notebook:~/StydyGit$ git log --oneline
b4a5442 (HEAD -> master) modifiy file.txt
17acb24 add file3.txt
80cbf7f add file2.txt
e6442a4 modifiy file.txt
5f9adfe add file.txt
使用
git reflog
niko@niko-notebook:~/StydyGit$ git reflog
b4a5442 (HEAD -> master) HEAD@{0}: commit: modifiy file.txt
17acb24 HEAD@{1}: commit: add file3.txt
80cbf7f HEAD@{2}: commit: add file2.txt
e6442a4 HEAD@{3}: commit: modifiy file.txt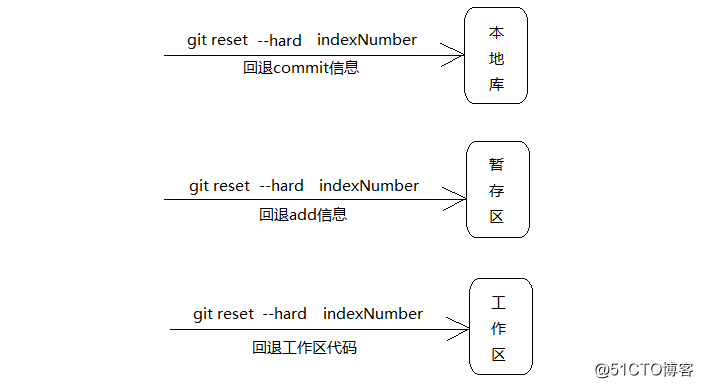
5f9adfe HEAD@{4}: commit (initial): add file.txt版本回退(git reset)
参数:
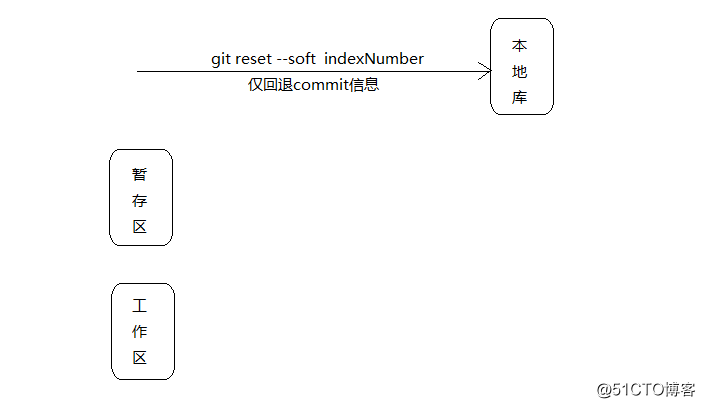
git reset --soft 回退本地库
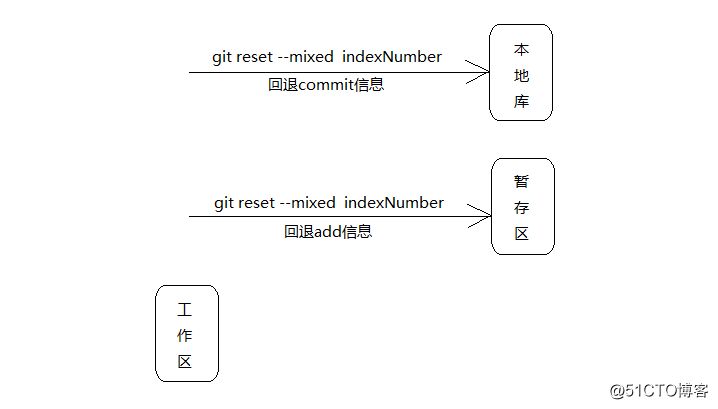
git reset --mixed 默认,回退暂存区、本地库
git reset --hard 回退暂存区、工作区、本地库
niko@niko-notebook:~/StydyGit$ git reset 80cbf7f
git reset --soft图示
git reset --mixed图示
git reset --hard图示
找回文件(git reset)
niko@niko-notebook:~/StydyGit$ ls    # 查看file2.txt文件是否存在
file.txt  file2.txt  file3.txt
niko@niko-notebook:~/StydyGit$ rm -rf file2.txt   # 删除file2.txt文件
niko@niko-notebook:~/StydyGit$ ls   # 确保file2.txt文件已经删除
file.txt  file3.txt
niko@niko-notebook:~/StydyGit$ git status  # 查看文件跟踪状态
On branch master
Changes not staged for commit:
(use "git add/rm <file>..." to update what will be committed)
(use "git checkout -- <file>..." to discard changes in working directory)

      deleted:    file2.txt

no changes added to commit (use "git add" and/or "git commit -a")
niko@niko-notebook:~/StydyGit$ git add .   # 跟踪当前状态
niko@niko-notebook:~/StydyGit$ git commit -m "del file2.txt"  # 将代码提交到本地库
[master db6e563] del file2.txt
1 file changed, 1 deletion(-)
delete mode 100644 file2.txt
niko@niko-notebook:~/StydyGit$ git reflog   # 查看形成一个版本信息db6e563
db6e563 (HEAD -> master) HEAD@{0}: commit: del file2.txt
bcf8ce2 HEAD@{1}: commit: first reset
80cbf7f HEAD@{2}: reset: moving to 80cbf7f
b4a5442 HEAD@{3}: commit: modifiy file.txt
17acb24 HEAD@{4}: commit: add file3.txt
80cbf7f HEAD@{5}: commit: add file2.txt
e6442a4 HEAD@{6}: commit: modifiy file.txt
5f9adfe HEAD@{7}: commit (initial): add file.txt
niko@niko-notebook:~/StydyGit$ git reset --hard bcf8ce2  # 回退到上一个版本
HEAD is now at bcf8ce2 first reset
niko@niko-notebook:~/StydyGit$ ls    # file2.txt文件已经存在
file.txt  file2.txt  file3.txt
niko@niko-notebook:~/StydyGit$ git status    # 查看当前跟踪状态
On branch master
nothing to commit, working tree clean
niko@niko-notebook:~/StydyGit$ git reflog   # 生成一个版本信息
bcf8ce2 (HEAD -> master) HEAD@{0}: reset: moving to bcf8ce2
db6e563 HEAD@{1}: commit: del file2.txt
bcf8ce2 (HEAD -> master) HEAD@{2}: commit: first reset
80cbf7f HEAD@{3}: reset: moving to 80cbf7f
b4a5442 HEAD@{4}: commit: modifiy file.txt
17acb24 HEAD@{5}: commit: add file3.txt
80cbf7f HEAD@{6}: commit: add file2.txt
e6442a4 HEAD@{7}: commit: modifiy file.txt
5f9adfe HEAD@{8}: commit (initial): add file.txt
git diff使用
git diff --staged比较工作区与暂存区的不同。使用
git diff --cached比较暂存区与本地库的不同。
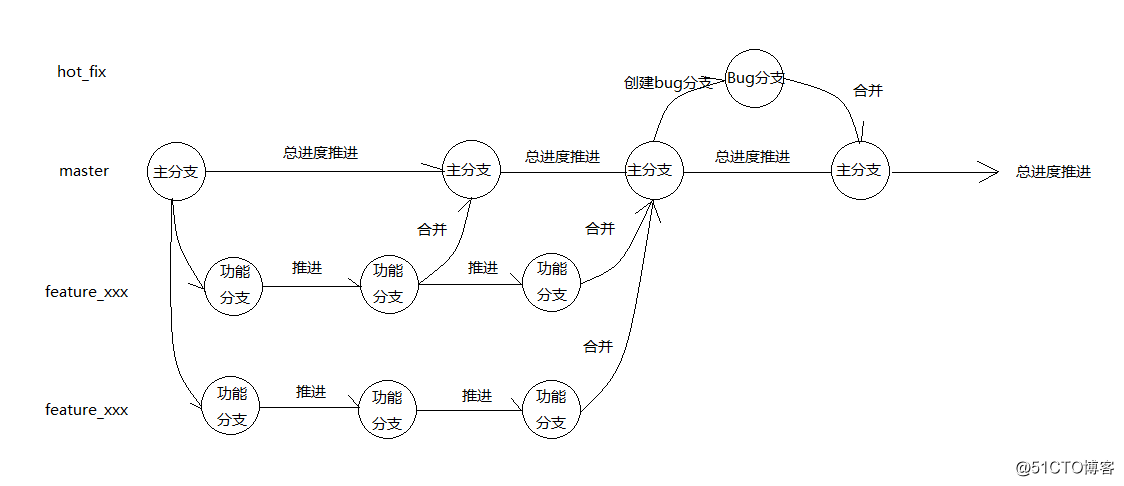
分支可以并行推进项目的开发,开发的某一个功能如果失败不会影响项目整体。
查看分支(git branch -v)
niko@niko-notebook:~/StydyGit$ git branch -v
* master bcf8ce2 first reset创建分支(git branch branchName)
niko@niko-notebook:~/StydyGit$ git branch hot_fix切换分支(git checkout branchName)
niko@niko-notebook:~/StydyGit$ git checkout hot_fix
Switched to branch ‘hot_fix‘
niko@niko-notebook:~/StydyGit$ git branch -v   # 星号所在分支就是当前分支
* hot_fix bcf8ce2 first reset
master bcf8ce2 first reset合并分支(git merge branchName)
niko@niko-notebook:~/StydyGit$ vim file3.txt   # 修改文件
niko@niko-notebook:~/StydyGit$ git status      # 查看分支状态
On branch hot_fix
Changes not staged for commit:
(use "git add <file>..." to update what will be committed)
(use "git checkout -- <file>..." to discard changes in working directory)

      modified:   file3.txt

no changes added to commit (use "git add" and/or "git commit -a")
niko@niko-notebook:~/StydyGit$ git add .       # 添加到当前分支的跟踪状态
niko@niko-notebook:~/StydyGit$ git commit -m "fix bug by xvge"   # 提交代码
[hot_fix 40376b9] fix bug by xvge
1 file changed, 1 insertion(+)
niko@niko-notebook:~/StydyGit$ git checkout master  # 切换到主分支
Switched to branch ‘master‘
niko@niko-notebook:~/StydyGit$ git merge hot_fix    # 将hot_fix合并到master
Updating bcf8ce2..40376b9
Fast-forward
file3.txt | 1 +
1 file changed, 1 insertion(+)
niko@niko-notebook:~/StydyGit$ git stataus         # 查看主分支状态
git: ‘stataus‘ is not a git command. See ‘git --help‘.

The most similar command is
      status
niko@niko-notebook:~/StydyGit$ git status
On branch master
nothing to commit, working tree clean
niko@niko-notebook:~/StydyGit$ git reflog  # 产生几个新版本
40376b9 (HEAD -> master, hot_fix) HEAD@{0}: merge hot_fix: Fast-forward
bcf8ce2 HEAD@{1}: checkout: moving from hot_fix to master
40376b9 (HEAD -> master, hot_fix) HEAD@{2}: commit: fix bug by xvge
bcf8ce2 HEAD@{3}: checkout: moving from master to hot_fix
bcf8ce2 HEAD@{4}: reset: moving to bcf8ce2
db6e563 HEAD@{5}: commit: del file2.txt
bcf8ce2 HEAD@{6}: commit: first reset
80cbf7f HEAD@{7}: reset: moving to 80cbf7f
b4a5442 HEAD@{8}: commit: modifiy file.txt
17acb24 HEAD@{9}: commit: add file3.txt
80cbf7f HEAD@{10}: commit: add file2.txt
e6442a4 HEAD@{11}: commit: modifiy file.txt
5f9adfe HEAD@{12}: commit (initial): add file.txt# 修改master分支代码
niko@niko-notebook:~/StydyGit$ git branch -v
hot_fix 40376b9 fix bug by xvge
* master 40376b9 fix bug by xvge
niko@niko-notebook:~/StydyGit$ vim file3.txt
niko@niko-notebook:~/StydyGit$ git add .
niko@niko-notebook:~/StydyGit$ git commit -m "add festure by master"
[master cbd7ce1] add festure by master
1 file changed, 1 insertion(+)
# 修改hot_fix分支代码
niko@niko-notebook:~/StydyGit$ git branch -v
* hot_fix 40376b9 fix bug by xvge
master 40376b9 fix bug by xvge
niko@niko-notebook:~/StydyGit$ vim file3.txt
niko@niko-notebook:~/StydyGit$ git add .
niko@niko-notebook:~/StydyGit$ git commit -m "add feature by fix"
[hot_fix 6cceae3] add feature by fix
1 file changed, 1 insertion(+)
# 将master合并到hot_fix上
niko@niko-notebook:~/StydyGit$ git branch -v
* hot_fix 6cceae3 add feature by fix
master cbd7ce1 add festure by master
niko@niko-notebook:~/StydyGit$ git merge master
Auto-merging file3.txt
CONFLICT (content): Merge conflict in file3.txt
Automatic merge failed; fix conflicts and then commit the result.
# 解决冲突
niko@niko-notebook:~/StydyGit$ vim file3.txt
Hi, FullStackDev.
fix this bug by xvge.
<<<<<<< HEAD
add festure by fix.
=======
add feature by master.
>>>>>>> master
# 提×××并
niko@niko-notebook:~/StydyGit$ git add .
niko@niko-notebook:~/StydyGit$ git commit -m "merge code by conflict"
[hot_fix 088f6c5] merge code by conflictgithub.com,如果勾选Initialize this repository with a README选项可能首次推送失败。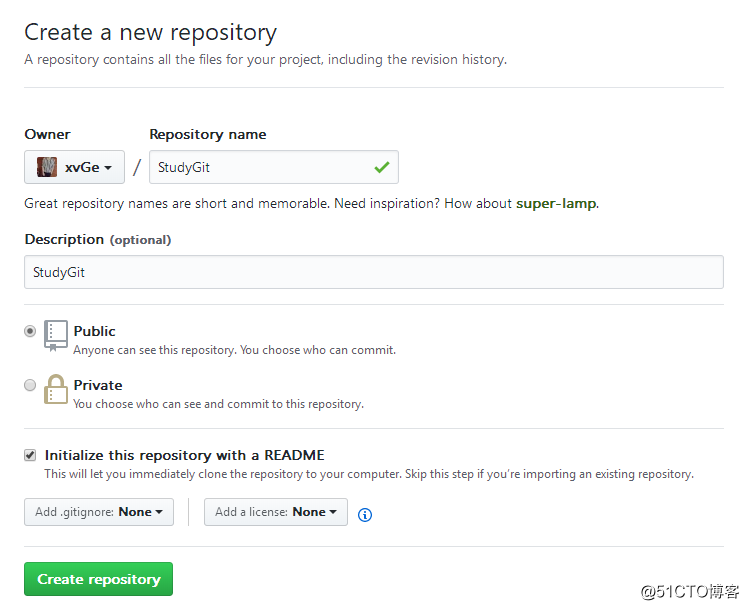
将GitHub地址保存到本地
niko@niko-notebook:~/StydyGit$ git remote add origin https://github.com/xvGe/StudyGit.git查看本地保存了什么地址
niko@niko-notebook:~/StydyGit$ git remote -v
origin  https://github.com/xvGe/StudyGit.git (fetch)
origin  https://github.com/xvGe/StudyGit.git (push)
将本地库推送到远程库
niko@niko-notebook:~/StydyGit$ git push origin master
Username for ‘https://github.com‘: xvGe
Password for ‘https://xvGe@github.com‘:
Counting objects: 19, done.
Delta compression using up to 4 threads.
Compressing objects: 100% (11/11), done.
Writing objects: 100% (19/19), 1.44 KiB | 52.00 KiB/s, done.
Total 19 (delta 2), reused 0 (delta 0)
remote: Resolving deltas: 100% (2/2), done.
remote:
remote: Create a pull request for ‘master‘ on GitHub by visiting:
remote:      https://github.com/xvGe/StudyGit/pull/new/master
remote:
To https://github.com/xvGe/StudyGit.git
* [new branch]      master -> master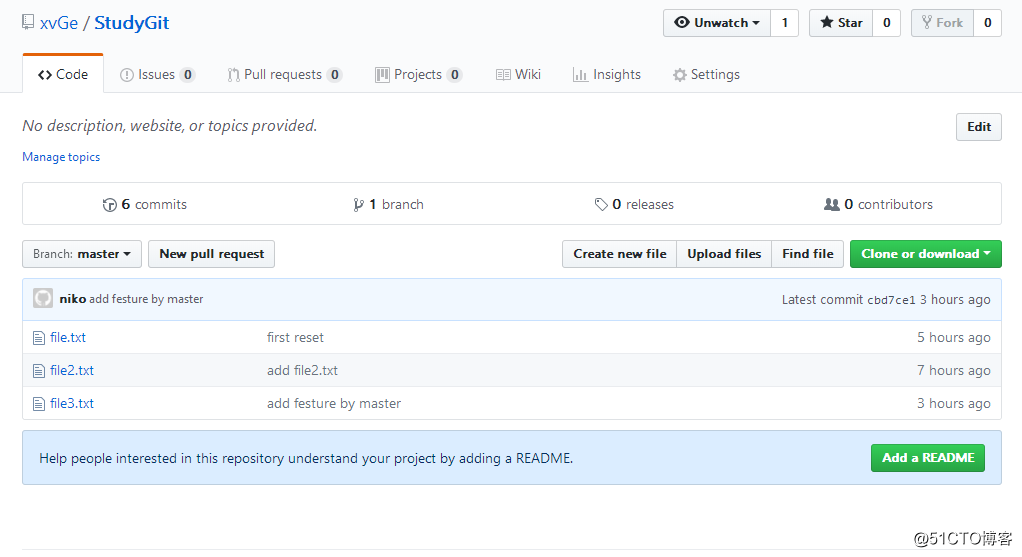
git clone)niko@niko-notebook:~/StydyGit$ cd ../
niko@niko-notebook:~$ rm -rf StydyGit/
niko@niko-notebook:~$ git clone https://github.com/xvGe/StudyGit.git
Cloning into ‘StudyGit‘...
remote: Counting objects: 19, done.
remote: Compressing objects: 100% (9/9), done.
remote: Total 19 (delta 2), reused 19 (delta 2), pack-reused 0
Unpacking objects: 100% (19/19), done.git pull和git fetch)niko@niko-notebook:~$ git init StudyGit2 # 创建新项目
Initialized empty Git repository in /home/niko/StudyGit2/.git/
niko@niko-notebook:~$ cd StudyGit2/ # 进入项目目录
niko@niko-notebook:~/StudyGit2$ git remote add origin https://github.com/xvGe/StudyGit.git#添加地址
niko@niko-notebook:~/StudyGit2$ git fetch origin master # 拉取项目
remote: Counting objects: 19, done.
remote: Compressing objects: 100% (9/9), done.
remote: Total 19 (delta 2), reused 19 (delta 2), pack-reused 0
Unpacking objects: 100% (19/19), done.
From https://github.com/xvGe/StudyGit
* branch master -> FETCH_HEAD
* [new branch] master -> origin/master
niko@niko-notebook:~/StudyGit2$ git branch -a # 查看所有分支
remotes/origin/master
niko@niko-notebook:~/StudyGit2$ git branch -r # 查看远程分支
origin/master
niko@niko-notebook:~/StudyGit2$ git merge origin/master # 合并分支
niko@niko-notebook:~/StudyGit2$ ls
file.txt file2.txt file3.txt
niko@niko-notebook:~/StudyGit2$ cd ../ # 返回上层
niko@niko-notebook:~$ git init StudyGit3 # 初始化一个项目
Initialized empty Git repository in /home/niko/StudyGit3/.git/
niko@niko-notebook:~$ cd StudyGit3/ # 进入项目目录
niko@niko-notebook:~/StudyGit3$ git pull https://github.com/xvGe/StudyGit.git # 拉取项目
remote: Counting objects: 19, done.
remote: Compressing objects: 100% (9/9), done.
remote: Total 19 (delta 2), reused 19 (delta 2), pack-reused 0
Unpacking objects: 100% (19/19), done.
From https://github.com/xvGe/StudyGit
* branch HEAD -> FETCH_HEAD
niko@niko-notebook:~/StudyGit3$ ls
file.txt file2.txt file3.txtgit fetch和git pull的区别是,前者会创建新分支,需要合并操作,但是更加安全;后者直接修改本地代码。
团队拉取远程仓库修改并推送
niko@niko-notebook:~$ git init StudyGitHub
Initialized empty Git repository in /home/niko/StudyGitHub/.git/
niko@niko-notebook:~$ cd StudyGitHub/
niko@niko-notebook:~/StudyGitHub$ git pull https://github.com/xv-niko/StudyGit.git
niko@niko-notebook:~/StudyGitHub$ git remote add origin https://github.com/xv-niko/StudyGit.git
niko@niko-notebook:~/StudyGitHub$ ls
file.txt  file2.txt  file3.txt
niko@niko-notebook:~/StudyGitHub$ echo "Desgin by B" >> file3.txt
niko@niko-notebook:~/StudyGitHub$ git add .
niko@niko-notebook:~/StudyGitHub$ git commit -m "add code"
[master 09003b9] add code
1 file changed, 1 insertion(+)
niko@niko-notebook:~/StudyGitHub$ git push origin master
Username for ‘https://github.com‘: xv-niko
Password for ‘https://xv-niko@github.com‘:
Counting objects: 3, done.
Delta compression using up to 4 threads.
Compressing objects: 100% (3/3), done.
Writing objects: 100% (3/3), 274 bytes | 68.00 KiB/s, done.
Total 3 (delta 2), reused 0 (delta 0)
remote: Resolving deltas: 100% (2/2), completed with 2 local objects.
To https://github.com/xv-niko/StudyGit.git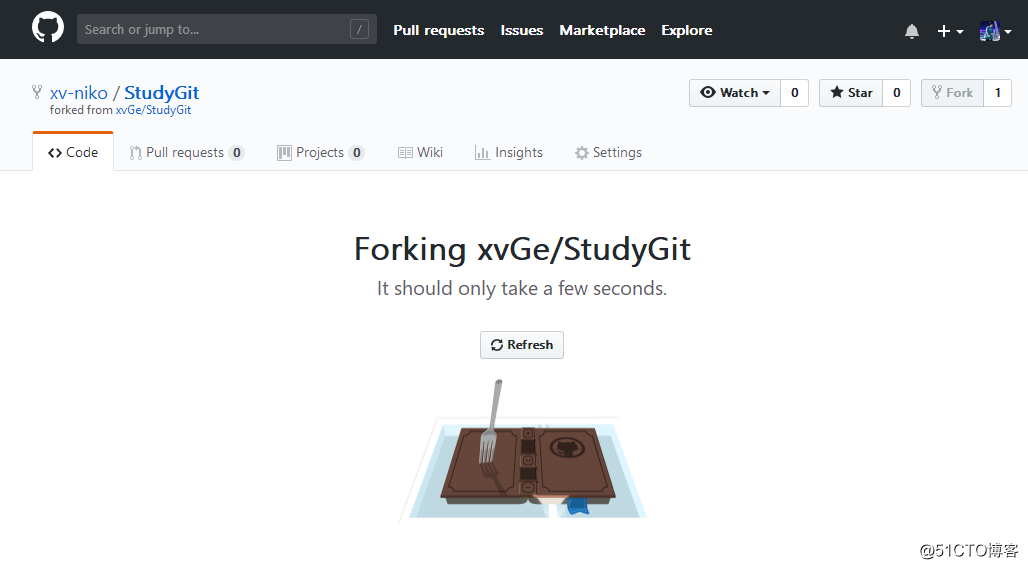
cbd7ce1..09003b9 master -> masterpull requests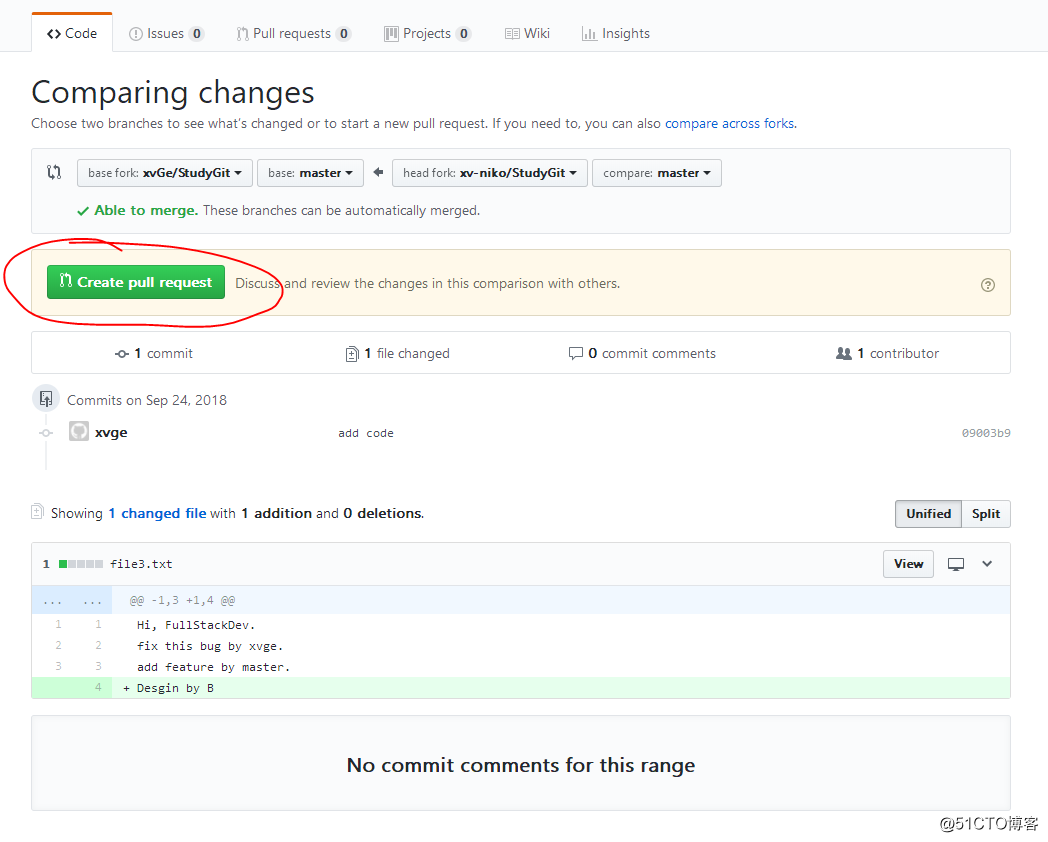
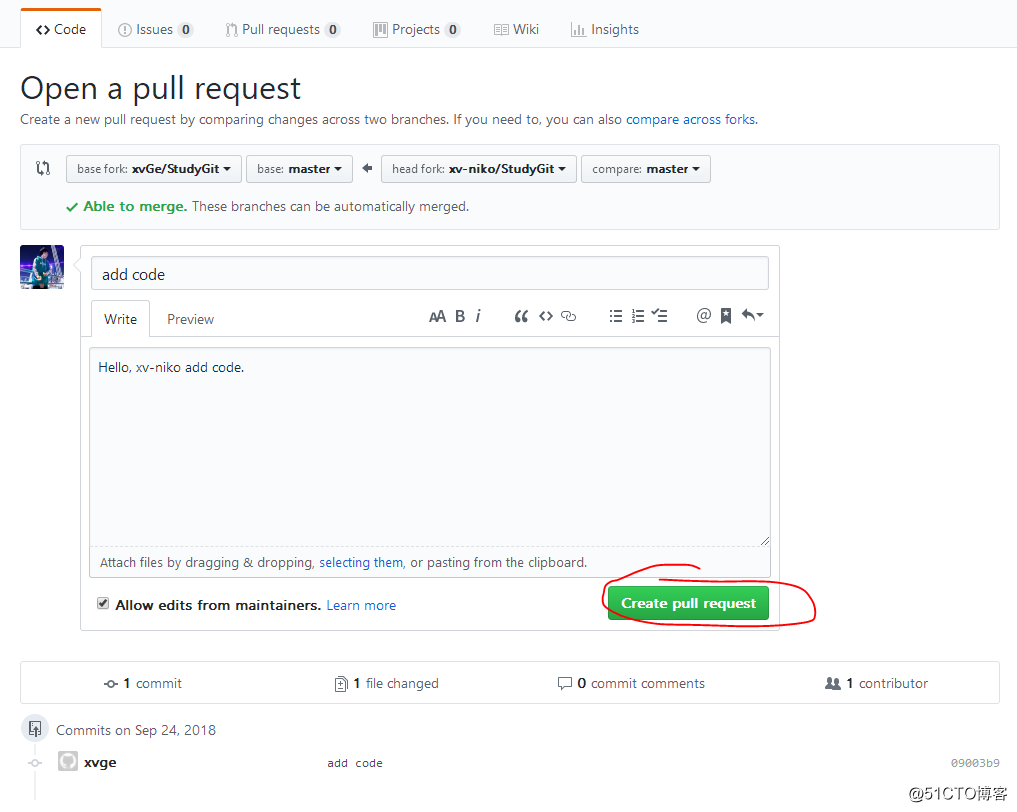
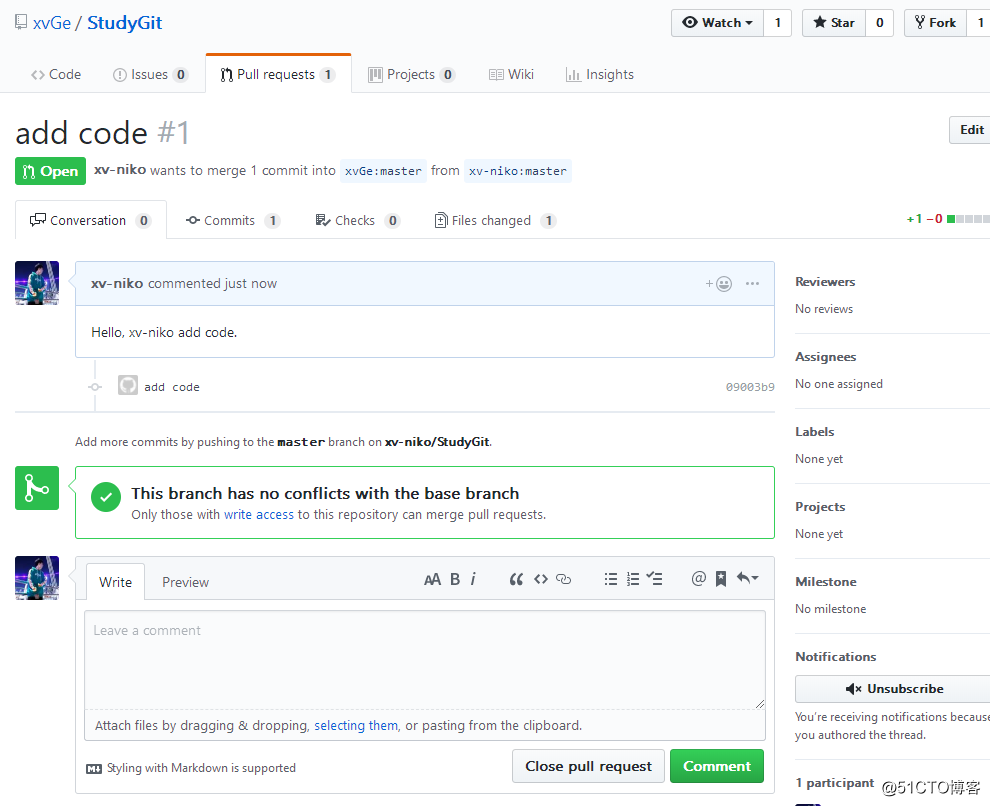
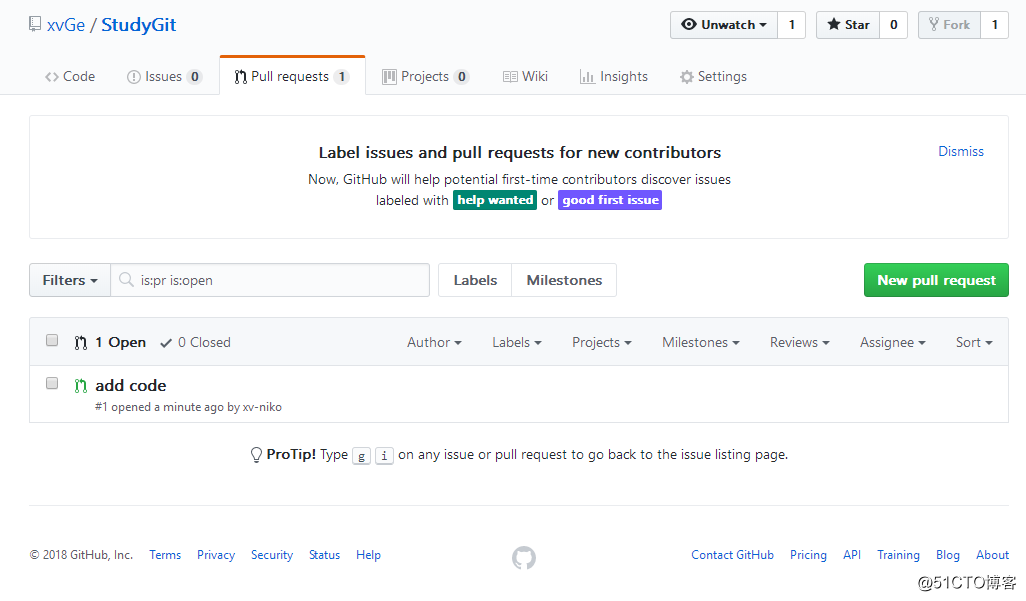
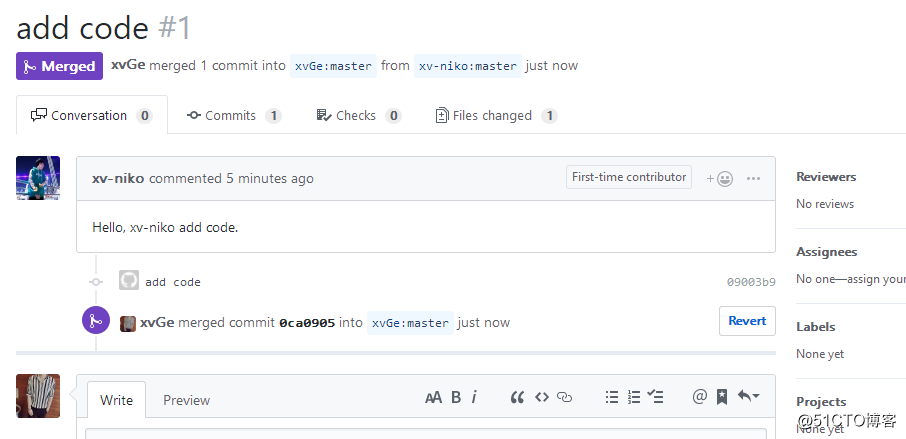
所有者团队合并到本地
niko@niko-notebook:~/StudyGitHub$ cd ../StudyGit
niko@niko-notebook:~/StudyGit$ git pull origin master
remote: Counting objects: 4, done.
remote: Compressing objects: 100% (2/2), done.
remote: Total 4 (delta 2), reused 3 (delta 2), pack-reused 0
Unpacking objects: 100% (4/4), done.
From https://github.com/xvGe/StudyGit
* branch            master     -> FETCH_HEAD
 cbd7ce1..0ca0905  master     -> origin/master
Updating cbd7ce1..0ca0905
Fast-forward
file3.txt | 1 +
1 file changed, 1 insertion(+)
niko@niko-notebook:~/StudyGit$ cat file3.txt
Hi, FullStackDev.
fix this bug by xvge.
add feature by master.
Desgin by B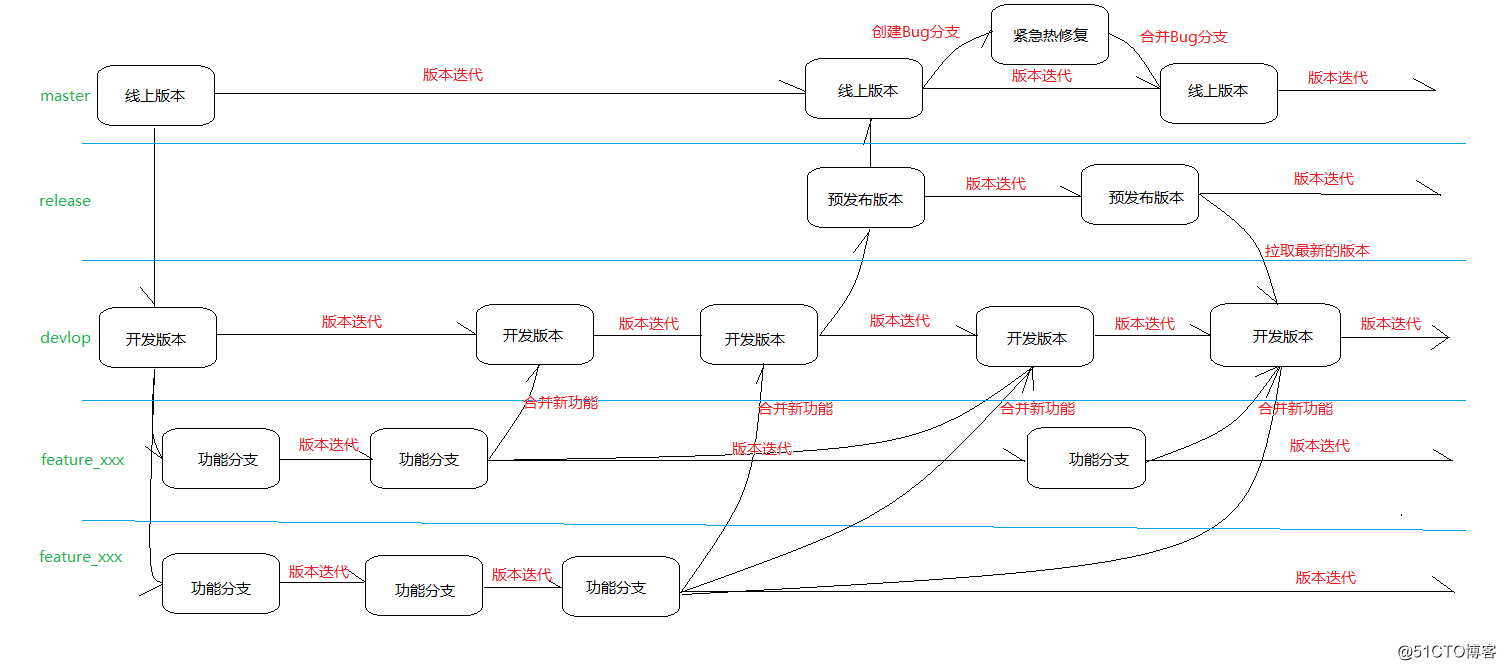
yum clean all && yum repolist all
yum install -y curl policycoreutils-python openssh-server
systemctl enable sshd
systemctl start sshd
firewall-cmd --permanent --add-service=http  # 如果开启了防火墙执行
systemctl reload firewalld                   # 如果开启了防火墙执行
yum install postfix -y
systemctl enable postfix
systemctl start postfix
curl -sS https://packages.gitlab.com/install/repositories/gitlab/gitlab-ce/script.rpm.sh | bash
EXTERNAL_URL="http://gitlab.example.com" yum install -y gitlab-ce
gitlab-ctl reconfigure     # 配置服务器
gitlab-ctl start # 启动服务器访问服务器地址即可,GitLab服务器搭建指南:https://about.gitlab.com/installation/
使用Git与GitHub协同开发并搭建私有GitLab代码托管服务器
标签:更改 root systemctl 团队 inux ble google content 就是
原文地址:http://blog.51cto.com/xvjunjie/2284293