标签:emd file 界面 一个 https yum仓库 root tftp服务 etc
作为中小公司的运维,经常会遇到一些机械式的重复工作,例如:有时公司同时上线几十甚至上百台服务器,而且需要我们在短时间内完成系统安装。
常规的办法有什么?
光盘安装系统===>一个服务器DVD内置光驱百千块,百台服务器都配光驱就浪费了,因为一台服务器也就开始装系统能用的上,以后用的机会屈指可数。用USB外置光驱,插来插去也醉了。
U盘安装系统===>还是同样的问题,要一台一台服务器插U盘。
网络安装系统(ftp,http,nfs) ===>这个方法不错,只要服务器能联网就可以装系统了,但还是需要一台台服务器去敲键盘点鼠标。时刻想偷懒的我们,有没有更好的方法!
高逼格的方法:
Kickstart
Cobbler
我们今天的主角,接下来我们就看看它是如何实现linux系统批量自动安装的。
Cobbler是一个Linux服务器安装的服务,可以通过网络启动(PXE)的方式来快速安装、重装物理服务器和虚拟机,同时还可以管理DHCP,DNS等。
Cobbler可以使用命令行方式管理,也提供了基于Web的界面管理工具(cobbler-web),还提供了API接口,可以方便二次开发使用。
Cobbler是较早前的kickstart的升级版,优点是比较容易配置,还自带web界面比较易于管理。
[root@m02 ~]# cat /etc/redhat-release
CentOS Linux release 7.2.1511 (Core)
[root@m02 ~]# uname -r
3.10.0-327.el7.x86_64
[root@m02 ~]# getenforce
Disabled
[root@m02 ~]# systemctl status firewalld.service
● firewalld.service - firewalld - dynamic firewall daemon
   Loaded: loaded (/usr/lib/systemd/system/firewalld.service; disabled; vendor preset: enabled)
   Active: inactive (dead)
[root@m02 ~]# hostname -I
10.0.0.62 172.16.1.62

curl -o /etc/yum.repos.d/CentOS-Base.repo http://mirrors.aliyun.com/repo/Centos-7.repo
wget -O /etc/yum.repos.d/epel.repo http://mirrors.aliyun.com/repo/epel-7.repo
优化yum源
yum -y install cobbler cobbler-web dhcp tftp-server pykickstart httpd python-django
systemctl start cobblerd.service
systemctl start httpd.service

执行 cobbler check  #照提示一个一个修正。


[root@Cobbler ~]# systemctl start cobblerd.service
[root@Cobbler ~]# systemctl start httpd.service
[root@Cobbler ~]#
[root@Cobbler ~]# cobbler check
The following are potential configuration items that you may want to fix:

1 : The ‘server‘ field in /etc/cobbler/settings must be set to something other than localhost, or kickstarting features will not work.  This should be a resolvable hostname or IP for the boot server as reachable by all machines that will use it.   在/etc/cobbler/settings中的server配置需要修改,将127.0.0.1修改为172.16.1.202


2 : For PXE to be functional, the ‘next_server‘ field in /etc/cobbler/settings must be set to something other than 127.0.0.1, and should match the IP of the boot server on the PXE network.    在/etc/cobbler/settings中的next_server配置需要修改,将127.0.0.1修改为172.16.1.202


3 : change ‘disable‘ to ‘no‘ in /etc/xinetd.d/tftp  将tftp交给xinetd管理,但是在CentOS7不使用


4 : Some network boot-loaders are missing from /var/lib/cobbler/loaders, you may run ‘cobbler get-loaders‘ to download them, or, if you only want to handle x86/x86_64 netbooting, you may ensure that you have installed a *recent* version of the syslinux package installed and can ignore this message entirely.  Files in this directory, should you want to support all architectures, should include pxelinux.0, menu.c32, elilo.efi, and yaboot. The ‘cobbler get-loaders‘ command is the easiest way to resolve these requirements.

通过cobbler get-loaders下载所有需要的网络启动文件

5 : enable and start rsyncd.service with systemctl     启动rsync服务
6 : debmirror package is not installed, it will be required to manage debian deployments and repositories
7 : The default password used by the sample templates for newly installed machines (default_password_crypted in /etc/cobbler/settings) is still set to ‘cobbler‘ and should be changed, try: "openssl passwd -1 -salt ‘random-phrase-here‘ ‘your-password-here‘" to generate new one   安装完系统root密码,默认cobbler,需要修改
8 : fencing tools were not found, and are required to use the (optional) power management features. install cman or fence-agents to use them

Restart cobblerd and then run ‘cobbler sync‘ to apply changes.


sed -i ‘s/server: 127.0.0.1/server: 172.16.1.202/‘ /etc/cobbler/settings
sed -i ‘s/next_server: 127.0.0.1/next_server: 172.16.1.202/‘ /etc/cobbler/settings
sed -i ‘s#yes#no#‘ /etc/xinetd.d/tftp
#防止误重装
sed -i ‘s/pxe_just_once: 0/pxe_just_once: 1/‘ /etc/cobbler/settings
#配置Cobbler统一管理DHCP
sed -i ‘s/manage_dhcp: 0/manage_dhcp: 1/‘ /etc/cobbler/settings
# 配置DHCP Cobbler模版
sed -i.ori ‘s#192.168.1#172.16.1#g;22d;23d‘ /etc/cobbler/dhcp.template
# 设置root密码
sed -ri "/default_password_crypted/s#(.*: ).*#\1\"`openssl passwd -1 -salt ‘oldboy‘ ‘123456‘`\"#" /etc/cobbler/settings

启动服务 同步配置
systemctl start rsyncd                           启动rsync服务
systemctl start tftp.socket                      启动tftp服务
systemctl restart cobblerd                       重新启动cobbler服务
systemctl enable tftp.socket httpd cobblerd   rsyncd   加入开机自启动
cobbler sync  --刷新配置文件
至此服务器上配置完成,接下来web操作cobbler
https://10.0.0.202/cobbler_web 账号秘密均为cobbler cobbler
rsync同步系统镜像
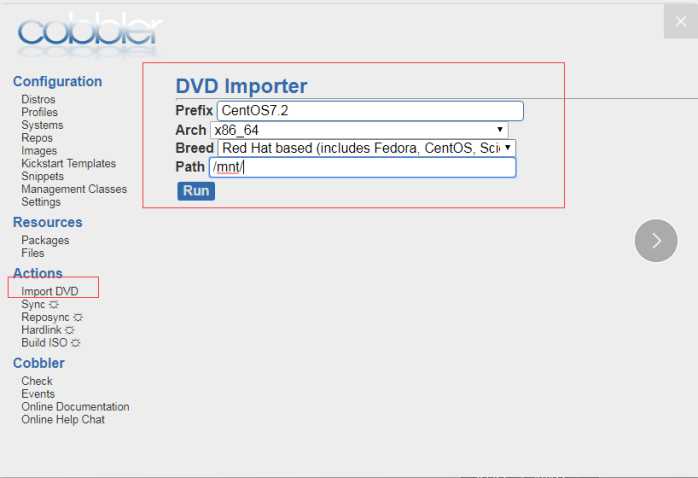
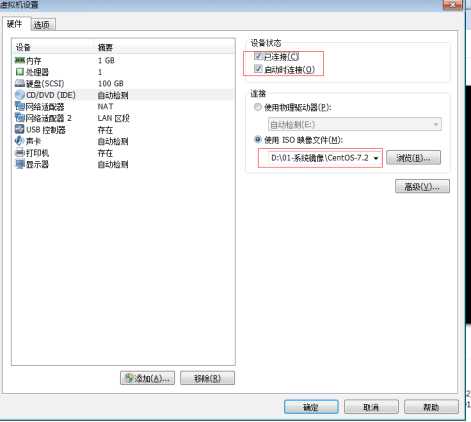
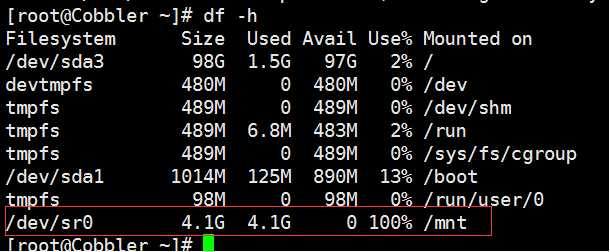
mount /dev/cdrom /mnt/ 挂载镜像
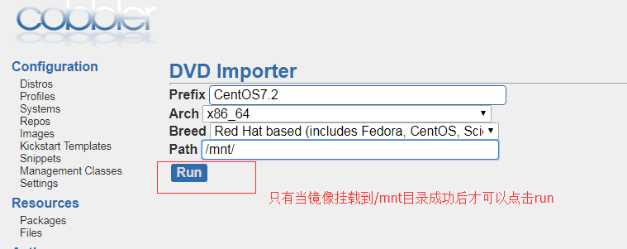

本质上就是调用了rsync 将/mnt镜像同步到/var/www/cobbler/ks_mirror/CentOS7.2-x86_64目录中
[root@Cobbler ~]# cd  /var/www/cobbler/ks_mirror/
 [root@Cobbler ks_mirror]# ls
CentOS7.2-x86_64  config
[root@Cobbler ks_mirror]# du -sh CentOS7.2-x86_64/
4.2G    CentOS7.2-x86_64/
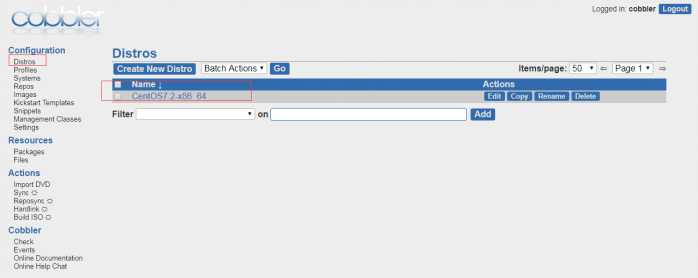
镜像已经有了
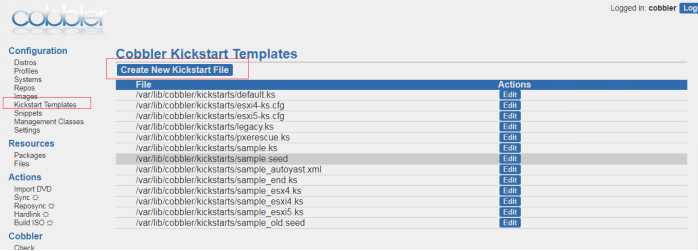
ks文件下载地址
链接:https://pan.baidu.com/s/1yZNYzBIEHo7XePqt1iaRZg
提取码:8o1i
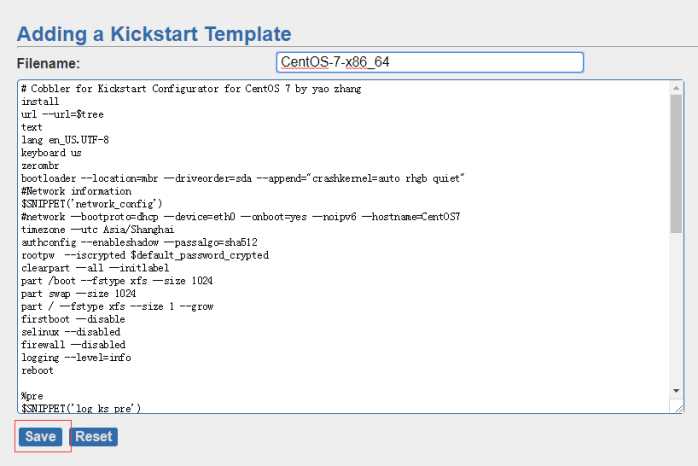
上面是添加成功,来指定一下使用定制的KS文件,并修改网卡名称。
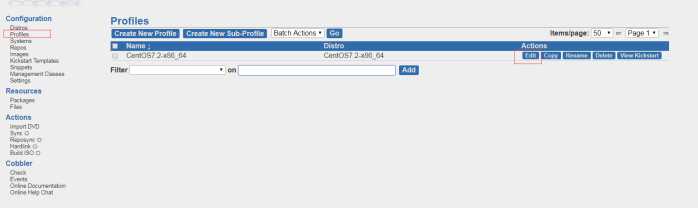
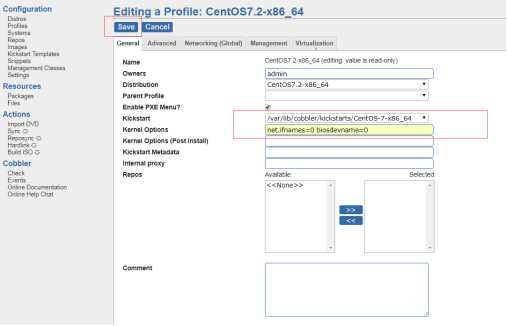

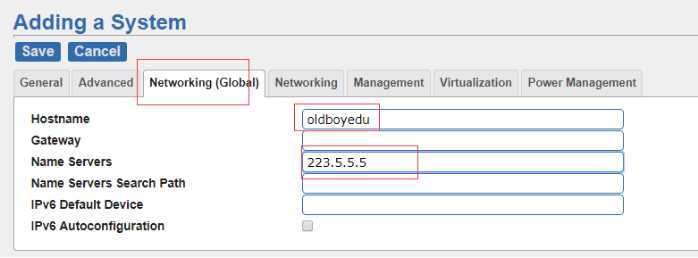
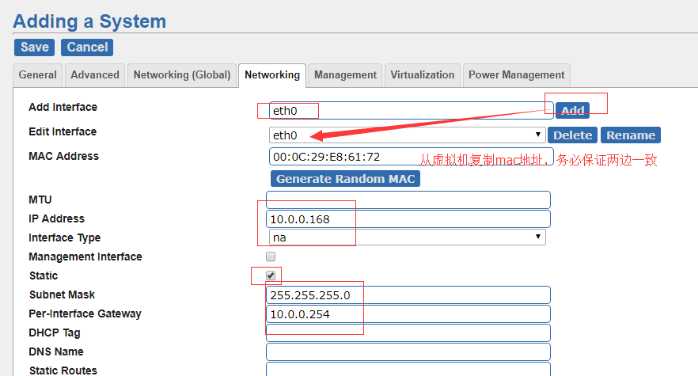
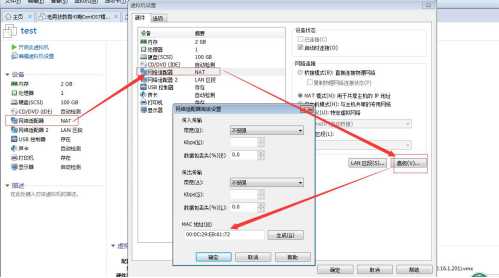
设置完成后左上角 Save保存

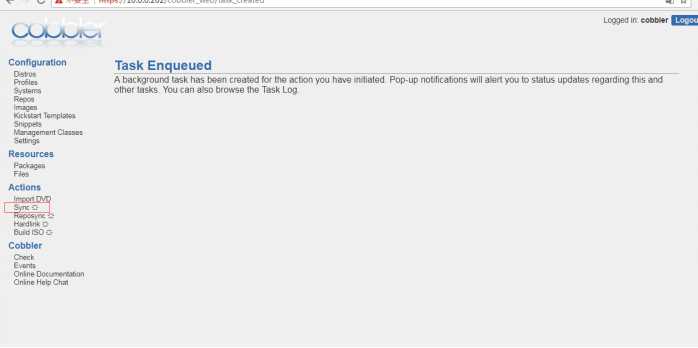
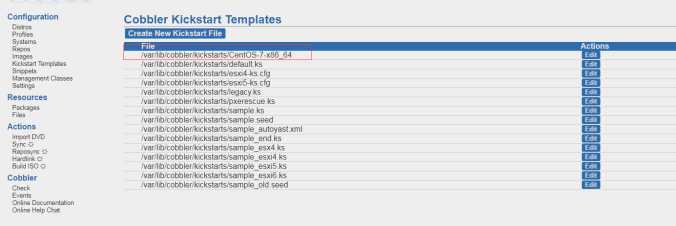
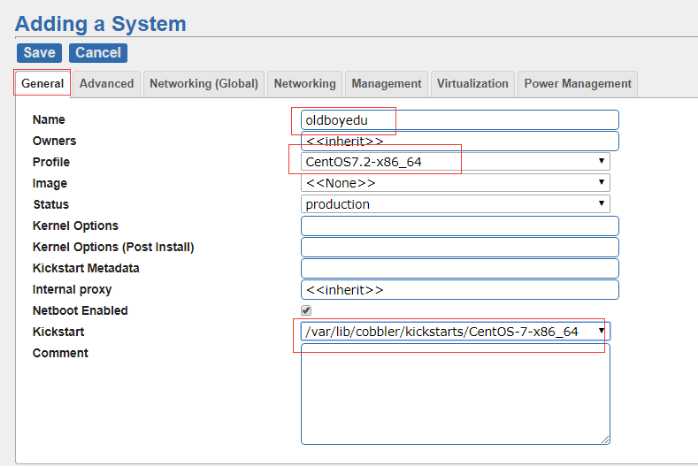
完成添加镜像,编写KS文件,设置IP地址。最后Sync 刷新一下配置,就可以开电源装系统了
标签:emd file 界面 一个 https yum仓库 root tftp服务 etc
原文地址:https://www.cnblogs.com/root0/p/9929890.html