标签:href color cti util centos handles title intern oca
官方文档:https://doc.scrapy.org/en/latest/
Global commands:
Project-only commands: 在项目目录下才可以执行
scrapy startproject <project_name> [project_dir]Creates a new Scrapy project named project_name, under the project_dir directory. If project_dir wasn’t specified, project_dirwill be the same as project_name.
Usage example:
$ scrapy startproject myproject
scrapy genspider [-t template] <name> <domain>Create a new spider in the current folder or in the current project’s spiders folder, if called from inside a project. The <name> parameter is set as the spider’s name, while <domain> is used to generate the allowed_domains and start_urls spider’s attributes.
Usage example:
$ scrapy genspider -l
Available templates:
  basic
  crawl
  csvfeed
  xmlfeed

$ scrapy genspider example example.com
Created spider ‘example‘ using template ‘basic‘

$ scrapy genspider -t crawl scrapyorg scrapy.org
Created spider ‘scrapyorg‘ using template ‘crawl‘
This is just a convenience shortcut command for creating spiders based on pre-defined templates, but certainly not the only way to create spiders. You can just create the spider source code files yourself, instead of using this command.
scrapy crawl <spider>Start crawling using a spider.
Usage examples:
$ scrapy crawl myspider
[ ... myspider starts crawling ... ]
scrapy check [-l] <spider>Run contract checks.
Usage examples:
$ scrapy check -l
first_spider
  * parse
  * parse_item
second_spider
  * parse
  * parse_item

$ scrapy check
[FAILED] first_spider:parse_item
>>> ‘RetailPricex‘ field is missing

[FAILED] first_spider:parse
>>> Returned 92 requests, expected 0..4
scrapy listList all available spiders in the current project. The output is one spider per line.
Usage example:
$ scrapy list
spider1
spider2
scrapy edit <spider>Edit the given spider using the editor defined in the EDITORenvironment variable or (if unset) the EDITOR setting.
This command is provided only as a convenience shortcut for the most common case, the developer is of course free to choose any tool or IDE to write and debug spiders.
Usage example:
$ scrapy edit spider1
scrapy fetch <url>Downloads the given URL using the Scrapy downloader and writes the contents to standard output.
The interesting thing about this command is that it fetches the page how the spider would download it. For example, if the spider has a USER_AGENT attribute which overrides the User Agent, it will use that one.
So this command can be used to “see” how your spider would fetch a certain page.
If used outside a project, no particular per-spider behaviour would be applied and it will just use the default Scrapy downloader settings.
Supported options:
--spider=SPIDER: bypass spider autodetection and force use of specific spider--headers: print the response’s HTTP headers instead of the response’s body--no-redirect: do not follow HTTP 3xx redirects (default is to follow them) #有重定向的连接时候使用这个参数Usage examples:
$ scrapy fetch --nolog http://www.example.com/some/page.html
[ ... html content here ... ]

$ scrapy fetch --nolog --headers http://www.example.com/
{‘Accept-Ranges‘: [‘bytes‘],
 ‘Age‘: [‘1263   ‘],
 ‘Connection‘: [‘close     ‘],
 ‘Content-Length‘: [‘596‘],
 ‘Content-Type‘: [‘text/html; charset=UTF-8‘],
 ‘Date‘: [‘Wed, 18 Aug 2010 23:59:46 GMT‘],
 ‘Etag‘: [‘"573c1-254-48c9c87349680"‘],
 ‘Last-Modified‘: [‘Fri, 30 Jul 2010 15:30:18 GMT‘],
 ‘Server‘: [‘Apache/2.2.3 (CentOS)‘]}
scrapy view <url>Opens the given URL in a browser, as your Scrapy spider would “see” it. Sometimes spiders see pages differently from regular users, so this can be used to check what the spider “sees” and confirm it’s what you expect.
Supported options:
--spider=SPIDER: bypass spider autodetection and force use of specific spider--no-redirect: do not follow HTTP 3xx redirects (default is to follow them)Usage example:
$ scrapy view http://www.example.com/some/page.html
[ ... browser starts ... ]
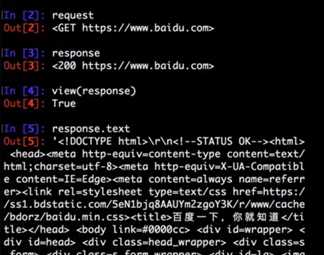
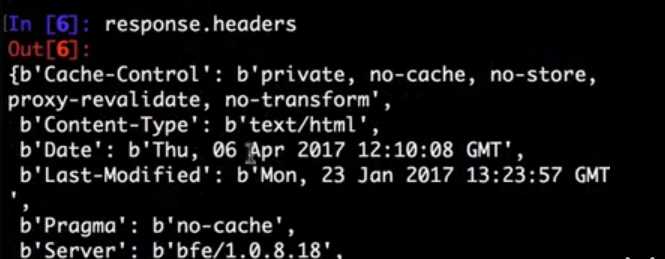
scrapy shell [url]Starts the Scrapy shell for the given URL (if given) or empty if no URL is given. Also supports UNIX-style local file paths, either relative with ./ or ../ prefixes or absolute file paths. See Scrapy shell for more info.
Supported options:
--spider=SPIDER: bypass spider autodetection and force use of specific spider-c code: evaluate the code in the shell, print the result and exit--no-redirect: do not follow HTTP 3xx redirects (default is to follow them); this only affects the URL you may pass as argument on the command line; once you are inside the shell, fetch(url) will still follow HTTP redirects by default.Usage example:
$ scrapy shell http://www.example.com/some/page.html
[ ... scrapy shell starts ... ]

$ scrapy shell --nolog http://www.example.com/ -c ‘(response.status, response.url)‘
(200, ‘http://www.example.com/‘)

# shell follows HTTP redirects by default
$ scrapy shell --nolog http://httpbin.org/redirect-to?url=http%3A%2F%2Fexample.com%2F -c ‘(response.status, response.url)‘
(200, ‘http://example.com/‘)

# you can disable this with --no-redirect
# (only for the URL passed as command line argument)
$ scrapy shell --no-redirect --nolog http://httpbin.org/redirect-to?url=http%3A%2F%2Fexample.com%2F -c ‘(response.status, response.url)‘
(302, ‘http://httpbin.org/redirect-to?url=http%3A%2F%2Fexample.com%2F‘)
scrapy parse <url> [options]Fetches the given URL and parses it with the spider that handles it, using the method passed with the --callback option, or parse if not given.
Supported options:
--spider=SPIDER: bypass spider autodetection and force use of specific spider--a NAME=VALUE: set spider argument (may be repeated)--callback or -c: spider method to use as callback for parsing the response--meta or -m: additional request meta that will be passed to the callback request. This must be a valid json string. Example: –meta=’{“foo” : “bar”}’--pipelines: process items through pipelines--rules or -r: use CrawlSpider rules to discover the callback (i.e. spider method) to use for parsing the response--noitems: don’t show scraped items--nolinks: don’t show extracted links--nocolour: avoid using pygments to colorize the output--depth or -d: depth level for which the requests should be followed recursively (default: 1)--verbose or -v: display information for each depth levelUsage example:
$ scrapy parse http://www.example.com/ -c parse_item
[ ... scrapy log lines crawling example.com spider ... ]

>>> STATUS DEPTH LEVEL 1 <<<
# Scraped Items  ------------------------------------------------------------
[{‘name‘: ‘Example item‘,
 ‘category‘: ‘Furniture‘,
 ‘length‘: ‘12 cm‘}]

# Requests  -----------------------------------------------------------------
[]
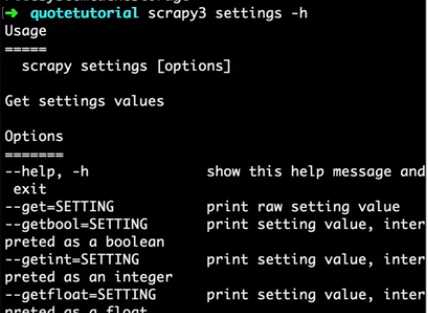
scrapy settings [options]Get the value of a Scrapy setting.
If used inside a project it’ll show the project setting value, otherwise it’ll show the default Scrapy value for that setting.
Example usage:
$ scrapy settings --get BOT_NAME
scrapybot
$ scrapy settings --get DOWNLOAD_DELAY
0


scrapy runspider <spider_file.py>Run a spider self-contained in a Python file, without having to create a project.
Example usage:
$ scrapy runspider myspider.py
[ ... spider starts crawling ... ]

scrapy version [-v]Prints the Scrapy version. If used with -v it also prints Python, Twisted and Platform info, which is useful for bug reports.

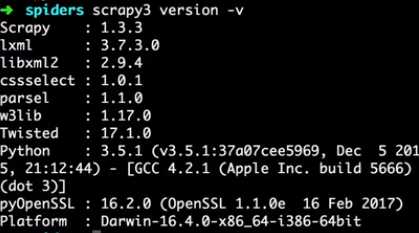
New in version 0.17.
scrapy bench
Run a quick benchmark test. Benchmarking.

标签:href color cti util centos handles title intern oca
原文地址:https://www.cnblogs.com/LXL616/p/10765902.html