标签:变化 cti 提示 生效 c中 允许 启用 技术 c程序
rsync(远程同步)是一个开源的快速备份工具,可以在不同主机之间镜像同步整个目录树,支持增量备份、保持链接和权限,且采用优化的同步算法,传输前进行压缩,因此适用于异地备份、镜像服务器等应用(虽然现在群集解决了这些问题,但还是有用上rsync远程同步的时候吧!)配置rsync的大概流程:
所需环境:
server A配置如下:
1、开始配置/etc/rsyncd.conf文件:
[root@localhost ~]# vim /etc/rsyncd.conf

                               ...........................
 uid = nobody                     #启用匿名用户
 gid = nobody
 use chroot = yes                 #禁锢在源目录
 address = 192.168.1.1       #监听地址
 port 873                             #监听端口
# max connections = 4       #自带的注释信息,不管它,包括下面的注释信息
 log file = /var/log/rsyncd.log         #日志文件位置
 pid file = /var/run/rsyncd.pid         #存放进程ID的文件位置
 hosts allow = 192.168.1.0/24    #允许访问的客户端地址,可以省略不写,则表示允许任意地址访问
# exclude = lost+found/
# transfer logging = yes
# timeout = 900
# ignore nonreadable = yes
# dont compress   = *.gz *.tgz *.zip *.z *.Z *.rpm *.deb *.bz2

 [wwwroot]     #共享模块名称
        path = /var/www/html                 #源目录的实际路径
        comment = ftp export area       #提示信息,无所谓的,不写也行
        read only = no                      #有读写的权限,若改为“yes”,则表示为只读权限。
 dont compress   = *.gz *.tgz *.zip *.z *.Z *.rpm *.deb *.bz2  #同步时不再压缩的文件类型。
        auth users = backuper                  #授权账户
        secrets file = /etc/rsyncd_users.db             #存放账户信息的数据文件。
同步可以采用匿名的方式,将其中的“auth users”和“secrets file”配置记录去掉即可。
2、为备份账户创建数据文件:
[root@localhost ~]# vim /etc/rsyncd_users.db    #该文件名必须和rsync中的“secrets file”指定的路径一致

backuper:pwd123             #该账号必须和rsync配置里的授权用户一致

[root@localhost ~]# chmod 600 /etc/rsyncd_users.db
[root@localhost html]# chmod o+w /var/www/html            #需要其他用户对源目录有读取权限
[root@localhost html]# ls -ld /var/www/html/
drwxr-xrwx. 2 root root 6 4月  21 2018 /var/www/html/
需要注意的是:“backuper”这个用户和系统用户账号,没有半毛钱关系,这是rsync服务独立的账号配置文件。
并且存放该账号的文件必须是“600”的权限,否则客户端同步时,会验证失败,哪怕权限是“777”都不行,可能是权限过大会触发它的保护机制。
3、启动rsync服务:
[root@localhost ~]# rsync --daemon

[root@localhost ~]# netstat -anpt | grep rsync
tcp        0      0 192.168.1.1:873   0.0.0.0:*    LISTEN      12187/rsync
若是更改了rsync的配置文件,则需要重启该服务才可生效,重启该服务,需要先kill这个进程,然后再使用 rsync --daemon启动它即可:
[root@localhost ~]# kill $(cat /var/run/rsyncd.pid)
[root@localhost ~]# rsync --daemon
在server B使用rsync备份工具:
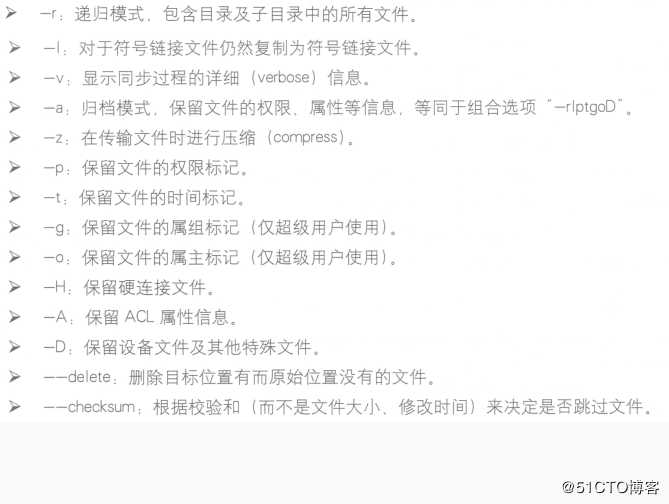
rsync命令的常用备份选项:
在server B进行备份:
[root@localhost myweb]# rsync -acz backuper@192.168.1.1::wwwroot /myweb
Password:
[root@localhost myweb]# ls
re.txt
说一下“--delete”这个神奇的选项:
#现在server  A的目录下有以下几个文件:

[root@localhost /]# ls /var/www/html/
index2.html  index3.html  index.html

#server  B的目录下有以下文件:
[root@localhost myweb]# ls /myweb/
1.html  2.html  3.html  re.txt

#在server  B客户端执行以下同步命令:
[root@localhost myweb]# rsync -avz --delete backuper@192.168.1.1::wwwroot /myweb
Password:
#输出以下信息:
receiving incremental file list
deleting re.txt
deleting 3.html
deleting 2.html
deleting 1.html
./
index.html
index2.html
index3.html

sent 84 bytes  received 255 bytes  135.60 bytes/sec
total size is 42  speedup is 0.12

[root@localhost myweb]# ls                    #查看一下/myweb目录下的变化
#之前的文件都没了,和rsync服务端的文件保持一致了
index2.html  index3.html  index.html
关于rsync的任务计划:
[root@localhost myweb]# vim /etc/server.pass             #建立密码文件,为了在同步时不需要输入密码

pwd123

[root@localhost myweb]# chmod 600 /etc/server.pass
[root@localhost myweb]# crontab -e             #编辑任务计划
30      22      *       *       *       /usr/bin/rsync -az --delete --password-file=/etc/server.pass backuper@192.168.1.1::wwwroot /myweb

#以上任务计划表示在每天22:30执行同步。
[root@localhost myweb]# systemctl restart crond #重启一下crond服务。标签:变化 cti 提示 生效 c中 允许 启用 技术 c程序
原文地址:https://blog.51cto.com/14154700/2404358