标签:列表 大于 net ssl setup pool cti keygen 写入
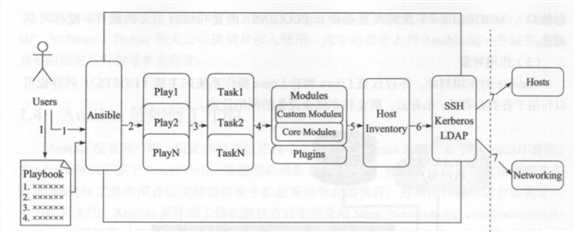
工作机制:ssh 无客户端
工作方式:
1,CMDB
2,公有云私有云API
3,使用ad-hoc
4,ansible-playbook
ansible 执行命令,底层调用传输连接模块,将命令或文件传输至远程服务器的/tmp目录,远程执行,操作完后删除,返回结果。

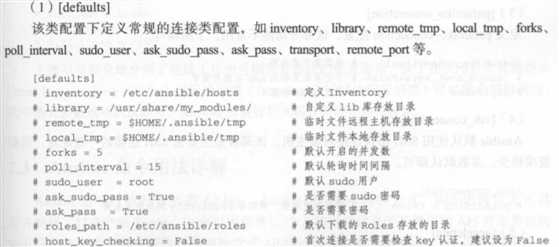
配置文件
/etc/ansible 功能;inventory 主机信息配置 工具功能
/usr/bin 系列命令默认存放位置
ansible 读取命令的顺序:
当前执行命令目录----用户家目录下 .ansible.cfg ------/etc/ansible.cfg ,先找到,先使用
ansible 配置项

2)[privilege_escalation] sudo 用户提权
3)
4)【ssh_connection】
5)【accelerate】
6)【selinux】
7)【colours】
公私钥
ssh-keygen -N " " -b 4096 -t rsa -C " " -f /root/.ssh/stanley.rsa
本机添加认证
ssh-copy-id -i /root/.ssh/stanley.rsa root@localhost
ssh -i /root/.ssh/stanley.rsa root@local
命令格式
ansible
执行后命令状态
红色: 过程异常,终止剩余任务
绿色: 执行结束后目标没有状态变化
橘黄色:执行正常,目标状态有变化
ansible-doc
-l l列出模块
ping 显示说明
ansibl-playbook .yml
ansibl-vault 加密配置文件
Inventory 是管理主机的配置文件,默认存放在 /etc/ansible/hosts
使用(默认只有一个inventory时不需要指定路径
ansible -i /etc/ansible/hosts webs -m ping
inventory 在其他路径时可以使用-i 指定位置
ansible all --list
Inventory 配置
定义主机及组
192.168.22.1
ntp.magedu.com:2222
nfs.magedu.com
#分组
[webserv]
web1.magedu.com
web[10:20].magedu.com 10-20 之间所有数字
主机变量 定义主机时定义变量
[webserv]
web1.magedu.com http_port=808 maxRequestsPerchild=801
 组变量
 [groupeservers]
 web1.magedu.com
 web2.magedu.com
 [groupeservers:vars]
 ntp_server=ntp.magedu.com     组中所有主机的ntp_serve值
 com
 nfs_server=nfs.magedu.com
 com

   定义组嵌套变量及组变量
[apache]
httpd1.magedu.com
httpd2.magedu.com
[nginx]
ngx1.magedu.com
ngx2.magedu.com
[webservers:children]
apache
nginx
[webservers:vars]
ntp_server=ntp.magedu.com
多重变量
变量可在INventory 定义,也可在之外定义,单独存储在YAML配置文件中,以.yml .yaml .json 后缀
或无后缀,从以下位置检索:
inventory 配置文件中 默认 /etc/ansible/hosts
Playbook 中vars 定义的域
Roles vars 目录下文件
Roles 同级目录 group_vars hosts_vars 目录下文件
优先级:

DINGY
正则表达式
针对inventory 中主机列表使用
ansible
对webserver 匹配
ansible webservers -m service -a "name=httpd state=restart "
全量匹配
ansible all -m ping
ans- "" -M ping
ans- 192.168.1. -m ping
逻辑或 or 匹配
ans- "web1:web2" -m ping
逻辑非 !
webservers:!phoenix (所有在webservers 组但不在phonenix 中的主机)
逻辑与
webservers:&phoenix 2组同时存在
多条件组合
webservers:dbservers:&staging:!phoenix webservers,dbservers所有主机在staging存在后且在phoenix 中不存在
模糊匹配
0或 多个任意字符
.magedu.com
one.magedu.com
域切割
str = ‘123456‘
print str[0:1]
例子:
[webservers]
web1
web2
web3
webservers[0] # web1
webservers[-1] web3
webservers[0:1] #webservers[0] webservers[1]
webservers[1:] webservers[1] webservers[2] web2 web3
正则匹配 ~ 表示正则匹配开始
~(web|db).*.example.com
ans- ~192.168.[0-9]{\2}.[0-9]{2,} -m ping
限定主机做变更
ansible app -m command -a "service ntpd status" --limit "192.168.36.3"
ansible 192.168.36.1 -m command -a "service ntpd status"
 playbook 正式运行前使用  --check 或 -C 检测playbook改变哪些内容
 ansible-playbook   --check
   ansible-playbook       xxxx.yml    --limit    webserver    限定webserver组
inventory 内置参数
General for all connections:
ansible_host
The name of the host to connect to, if different from the alias you wish to give to it.
ansible_port
The ssh port number, if not 22
ansible_user
The default ssh user name to use.
    Specific to the SSH connection:

    ansible_host
    The name of the host to connect to, if different from the alias you wish to give to it.
    ansible_port
    The ssh port number, if not 22
    ansible_user
    The default ssh user name to use.
    Specific to the SSH connection:

    ansible_ssh_pass
    The ssh password to use (never store this variable in plain text; always use a vault. See Variables and Vaults)
    ansible_ssh_private_key_file
    Private key file used by ssh. Useful if using multiple keys and you don’t want to use SSH agent.
    ansible_ssh_common_args

    playbook    语法检测
    ansible-play    nginx.yml   --syntax-check
                                           --list-hosts
ansible?test70?-m?blockinfile?-a?‘path=/testdir/rc.local?block="systemctl?start?mariadb\nsystemctl?start?httpd"?‘ 末尾插入2行
效果:
systemctl?start?mariadb
systemctl?start?httpd
自定义标记
ansible?test70?-m?blockinfile?-a?‘path=/testdir/rc.local?block="systemctl?start?mariadb\nsystemctl?start?httpd"?marker="#{mark}?serivce?to?start"?‘
ansible?test70?-m?blockinfile?-a?‘path=/testdir/rc.local?block="systemctl?start?mariadb"?marker="#{mark}?serivce?to?start"?‘ 更新上条语句块的内容
ansible?test70?-m?blockinfile?-a?‘path=/testdir/rc.local?block=""?marker="#{mark}?serivce?to?start"?‘ 删除内容
ansible?test70?-m?blockinfile?-a?‘path=/testdir/rc.local??marker="#{mark}?serivce?to?start"?state=absent‘ 删除内容
ansible?test70?-m?blockinfile?-a?‘path=/testdir/rc.local?block="####blockinfile?test####"??marker="#{mark}?test?reg"?insertafter="^#!/bin/bash"?‘ 指定位置插入
lineinfile ,确保某一行存在指定文本中。
确保指定的一行文本 存在于文件中,如果指定的文本存在,不做操作,否则在文件末尾添加
ansible?test70?-m?lineinfile?-a?‘path=/testdir/test?line="test?text"‘
根据正则表达式替换某一行,如果有许多行匹配,只有最后一个匹配的行才会被替换,被替换为指定的文本,如没有匹配得到任一行,line 内容添加到最后一行
ansible?test70?-m?lineinfile?-a?‘path=/testdir/test?regexp="^line"?line="test?text"?‘
根据正则表达式替换某一行,如果有许多行匹配,只有最后一个匹配的行才会被替换,被替换为指定的文本,如没有匹配得到任一行,不操作
ansible?test70?-m?lineinfile?-a?‘path=/testdir/test?regexp="^line"?line="test?text"?backrefs=yes?‘
匹配到的行删除
ansible?test70?-m?lineinfile?-a?‘path=/testdir/test?line="lineinfile?-"?state=absent‘
根据正则表达式匹配,并删除
ansible?test70?-m?lineinfile?-a?‘path=/testdir/test?regexp="^lineinfile"?state=absent‘
开启后向引用匹配
ansible?test70?-m?lineinfile?-a?‘path=/testdir/test?regexp="(H.{4}).*(H.{4})"?line="\2"?backrefs=yes‘
变量的定义
变量名由字母数字,下划线组成,变量名以字母开头,内置的关键字不能作变量名
变量优先级
文件定义的变量优先级大于playbook hosts内的变量
-?hosts:?test70
??vars:
????testvar1:?testfile #定义
??remote_user:?root
??tasks:
??-?name:?task1
????file:
??????path:?/testdir/{{?testvar1?}} #引用
??????state:?touch
定义多个变量:
vars:
??testvar1:?testfile
??testvar2:?testfile2
yaml语法定义
vars:
??-?testvar1:?testfile
??-?testvar2:?testfile2
-?hosts:?test70
??remote_user:?root
??vars:
????nginx:
??????conf80:?/etc/nginx/conf.d/80.conf
??????conf8080:?/etc/nginx/conf.d/8080.conf
??tasks:
??-?name:?task1
????file:
??????path:?"{{nginx.conf80}}" #或者 "{{nginx[‘conf8080‘]}}" 引用
??????state:?touch
??-?name:?task2
????file:
??????path:?"{{nginx.conf8080}}"
??????state:?touch
引用变量时使用了双引号,变量在引用时处于开头位置。
path:?/testdir/{{?testvar1?}} 不处于开头可以不用双引号
可使用等号赋值,不需要引号
---
-?hosts:?test70
??remote_user:?root
??vars:
????nginx:
??????conf80:?/etc/nginx/conf.d/80.conf
??????conf8080:?/etc/nginx/conf.d/8080.conf
??tasks:
??-?name:?task1
????file:
??????path={{nginx.conf80}}
??????state=touch
??-?name:?task2
????file:
??????path={{nginx[‘conf8080‘]}}
??????state=touch
在单独文件中定义变量并应用,文件名为nginx_vars.yml 在文件中定义变量不需要vars关键字,直接定义。
语法一示例:
??testvar1:?testfile
??testvar2:?testfile2
语法二示例:
??-?testvar1:?testfile
??-?testvar2:?testfile2
语法三示例:
nginx:
??conf80:?/etc/nginx/conf.d/80.conf
??conf8080:?/etc/nginx/conf.d/8080.conf
引用
---
-?hosts:?test70
??remote_user:?root
??vars_files:
??-?/testdir/ansible/nginx_vars.yml
??tasks:
??-?name:?task1
????file:
??????path={{nginx.conf80}}
??????state=touch
??-?name:?task2
????file:
??????path={{nginx[‘conf8080‘]}}
??????state=touch
可以引用多个文件,
vars 和vars_files可同时使用
??vars:
??-?conf90:?/etc/nginx/conf.d/90.conf
??vars_files:
??-?/testdir/ansible/nginx_vars.yml
ansible?test70?-m?setup 显示收集的信息(很多信息
使用关键字查看想要的信息
ansible?test70?-m?setup?-a?‘filter=ansible_memory_mb‘
通配符过滤
ansible?test70?-m?setup?-a?"filter=mb"
在远程主机写入自定义的信息
在远程主机 /etc/ansible/facts.d/testinfo.fact 写入信息
[root@test70?facts.d]#?cat?testinfo.fact
[testmsg]
msg1=This?is?the?first?custom?test?message
msg2=This?is?the?second?custom?test?message
json格式
{
???"testmsg":{
???????"msg1":"This?is?the?first?custom?test?message",
???????"msg2":"This?is?the?second?custom?test?message"
???}
}
调用
ansible?test70?-m?setup?-a?"filter=ansible_local"
默认会查找远程主机 /etc/ansible/facts.d目录,如果将local tacts信息放入其他目录,需指定
ansible?test70?-m?setup?-a?‘fact_path=/testdir‘
-?hosts:?test70
??remote_user:?root
??tasks:
??-?name:?touch?testfile
????file:
??????path:?/testdir/testfile
??????state:?touch
??-?name:?debug?demo
????debug:
??????msg:?this?is?debug?info,The?test?file?has?been?touched
执行后控制台会输出信息
debug 模块输出自定义及变量信息
---
-?hosts:?test70
??remote_user:?root
??vars:
????testvar:?value?of?test?variable
??tasks:
??-?name:?debug?demo
????debug:
??????var:?testvar
-?hosts:?test70
??remote_user:?root
??vars:
????testvar:?testv
??tasks:
??-?name:?debug?demo
????debug:
??????msg:?"value?of?testvar?is?:?{{testvar}}" #msg引用了变量 变量引用前有: 需要使用“”
-?hosts:?test70
??remote_user:?root
??tasks:
??-?name:?debug?demo
????debug:
??????msg:?"Remote?host?memory?information:?{{ansible_memory_mb}}"
语法一示例:
debug:
?????msg:?"Remote?host?memory?information?:?{{ansible_memory_mb.real}}"
语法二示例:
debug:
?????msg:?"Remote?host?memory?information?:?{{ansible_memory_mb[‘real‘]}}"
上述两种语法前文中已经进行过示例,此处不再赘述。
注册变量:
模块运行时会返回值,默认不显示(使用-vvvv显示),可以将其写入变量后通过引用进行提取
-?hosts:?test70
??remote_user:?root
??tasks:
??-?name:?test?shell
????shell:?"echo?test?>?/var/testshellfile"
????register:?testvar #注册变量
??-?name:?shell?module?return?values
????debug:
??????var:?testvar # 引用
返回的值
changed: [192.168.36.73] => {
"changed": true,
"cmd": "echo test1 > /data/testfile",
"delta": "0:00:00.002276",
"end": "2019-04-23 18:30:31.285899",
可以通过指定的key获取其value,方式;
语法一
??-?name:?shell?module?return?values
????debug:
??????msg:?"{{testvar.cmd}}"
语法二
??-?name:?shell?module?return?values
????debug:
??????msg:?"{{testvar[‘cmd‘]}}"
返回值含义文档: https://docs.ansible.com/ansible/2.4/shell_module.html
提示用户输入信息:
---
-?hosts:?test70
??remote_user:?root
??vars_prompt:
????-?name:?"your_name"
??????prompt:?"What?is?your?name"
#默认输入不显示;希望显示
private: no
????-?name:?"your_age"
??????prompt:?"How?old?are?you"
??tasks:
???-?name:?output?vars
?????debug:
??????msg:?Your?name?is?{{your_name}},You?are?{{your_age}}?years?old.
-?hosts:?test70
??remote_user:?root
??vars_prompt:
????-?name:?"solution"
??????prompt:?"Choose?the?solution?you?want?\n
??????A:?solutionA\n
??????B:?solutionB\n
??????C:?solutionC\n"
??????private:?no
??????default:?A
??tasks:
???-?name:?output?vars
?????debug:
??????msg:?The?final?solution?is?{{solution}}.
脚本:用户输入密码后创建账户(需要对密码加密,使用passlib库,python.用户可以确认密码
-?hosts:?test70
??remote_user:?root
??vars_prompt:
????-?name:?"user_name"
??????prompt:?"Enter?user?name"
??????private:?no
????-?name:?"user_password"
??????prompt:?"Enter?user?password"
??????encrypt:?"sha512_crypt"
??????confirm:?yes
??tasks:
???-?name:?create?user
?????user:
??????name:?"{{user_name}}"
??????password:?"{{user_password}}"
通过命令行传入变量
playbook中未定义变量,想直接引用可通过命令行传入
ansible-playbook?cmdvar.yml?--extra-vars?"pass_var=cmdline?pass?var" #传入长变量
ansible-playbook?cmdvar.yml?-e?‘pass_var="test"?pass_var1="test1"‘ 短变量
如果未定义变量,也没有传入变量,会报错,可playbook在playbo添加默认变量
-?hosts:?test70
??remote_user:?root
??vars:
????pass_var:?test_default
??tasks:
??-?name:?"Passing?Variables?On?The?Command?Line"
????debug:
??????msg:?"{{pass_var}}"
在清单中为主机添加变量,主机变量的使用范围仅限于对应的主机
test70?ansible_host=10.1.1.70?testhostvar=test70_host_var 应用。使用{{testhostvar}}
yaml语法配置
all:
?hosts:
???test70:
?????ansible_host:?10.1.1.70
?????ansible_port:?22
?????testhostvar:?test70_host_var
?????testhostvar1:?test70_host_var1
主机组变量
[testB]
test70?ansible_host=10.1.1.70
test71?anisble_host=10.1.1.71
?
[testB:vars]
test_group_var1=‘group?var?test‘
test_group_var2=‘group?var?test2‘
YAML
all:
?children:
???testB:
?????hosts:
???????test70:
?????????ansible_host:?10.1.1.70
?????????ansible_port:?22
???????test71:
?????????ansible_host:?10.1.1.71
?????????ansible_port:?22
?????vars:
???????test_group_var1:?‘group?var?test1‘
???????test_group_var2:?‘group?var?test2‘
通过set_fact 定义变量
-?hosts:?test70
??remote_user:?root
??vars:
????testvar1:?test1_string
??tasks:
??-?shell:?"echo?test2_string"
????register:?shellreturn
??-?set_fact:
??????testsf1:?"{{testvar1}}"
??????testsf2:?"{{shellreturn.stdout}}"
??-?debug:
??????msg:?"{{testsf1}}?{{testsf2}}"
http://www----zsythink.net/archives/2698 最后有不懂得
内置变量
ansible all -m debug -a "msg={{ansible_version}}"
hostvars
inventory_hostname 当前被操作的主机名称,是对应清单中的主机名,
inventory_hostname_short ,主机名更短
play_hosts 当前play 所操作的所有主机的列表
groups 分组的信息 每个分组的主机,以及没有被分组的单独的主机
group_names
inventory_dir
71 #host_key_checking = False 第一次检查key 取消注释,默认回答yes
以sudo执行,需要输入sudo口令,使用-K
chrony 同步 playbook
server 0.centos.pool.ntp.org iburst
计划任务
不输入确认口令 visudo NOPASSWORD:ALL
ansible all -m ping -u yon -b -K
-u 使用-u 默认使当前用户(即在控制端使用的用户)
启用日志 log_path
ansible ‘appservers:!webservers‘ -m ping
ansible 命令行选项
修改ansible 默认模块 -m shell 默认使用shell执行
user 创建家目录,但是不生成家目录的文件
文件分类放置,yaml和配置文件
变量优先级 变量文件 > playbook > -e > hosts主机变量 > hosts公共变量
跨角色 引用文件,从roles/httpd/files/xxxx.index.html
角色默认的路经
标签:列表 大于 net ssl setup pool cti keygen 写入
原文地址:https://www.cnblogs.com/g2thend/p/11621328.html