标签:数据信息 linking space ready timeout store workgroup perl 企业

目前最为成熟的一-种企业网站应用模式,可提供动态Web站点应
用及开发环境
1、构成组件
●Linux、 Apache、 MySQL、PHP/Perl/Python
2、LAMP的优势
●成本低廉
●可定制、易于开发
●方便易用、安全和稳定
1、编译安装的优点
●具有较大的自由度,功能可定制
●可及时获得最新的软件版本
●普遍适用于大多数Linux版本,便于移植使用
2、获得Apache服务器的源码包
●参考地址: htp://ttpd.apache .org/download.cgi
3、httpd.conf配置文件参数
常用的全局配置参数
●ServerRoot:服务目录
●Listen:监听的IP地址、端口号
●User:运行服务的用户身份
●Group:运行服务的组身份
●ServerAdmin:管理员邮箱
●ServerName:网站服务器的域名
●DocumentRoot:网页文档的根目录(站点)
●DirectoryIndex:默认的索引页文件(首页)
●ErrorLog:设置错误日志文件的路径(服务出错看日志)
●LogL .evel:记录日志的级别,默认为warn
●CustomL og:访问日志文件的位置
●PidFile:保存httpd进程PID号的文件(PID:117)
●AddDefaultCharset:设置站点中的网页默认使用的字符集编码
●Timeout:网络连接超时,默认为300秒
●KeepAlive:是否保持连接,可选On或Off
●MaxKeepAliveRequests:每次连接最多请求文件数
●KeepAlive Timeout:保持连接状态时的超时时间
●Include:需要包含进来的其他配置文件
Listen:监听的IP地址,端口号
ServerName:网站服务器的域名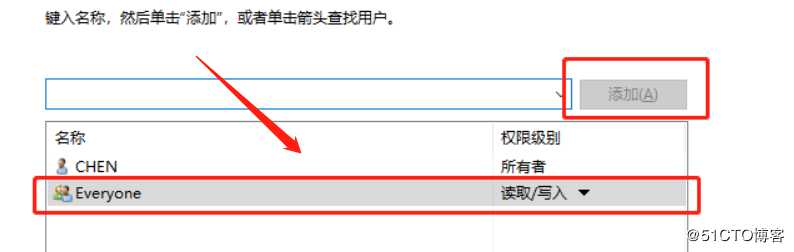
这两个后面需要修改1、先在宿主机把我们需要的源码包(源码包小编有,私聊即可到手)共享出来。若实在共享不出来,则直接把源代码压缩包拷贝进虚拟机(鼠标点住拖到Linux的主文件夹下即可,简单快捷,小编亲测有效)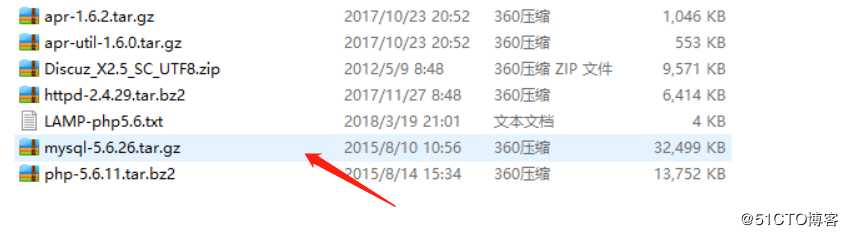
2、给宿主机的vmnet1网卡设置IP地址
3、挂载共享文件到mnt目录,若直接拖进来的,文件则在桌面主文件下。
[root@localhost ~]# smbclient -L //192.168.100.3/  //访问宿主机的IP地址
Enter SAMBA\root‘s password:
OS=[Windows 10 Enterprise 17763] Server=[Windows 10 Enterprise 6.3]

    Sharename       Type      Comment
    ---------       ----      -------
    ADMIN$          Disk      远程管理
    C$                   Disk      默认共享
    D$                   Disk      默认共享
    E$                   Disk      默认共享
    F$                   Disk      默认共享
    G$                   Disk      默认共享
    IPC$               IPC       远程 IPC
    LAMP              Disk
    LAMP-C7        Disk
    share              Disk
    Users              Disk
Connection to 192.168.100.3 failed (Error NT_STATUS_RESOURCE_NAME_NOT_FOUND)
NetBIOS over TCP disabled -- no workgroup available
[root@localhost ~]# mount.cifs //192.168.100.3/LAMP-C7 /mnt/  //挂载到mnt目录
Password for root@//192.168.100.3/LAMP-C7:
[root@localhost ~]# cd /mnt
[root@localhost mnt]# ls             看挂载目录下有没有这些源码包
[root@localhost mnt]# cd /mnt
[root@localhost mnt]# ls
apr-1.6.2.tar.gz       Discuz_X2.5_SC_UTF8.zip  LAMP-php5.6.txt      php-5.6.11.tar.bz2
apr-util-1.6.0.tar.gz  httpd-2.4.29.tar.bz2     mysql-5.6.26.tar.gz
4、将底层的跨平台工具包解压到opt目录底下,HTTP工具包解压到opt目录底下,再把跨平台工具包解压好的两个文件放到HTTP工具包下
tar zxvf apr-1.6.2.tar.gz -C /opt
tar zxvf apr-util-1.6.0.tar.gz -C /opt
tar jxvf httpd-2.4.29.tar.bz2 -C /opt
mv apr-1.6.2 httpd-2.4.29/srclib/apr
mv apr-util-1.6.0 httpd-2.4.29/srclib/apr-util
[root@localhost mnt]# cd /opt
[root@localhost opt]# ls
apr-1.6.2  apr-util-1.6.0  httpd-2.4.29  rh
[root@localhost opt]# mv apr-1.6.2 httpd-2.4.29/srclib/apr
[root@localhost opt]# mv apr-util-1.6.0 httpd-2.4.29/srclib/apr-util
[root@localhost opt]# ls
httpd-2.4.29  rh
5、安装搭建实验的环境包
[root@localhost opt]# yum -y install gcc gcc-c++ \   //环境语言
make \      //编译成能让计算机识别的语言
pcre-devel \  //pcre语言,就像正则表达式一样
expat-devel \  //支持识别标签性语言
perl    //perl编译器
6、手工编译安装
[root@localhost opt]# cd httpd-2.4.29/
[root@localhost httpd-2.4.29]# ./configure > --prefix=/usr/local/httpd \                       //"\"代表换行表示,指定路径
> --enable-so \                                         //apache核心模块开启
> --enable-rewrite \                                 //开启重写功能,防盗链
> --enable-charset-lite \                          //支持字符集,简体中文
> --enable-cgi                                         //通用网关接口
>
config.status: creating build/rules.mk
config.status: creating build/pkg/pkginfo
config.status: creating build/config_vars.sh
config.status: creating include/ap_config_auto.h
config.status: executing default commands
configure: summary of build options:
7、配置文件编译转换成主机能识别的语言,再安装
[root@localhost httpd-2.4.29]# make

les -module -avoid-version  mod_rewrite.lo
make[4]: 离开目录“/opt/httpd-2.4.29/modules/mappers”
make[3]: 离开目录“/opt/httpd-2.4.29/modules/mappers”
make[2]: 离开目录“/opt/httpd-2.4.29/modules”
make[2]: 进入目录“/opt/httpd-2.4.29/support”
make[2]: 离开目录“/opt/httpd-2.4.29/support”

make[1]: 离开目录“/opt/httpd-2.4.29”
[root@localhost httpd-2.4.29]# make install
Installing man pages and online manual
mkdir /usr/local/httpd/man
mkdir /usr/local/httpd/man/man1
mkdir /usr/local/httpd/man/man8
mkdir /usr/local/httpd/manual
make[1]: 离开目录“/opt/httpd-2.4.29”
8、Apache启动脚本放进去方便管理,重新命名httpd
[root@localhost httpd-2.4.29]# cp /usr/local/httpd/bin/apachectl /etc/init.d/httpd 9、进入vi /etc/init.d/httpd配置文件参数
配置文件首行加入参数
#/bin/sh
#hkconfig: 35 85 21 //35级别自动运行  第85个启动 第21个关闭
#escription: Apache is a World Wide Web server
10、httpd服务加入到Service管理器,便于开启、关闭以及加载等。
[root@localhost init.d]# chkconfig --add httpd
[root@localhost init.d]#
11、vim /usr/local/httpd/conf/httpd.conf //到配置文件中配置参数
#ServerName www.yun.com:80

#Listen 192.168.136.132:80
Listen 80        (数据查找并更改)
12、创建软链接,便于调取
ln -s /usr/local/httpd/conf/httpd.conf /etc/   //做个软链接,下次直接就输入vim /etc/httpd.conf就行
ln -s /usr/local/httpd/bin/* /usr/local/bin/   //做个软链接,便于你的系统可以识别
13、检查配置文件语法错误
[root@localhost init.d]# httpd -t
AH00558: httpd: Could not reliably determine the server‘s fully qualified domain name, using localhost.localdomain. Set the ‘ServerName‘ directive globally to suppress this message
Syntax OK
[root@localhost init.d]# apachectl -t
AH00558: httpd: Could not reliably determine the server‘s fully qualified domain name, using localhost.localdomain. Set the ‘ServerName‘ directive globally to suppress this message
Syntax OK
14、一系列操作后,开启服务
[root@localhost init.d]# systemctl stop firewalld.service  //关闭防火墙
[root@localhost init.d]# setenforce 0  //关闭增强功能
[root@localhost init.d]# service httpd start  //开启http服务
AH00558: httpd: Could not reliably determine the server‘s fully qualified domain name, using localhost.localdomain. Set the ‘ServerName‘ directive globally to suppress this message
httpd (pid 70331) already running
[root@localhost init.d]# netstat -anpt | grep 80  //查看监听端口
tcp        0      0 192.168.136.132:22      192.168.136.1:58031     ESTABLISHED 3506/sshd: root@pts
tcp6       0      0 :::80                   :::*                    LISTEN      70331/httpd
[root@localhost init.d]#
15、在Linux上可以访问HTTP服务,即第一步Apache网站搭建成功。
1、编码安装MYSQL数据库
[root@localhost init.d]# yum install ncurses-devel autoconf cmake -y  //安装环境包和Cmake工具包
已加载插件:fastestmirror, langpacks
Loading mirror speeds from cached hostfile
 * base: mirrors.aliyun.com
 * extras: mirrors.nju.edu.cn
 * updates: mirrors.nju.edu.cn
正在解决依赖关系
--> 正在检查事务
---> 软件包 autoconf.noarch.0.2.69-11.el7
2、数据库的软件包解压缩到opt底下,编译环境包
[root@localhost mnt]# cd /mnt
tar xzvf mysql-5.6.26.tar.gz -C /opt
[root@localhost mnt]# cd /opt
[root@localhost opt]# ls
httpd-2.4.29 mysql-5.6.26 rh
[root@localhost opt]# cd /opt/mysql-5.6.26/
[root@localhost mysql-5.6.26]#
cmake \
-DCMAKE_INSTALL_PREFIX=/usr/local/mysql \ //指定安装路径
-DDEFAULT_CHARSET=utf8 \ //指定字符集
-DDEFAULT_COLLATION=utf8_general_ci \ //指定字符集默认
-DEXTRA_CHARSETS=all \ //指定扩展字符集
-DSYSCONFIDIR=/etc \ //指定配置文件目录
-DMYSQL_DATADIR=/home/mysql/ \ //指定数据库里的数据文件
-DMYSQL_UNIX_ADDR=/home/mysql/mysql.sock //定义sock文件连接数据库文件
3、编译安装,能让计算机识别。如果出error报错,一定是配置文件更改有误或路径出错,回去查看。
[root@localhost mysql-5.6.26]# make
[root@localhost mysql-5.6.26]# make install
[100%] Building CXX object libmysqld/examples/CMakeFiles/mysql_embedded.dir/__/__/client/readline.cc.o
Linking CXX executable mysql_embedded
[100%] Built target mysql_embedded
Scanning dependencies of target mysqltest_embedded
[100%] Building CXX object libmysqld/examples/CMakeFiles/mysqltest_embedded.dir/__/__/client/mysqltest.cc.o
Linking CXX executable mysqltest_embedded
[100%] Built target mysqltest_embedded
Scanning dependencies of target my_safe_process
[100%] Building CXX object mysql-test/lib/My/SafeProcess/CMakeFiles/my_safe_process.dir/safe_process.cc.o
Linking CXX executable my_safe_process
[100%] Built target my_safe_process
4、配置数据库
[root@localhost mysql-5.6.26]# cp support-files/my-default.cnf /etc/my.cnf  //把配置文件放进去
cp:是否覆盖"/etc/my.cnf"? yes
[root@localhost mysql-5.6.26]#
[root@localhost mysql-5.6.26]# cp support-files/mysql.server /etc/init.d/mysqld   //把配置文件放到启动脚本
cp:是否覆盖"/etc/init.d/mysqld"? yes
[root@localhost mysql-5.6.26]# chmod 755 /etc/init.d/mysqld  //添加执行权限
[root@localhost mysql-5.6.26]# chkconfig --add /etc/init.d/mysqld //把服务添加到服务管理器中
[root@localhost mysql-5.6.26]# chkconfig  mysqld --level 35 on   //35级别开启
[root@localhostmysql5.6.26]#echo "PATH=$PATH:/usr/local/mysql/bin" >> /etc/profile
//启动系统环境变量
[root@localhost mysql-5.6.26]# source /etc/profile //启动系统环境变量
[root@localhost mysql-5.6.26]# echo $PATH  //查看系统环境变量,命令有没有被添加进去
/usr/local/bin:/usr/local/sbin:/usr/bin:/usr/sbin:/bin:/sbin:/root/bin:/usr/local/mysql/bin:/usr/local/mysql/bin:/usr/local/mysql/bin
[root@localhost mysql-5.6.26]# useradd -s /sbin/nologin mysql  //创建程序用户,不让它登录本地控制台
[root@localhost mysql-5.6.26]# chown -R mysql:mysql   //提升路径下所有用户的权限 /usr/local/mysql/
5、将数据信息载入到数据库中
[root@localhost mysql-5.6.26]# /usr/local/mysql/scripts/mysql_install_db \  //初始化数据库
--user=mysql \   //数据库用户
--ldata=/var/lib/mysql \   //数据
--basedir=/usr/local/mysql \  //数据库目录
--datadir=/home/mysql  //数据库存放目录
6、开启数据库
[root@localhost mysql]# vim /etc/init.d/mysqld

46 basedir=/usr/local/mysql   //指明路径   46行
 47 datadir=/home/mysql    //指明数据库存放位置   47行

[root@localhost mysql]# vim /etc/init.d/mysqld
[root@localhost mysql]# service mysqld start   //开启数据库
Starting MySQL.... SUCCESS!
[root@localhost mysql]# netstat -anpt | grep 3306  //查看监听端口
tcp6       0      0 :::3306                 :::*                    LISTEN      6458/mysqld
7、给数据库管理员设置一个密码:abc123
[root@localhost mysql]# mysqladmin -u root -p password "abc123"
Enter password:
Warning: Using a password on the command line interface can be insecure.1、安装环境
root@localhost opt]# yum -y install gd \     //图像化处理,
libpng \    //支持PNG图片
libpng-devel pcre pcre-devel libxml2-devel \   //支持解析,标签性语言
libjpeg-devel      //支持jpg图片格式
2、解压并关联数据库和Apache
[root@localhost mnt]# tar xjvf php-5.6.11.tar.bz2 -C /opt
cd /opt/php-5.6.11/

[root@localhost php-5.6.11]# ./configure > --prefix=/usr/local/php5 \ //指定安装路径
> --with-gd \  //gd库,图像化处理
> --with-zlib \   //函数库
> --with-apxs2=/usr/local/httpd/bin/apxs \  //给apache提供功能性模块
> --with-mysql=/usr/local/mysql \  //关联数据库
> --with-config-file-path=/usr/local/php5 \  //关联PHP配置
> --enable-mbstring   //功能性模块加载
3、编译、安装以及创建软链接,细心一点。
[root@localhost php-5.6.11]#make
[root@localhost php-5.6.11]#make install
Installing PEAR environment:      /usr/local/php5/lib/php/
[PEAR] Archive_Tar    - installed: 1.3.12
[PEAR] Console_Getopt - installed: 1.3.1
[PEAR] Structures_Graph- installed: 1.0.4
[PEAR] XML_Util       - installed: 1.2.3
[PEAR] PEAR           - installed: 1.9.5
Wrote PEAR system config file at: /usr/local/php5/etc/pear.conf
You may want to add: /usr/local/php5/lib/php to your php.ini include_path
/opt/php-5.6.11/build/shtool install -c ext/phar/phar.phar /usr/local/php5/bin
ln -s -f phar.phar /usr/local/php5/bin/phar
Installing PDO headers:          /usr/local/php5/include/php/ext/pdo/

[root@localhost php-5.6.11]# cp php.ini-development /usr/local/php5/php.ini
//复制配置文件到php.ini中
[root@localhost php-5.6.11]# ln -s /usr/local/php5/bin/* /usr/local/bin/  把php5的所有命令做个软链接
[root@localhost php-5.6.11]# ln -s /usr/local/php5/sbin/* /usr/local/sbin/

[root@localhost php-5.6.11]# vim /etc/httpd.conf
<IfModule dir_module>
    DirectoryIndex index.html index.php
</IfModule>//默认首页加上php

AddType application/x-httpd-php .php
AddType application/x-httpd-php-source .phps//加入PHP的配置文件
4、进入网页配置文件、改名、PHP
[root@localhost php-5.6.11]# cd /usr/local/httpd/htdocs/
root@localhost htdocs]# mv index.html index.php

vi /usr/local/httpd/htdocs/index.php
<?php
phpinfo();
?>
[root@localhost htdocs]# ls
index.php
5、LAMP架构成型。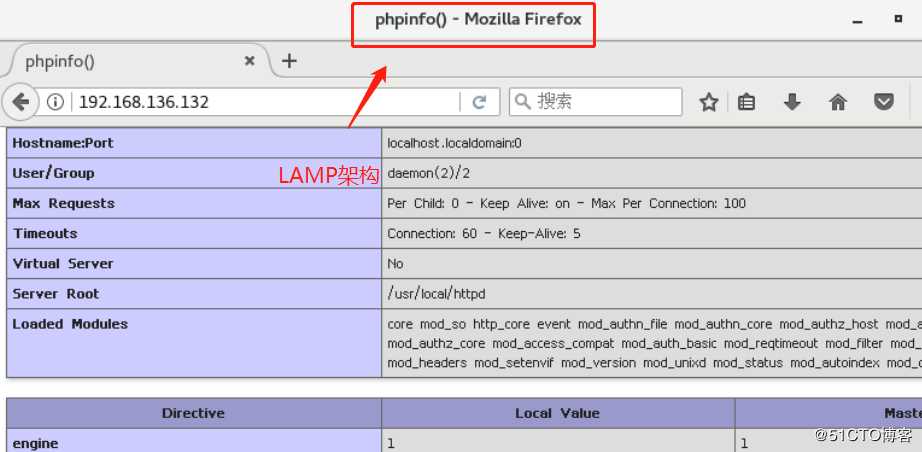
6、配置数据库Mysql
[root@localhost ~]# cd /mnt  //我们的论坛包在我们之前的源码包中,要的私信我
[root@localhost mnt]# ls
apr-1.6.2.tar.gz         httpd-2.4.29.tar.bz2  php-5.6.11.tar.bz2
apr-util-1.6.0.tar.gz    LAMP-php5.6.txt
Discuz_X2.5_SC_UTF8.zip  mysql-5.6.26.tar.gz

[root@localhost mnt]# mysql -u root -p  //进入数据库
Enter password:     //输入你的设置的密码abc123
Welcome to the MySQL monitor.  Commands end with ; or \g.
Your MySQL connection id is 1
Server version: 5.6.26 Source distribution

Copyright (c) 2000, 2015, Oracle and/or its affiliates. All rights reserved.

Oracle is a registered trademark of Oracle Corporation and/or its
affiliates. Other names may be trademarks of their respective
owners.

Type ‘help;‘ or ‘\h‘ for help. Type ‘\c‘ to clear the current input statement.

mysql> create database bbs;   //创建数据库
Query OK, 1 row affected (0.00 sec)

mysql> show databases; //查看数据库
+--------------------+
| Database           |
+--------------------+
| information_schema |
| bbs                |
| mysql              |
| performance_schema |
| test               |
+--------------------+
5 rows in set (0.02 sec)

mysql> GRANT all ON bbs.* TO ‘bbsuser‘@‘192.168.102.166‘ IDENTIFIED BY ‘admin123‘;  //提升权限给BBS数据库当中所有的表格,给bbsuser用户,给所有终端可以登录,设置密码admin123
Query OK, 0 rows affected (0.01 sec)

mysql> flush privileges;
Query OK, 0 rows affected (0.00 sec)

mysql> exit  //退出
Bye
7、论坛的源代码包解压到opt目录下
[root@localhost htdocs]# cd /mnt
[root@localhost mnt]# ls
apr-1.6.2.tar.gz         httpd-2.4.29.tar.bz2  php-5.6.11.tar.bz2
apr-util-1.6.0.tar.gz    LAMP-php5.6.txt
Discuz_X2.5_SC_UTF8.zip  mysql-5.6.26.tar.gz
[root@localhost mnt]#Discuz_X2.5_SC_UTF8.zip -d /opt/dis  //把这个论坛包解压到OPT底下
  creating: /opt/dis/utility/oldprg/uchome/
  inflating: /opt/dis/utility/oldprg/uchome/invite.php
  inflating: /opt/dis/utility/oldprg/uchome/space.php
  inflating: /opt/dis/utility/restore.php
  inflating: /opt/dis/utility/update.php

[root@localhost mnt]#cd /opt/dis
[root@localhost dis]#cp -r upload/ /usr/local/httpd/htdocs/bbs ////把网站所有的东西,复制到apache站点中起个名字bbs
[root@localhost bbs]# cd /usr/local/httpd/htdocs/
[root@localhost htdocs]# ls  //查看有没有这个页面配置文件
bbs  index.php
8、访问bbs页面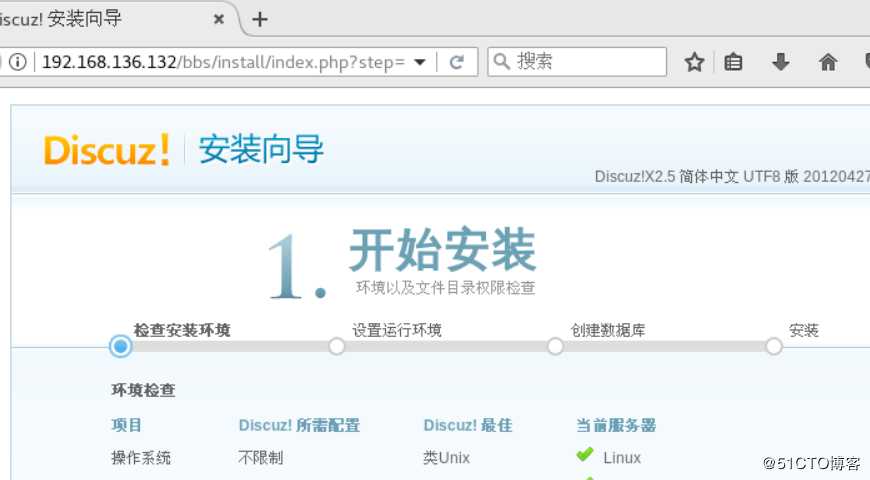
9、给程序用户提升权限
[root@localhost htdocs]# cd bbs/
[root@localhost bbs]# ls -l
总用量 76
-rw-r--r--.  1 root root 2603 10月 20 10:13 admin.php
drwxr-xr-x. 11 root root  163 10月 20 10:13 api
-rw-r--r--.  1 root root  727 10月 20 10:13 api.php
drwxr-xr-x.  2 root root   23 10月 20 10:13 archiver
drwxr-xr-x.  2 root root   90 10月 20 10:13 config
-rw-r--r--.  1 root root  922 10月 20 10:13 connect.php
-rw-r--r--.  1 root root  253 10月 20 10:13 cp.php
-rw-r--r--.  1 root root  106 10月 20 10:13 crossdomain.xml
drwxr-xr-x. 13 root root  216 10月 20 10:13 data
-rw-r--r--.  1 root root 5558 10月 20 10:13 favicon.ico
-rw-r--r--.  1 root root 2110 10月 20 10:13 forum.php
-rw-r--r--.  1 root root  823 10月 20 10:13 group.php
-rw-r--r--.  1 root root 1223 10月 20 10:13 home.php
-rw-r--r--.  1 root root 5448 10月 20 10:13 index.php
drwxr-xr-x.  5 root root   64 10月 20 10:13 install
-rw-r--r--.  1 root root 1040 10月 20 10:13 member.php
-rw-r--r--.  1 root root 1381 10月 20 10:13 misc.php
-rw-r--r--.  1 root root 1757 10月 20 10:13 plugin.php
-rw-r--r--.  1 root root  985 10月 20 10:13 portal.php
-rw-r--r--.  1 root root  582 10月 20 10:13 robots.txt
-rw-r--r--.  1 root root 1158 10月 20 10:13 search.php
drwxr-xr-x. 10 root root  168 10月 20 10:13 source
drwxr-xr-x.  6 root root   72 10月 20 10:13 static
drwxr-xr-x.  3 root root   38 10月 20 10:13 template
drwxr-xr-x.  6 root root   92 10月 20 10:13 uc_client
drwxr-xr-x. 13 root root  241 10月 20 10:13 uc_server
-rw-r--r--.  1 root root 1691 10月 20 10:13 userapp.php
[root@localhost bbs]# chown -R daemon ./config
[root@localhost bbs]# chown -R daemon ./data
[root@localhost bbs]# chown -R daemon ./uc_client
[root@localhost bbs]# chown -R daemon ./uc_server/data
[root@localhost bbs]#
[root@localhost bbs]# ls -l
总用量 76
-rw-r--r--.  1 root   root 2603 10月 20 10:13 admin.php
drwxr-xr-x. 11 root   root  163 10月 20 10:13 api
-rw-r--r--.  1 root   root  727 10月 20 10:13 api.php
drwxr-xr-x.  2 root   root   23 10月 20 10:13 archiver
drwxr-xr-x.  2 daemon root   90 10月 20 10:13 config
-rw-r--r--.  1 root   root  922 10月 20 10:13 connect.php
-rw-r--r--.  1 root   root  253 10月 20 10:13 cp.php
-rw-r--r--.  1 root   root  106 10月 20 10:13 crossdomain.xml
drwxr-xr-x. 13 daemon root  216 10月 20 10:13 data
-rw-r--r--.  1 root   root 5558 10月 20 10:13 favicon.ico
-rw-r--r--.  1 root   root 2110 10月 20 10:13 forum.php
-rw-r--r--.  1 root   root  823 10月 20 10:13 group.php
-rw-r--r--.  1 root   root 1223 10月 20 10:13 home.php
-rw-r--r--.  1 root   root 5448 10月 20 10:13 index.php
drwxr-xr-x.  5 root   root   64 10月 20 10:13 install
-rw-r--r--.  1 root   root 1040 10月 20 10:13 member.php
-rw-r--r--.  1 root   root 1381 10月 20 10:13 misc.php
-rw-r--r--.  1 root   root 1757 10月 20 10:13 plugin.php
-rw-r--r--.  1 root   root  985 10月 20 10:13 portal.php
-rw-r--r--.  1 root   root  582 10月 20 10:13 robots.txt
-rw-r--r--.  1 root   root 1158 10月 20 10:13 search.php
drwxr-xr-x. 10 root   root  168 10月 20 10:13 source
drwxr-xr-x.  6 root   root   72 10月 20 10:13 static
drwxr-xr-x.  3 root   root   38 10月 20 10:13 template
drwxr-xr-x.  6 daemon root   92 10月 20 10:13 uc_client
drwxr-xr-x. 13 root   root  241 10月 20 10:13 uc_server
-rw-r--r--.  1 root   root 1691 10月 20 10:13 userapp.php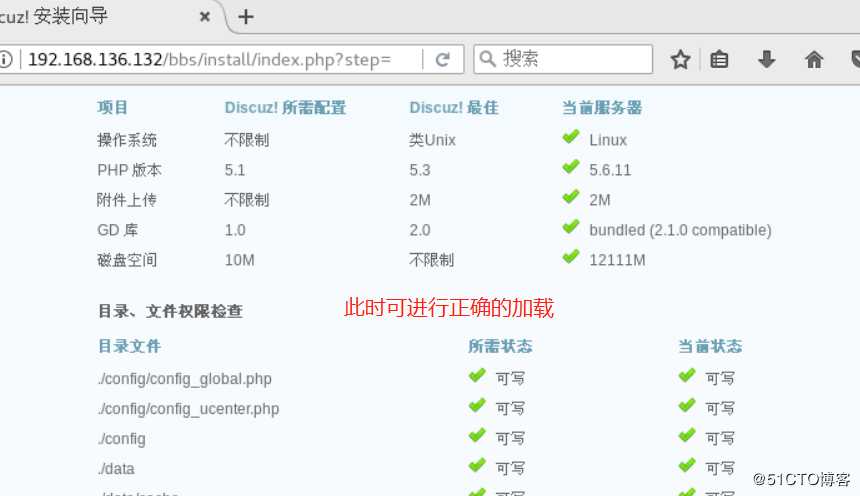
10、点下一步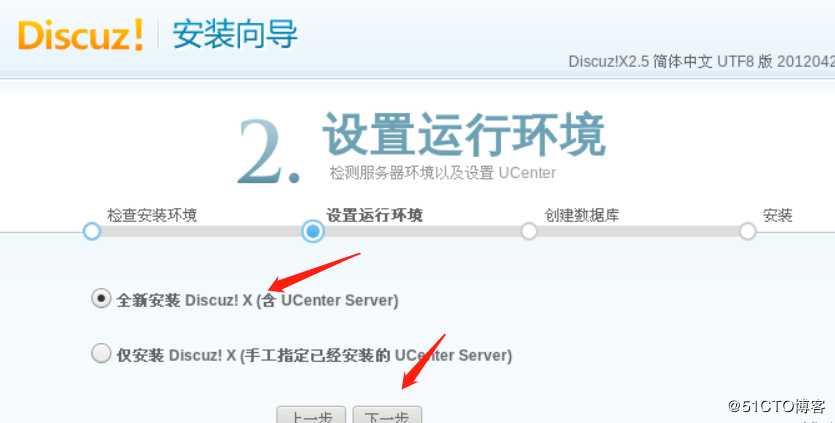
11、信息不要填错,否则进不去。给管理员设置一个密码。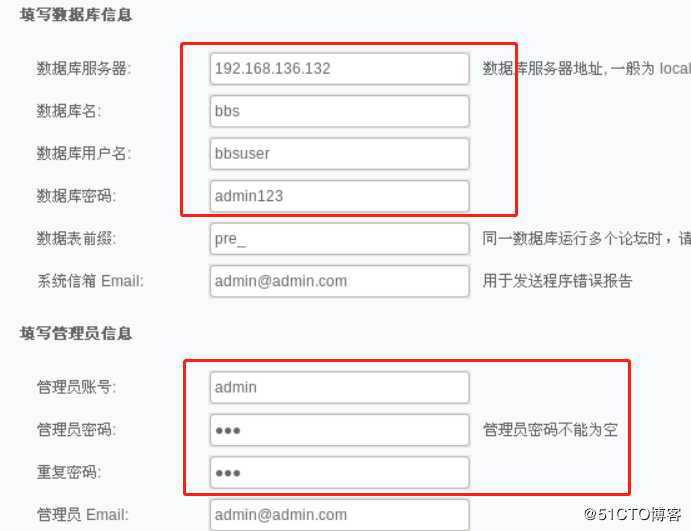
12、.输入http://192.168.136.132/bbs 就能进入论坛首页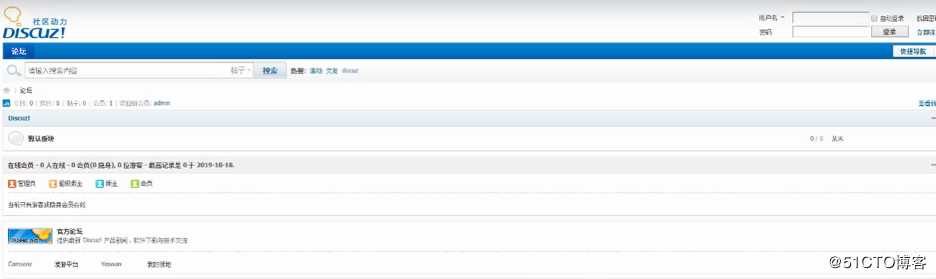
13、输入http://192.168.136.132/bbs/admin.php 就能进入后端进行操作,输入密码,用户名进行登陆,登陆进去后可任意操作。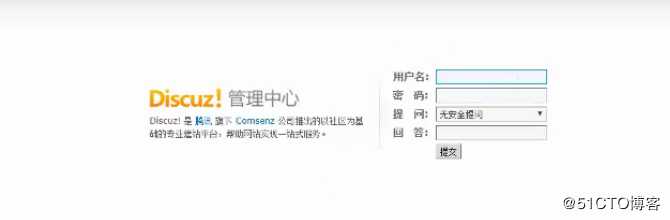
标签:数据信息 linking space ready timeout store workgroup perl 企业
原文地址:https://blog.51cto.com/14475593/2444272