标签:command htttp 语法检查 模板 touch nlp 图片 一点 假设
目录
我叫张贺,贪财好色。一名合格的LINUX运维工程师,专注于LINUX的学习和研究,曾负责某中型企业的网站运维工作,爱好佛学和跑步。
个人博客:传送阵
笔者微信:zhanghe15069028807,非诚勿扰。
ansible-playbook其实就是把ad-hoc写成脚本的方式,一定要注意格式,playbook的格式非常严格
缩进:使用固定的网络表示层级结构,每个缩进两个空格,不能用tab
冒号:以冒号结尾除外,其他的冒号后面必须要有空格
短横线:表示列表项,使用一个短横加一个空格,多个项使用同样的缩进级别作为同一列表
模块在描述的下面就行,不能同级或超过,我们最好用两个空格
//示例
[root@ansible ansible]# vim test1.yml
- hosts: nfs   #顶格杠,空格,hosts,冒号,空格,nfs
  tasks:   #开头两空格
    - name: Install NFS  #四空格
      yum: name=nfs-utils state=present  #六个空格

    - name: Copy File exports
      copy: src=/root/exports.template dest=/etc/exports

    - name: Start Nfs Server
      service: name=nfs-server state=started enabled=yes

//语法检查
[root@ansible ansible]# ansible-playbook --syntax-check test1.yml
playbook: test1.yml

//模拟执行
[root@ansible ansible]# ansible-playbook -C test1.yml  #+C模拟执行

//正式执行
[root@ansible ansible]# ansible-playbook test2.yml  #这样才会执行

PLAY [nfs] **************************************************************************************************************************************

TASK [Gathering Facts] **************************************************************************************************************************
ok: [192.168.80.188]

TASK [Create New File] **************************************************************************************************************************
changed: [192.168.80.188]

PLAY RECAP **************************************************************************************************************************************
192.168.80.188             : ok=2    changed=1    unreachable=0    failed=0    skipped=0    rescued=0    ignored=0
一个play单个任务
[root@ansible ansible]# vim test2.yml

- hosts: nfs
  tasks:
    - name: Create New File
      file: path=/tmp/test.txt state=touch owner=root group=root mode=400

//检查语法,如果什么都不提示,那就说明没有错误
[root@ansible ansible]# ansible-playbook --syntax-check test2.yml
playbook: test2.yml  #只检查语法,不会检测内容
一个play多个任务
[root@ansible ansible]# cat test2.yml
- hosts: nfs
  tasks:
    - name: Create New File
      file: path=/tmp/test.txt state=touch owner=root group=root mode=400

    - name: Create New Directory
      file: path=/tmp/oldboy_dir state=directory owner=root group=root mode=700
多个play,多个任务(不建议这样用,建立多建一个文件)
[root@ansible ansible]# cat test2.yml
- hosts: nfs
  tasks:
    - name: Create New File
      file: path=/tmp/test.txt state=touch owner=root group=root mode=400

    - name: Create New Directory
      file: path=/tmp/oldboy_dir state=directory owner=root group=root mode=700

- hosts: web
  tasks:
    - name: Create Web New File
      file: path=/opt/test.txt owner=root group=root mode=400 state=touch

    - name: Create Web New Directory
      file: path=/opt/oldboy_dir state=directory owner=root group=root mode=700
[root@ansible ansible]# ansible-playbook --syntax-check test2.yml

playbook: test2.yml像上面,我们写的脚本太长了,关键是因为路径太长了,我们可以把路径定义到变量,然后下面再引用, 这样就好看多了。
变量的定义有三种方式:
在playbook文件里面定义;
外部定义,然后传进来;
单独定义一个变量文件
在playbook文件里面定义:
[root@ansible ansible]# vim test2.yml    #路径变量
- hosts: nfs
  vars:                             #这里定义了一个变量
    file_name: /tmp/tt
  tasks:
    - name: Create New File
      file: path={{ file_name }} state=touch owner=root group=root mode=400   #在这里引用了一下,双花括号,两边有空格,注意这个格式

    - name: Create New Directory        #在name里面也可以引用变量,在执行的时候也会翻译出来
      file: path=/tmp/tt.dir state=directory owner=root group=root mode=700
主机清单里面定义:
[root@ansible ansible]# cat hosts      #在主机清单里面的web再定一个同样的变量
[web]
192.168.80.166
[web:vars]                               #注意这个格式,很少在这里定义,知道即可
file_name=temp.hosts
外部定义
 //执行的时候会有一个报警,提示让你不要用shell模块
 [root@ansible ansible]# ansible-playbook test4.yml --extra-vars "file_name=temp_extra"
在web上查看,外置优先生效,共次是playbook生效,最后才是主机清单生效
单独用一个文件定义
[root@ansible ansible]# cat vars.yml
file_name: temp.vars
[root@ansible ansible]# cat test4.yml
- hosts: web
  vars_files:                          #用关键字引用一下,在大型项目当中很常见
    ./vars.yml
  tasks:
    - name: Create New File name:{{ file_name }}
file: name=/opt/{{ file_name }} state=touch假设我想在ansible上通过playbook查看web服务器当中开了哪些端口,怎么写呢?先写一个简单的,如下所示:
[root@ansible ansible]# cat test5.yml
---
- hosts: web
  tasks:
    - name: show "ss -tnlp"
      shell: ss -tnlp
[root@ansible ansible]# ansible-playbook test5.yml    #并没有输出结果,只是显示执行成功了。。
没有输入结果,只是显示执行成功了,那怎么办呢?其实方法很简单,就将结果赋值给一个变量,然后我们把变量打印出来就好了,如下所示:
[root@ansible ansible]# cat test5.yml
---
- hosts: web
  tasks:
    - name: show "ss -tnlp"
      shell: ss -tnlp | grep 22
      register: Net_Status            #将结果保存在Net_Status变量当中

    - name: Output Status
      debug: msg={{ Net_Status }}    #debug模块用于输出函数
下面这是输出,通过输出我们看到还是比较乱的:
我们可以仅将标准输出打印出来,别的东西都不要打印了,就在debug模块后面的变量当中加一个stdout即可,如下所示:
[root@ansible ansible]# cat test5.yml
---
- hosts: web
tasks:
- name: show "ss -tnlp"
shell: ss -tnlp | grep 22
register: Net_Status
- name: Output Status
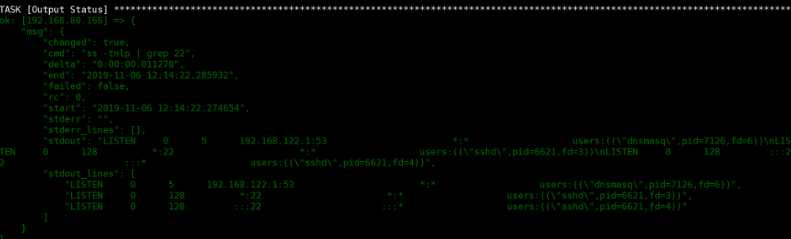
debug: msg={{ Net_Status.stdout }} #加在了这里下面是输出,没有那么难看复杂了,但还是看着有点难看,如下所示:

再加一个按行显示:
[root@ansible ansible]# cat test5.yml
---
- hosts: web
  tasks:
    - name: show "ss -tnlp"
      shell: ss -tnlp | grep 22
      register: Net_Status

    - name: Output Status
      debug: msg={{ Net_Status.stdout_lines }}    #debug不是调试的意思,而是输出的意思
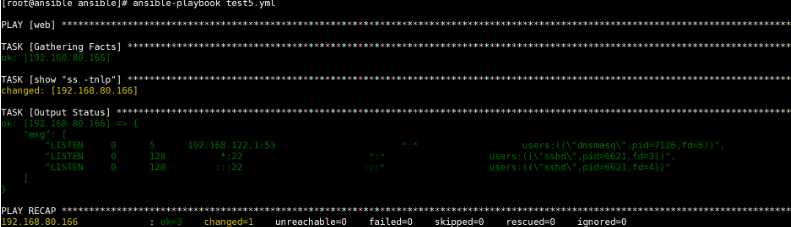
用到什么地方呢?我们在启动服务了之后,用这种方法检查端口是否起来了
playbook中的条件判断用when
[root@ansible ansible]# ansible nfs -m setup #在ansible上取其它主机的变量[root@ansible ansible]# vim test6.yml
---
- hosts: all
tasks:
- name: Create a File
file: path=/tmp/this_is_{{ ansible_hostname }} state=touch
when: (ansible_hostname == 'BACKUP') or (ansible_hostname == 'web1') #只有两台主机才会执行假设说现在我们要安装两个软件,给web1这个服务器上,怎样用ansible-playbook写呢?
[root@ansible ansible]# cat test7.yml     #安装两个软件,这么写有点乱,我们下面再换一种写法
---
- hosts: web
  tasks:
    - name: Install Wget Tree
      yum:
        name:
          - wget
          - tree
        state: present
[root@ansible ansible]# cat test8.yml #这么写看着舒服一点
---
- hosts: web
tasks:
- name: Install Wget Tree
yum: name=wget,tree state=present除了这两种写法,我们还可以使用循环的方式去写:
[root@ansible ansible]# cat test9.yml
---
- hosts: web
  tasks:
    - name: Install Wget Tree
      yum: name={{ item }} state=present
      with_items:   #软件可以专门用一个列表
        - wget
        - tree
---
- hosts: web
remote_user: root
tasks:
- name: Add Users
user: name={{ item.name }} groups={{ item.groups }} state=present
with_items:
- { name: 'test1',groups: 'bin' }
- { name: 'test2',groups: 'root' }默认playbook会检查命令和模块的返回状态,如果遇到错误就中断执行,加入参数ignore_errors:yes会忽略错误,继续向下执行。
[root@ansible ansible]# cat test8.yml
---
- hosts: web
  tasks:
    - name: Ignore False
      command: /bin/false
      ignore_errors: yes

    - name: Service Nfs Server
      service: name=nfs-server state=started enabled=yes
tags: start_nfs-server假设说我们已经在playbook里面写了20个任务,一执行在第15个报错了,我们调试完了之后执行,又开始从头开始执行,其实这样没有必要,我们只需要执行一下第15个就行了或者只需要从第15个之后开始执行,这就需要控制,这个控制就要通过打标记来实现。
[root@ansible ansible]# cat test8.yml
---
- hosts: web
  tasks:
    - name: Install Nfs
      yum: name=nfs-utils state=present
      tags: install_nfs

    - name: Service Nfs Server
      service: name=nfs-server state=started enabled=yes
      tags: start_nfs-server

//正常执行
[root@ansible ansible]# ansible-playbook test8.yml

//使用-t指定tag执行,多个tag可以用逗号隔开
[root@ansible ansible]# ansible-playbook -t install_nfs test8.yml

//使用--skip-tags排除不执行的tags
[root@ansible ansible]# ansible-playbook --skip-tags install_nfs test8.yml假如我们通过playbook给web更改了一个端口,更改端口当然是在配置文件里面更改,那么配置文件一更改,我们要通过cp模块推送,推送过去之后因为当前目标服务已经是启动状态,并不会重启,那你说我们直接在playbook里面写一个重启不就完了吗?但是如果在playbook里面写了重启的话,以后每次触发这个playbook都会重启,这不合适,这时候就我们就需要通过notify模块监控配置文件如果改变了的话,就会触发handlers任务,如下所示:
[root@ansible ansible]# cat test8.yml
---
- hosts: web
  tasks:
    - name: Install Httpd
      yum: name=httpd state=present
      tags: install_nfs

    - name: configure httpd
      copy: src=./httpd.conf.template dest=/etc/httpd/conf/httpd.conf backup=yes
      notify: Restart Httpd

    - name: Started Htttpd
      service: name=httpd state=started enabled=yes

  handlers:
    - name: Restart Httpd
service: name=httpd state=restarted上面我们是手工在ansible上面更改了httpd的配置文件的端口之后,然后推送到web,有没有办法使得我们不用手工更改,只需要在playbook里面定义一个变量,然后在在配置文件的端口的地方引用这个变量, 这时我们就要通过template模块替换cp模块,cp模块是见什么推送什么,而template模块就把配置文件里面的变量先翻译过来,然后再推送到web端。
[root@ansible ansible]# cat test8.yml
---
- hosts: web
#1、定义一个变量,在httpd的配置文件当中引用
  vars:
    http_port: 8080

#2.安装httpd
  tasks:
    - name: Install Httpd
      yum: name=httpd state=present
      tags: install_nfs

#3、使用template模板,翻译引用上述定义的变量
    - name: configure httpd
      template: src=./httpd.conf.template dest=/etc/httpd/conf/httpd.conf backup=yes
      notify: Restart Httpd

#4、启动httpd
    - name: Started Htttpd
      service: name=httpd state=started enabled=yes

#5、检查httpd的启动和当前状态
    - name: Get httpd status
      shell: netstat -tnlp|grep httpd
      register: Httpd_Port

#6、输出变量到面板
    - name: output httpd status
      debug: msg={{ Httpd_Port.stdout_lines }}
      ignore_errors: yes

#7、如果配置文件发生变化会调用handlers下面的模板
  handlers:
    - name: Restart Httpd
      service: name=httpd state=restarted
[root@ansible ansible]# vim ./httpd.conf.template
Listen {{ http_port }}include是调用任务的方式,把多个playbook名字的引用到一个文件里面,这样一执行这个文件,就会把引用到的所有的文件给执行了,如下所示:
[root@ansible ansible]# cat main.yml
- hosts: all
  tasks:
    - include_tasks: test1.yml
    - include_tasks: test2.yml

[root@ansible ansible]# cat test1.yml
- name: create file1
  command: touch file1

[root@ansible ansible]# cat test2.yml
- name: create file2
command: touch file2标签:command htttp 语法检查 模板 touch nlp 图片 一点 假设
原文地址:https://www.cnblogs.com/yizhangheka/p/12114168.html