标签:说明 quit pytho plot 系统 medium 监控 https 安装
最近在研究OpenCV,希望能通过机器视觉解决一些网络安全领域的问题。本文简要介绍如何通过OpenCV实现简单的图像识别,并让计算机通过“视觉”自动玩一个简单的2D小游戏,文末有视频演示及完整代码。
0x01 OpenCV介绍
Open Source Computer Vision Library.OpenCV于1999年由Intel建立,如今由Willow Garage提供支持。OpenCV是一个基于BSD许可(开源)发行的跨平台计算机视觉库,可以运行在Linux、Windows、MacOS操作系统上。它轻量级而且高效——由一系列 C 函数和少量C++类构成,同时提供了Python、Ruby、MATLAB等语言的接口,实现了图像处理和计算机视觉方面的很多通用算法。最新版本是3.1 ,2016年1月29日发布。(引自百度百科openCV)
简言之,通过openCV可实现计算机图像、视频的编辑。广泛应用于图像识别、运动跟踪、机器视觉等领域。
0x02 环境
Win7 或Win10操作系统
Python 3.5 以上
0x03 安装
pip install --upgrade setuptools
pip install numpy Matplotlib
pip install opencv-python
pip install pyautogui
pip install mss
pip install pynput
0x04 代码说明
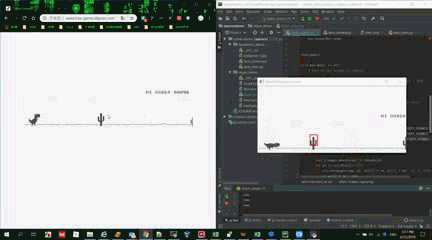
这个网站提供一个简单的2D小游戏,越过障碍获得分数,我们希望让计算机模拟人的行为控制小恐龙跳过地面上不断出现的树木,整个程序可以被分成三个阶段,即屏幕监控(看) > 障碍物识别(识别) > 键盘控制(控制)。
屏幕监控
我们使用python mss对屏幕的指定区域进行监控,其实就是不断截图并对一帧一帧的图片进行分析。 这里monitor变量保存的是屏幕监控的区域
1 with mss.mss() as sct:
2     # Part of the screen to capture
3    ** = {‘top‘: 280, ‘left‘: 100, ‘width‘: 660, ‘height‘: 300}
4     while ‘Screen capturing‘:
5         # Get raw pixels from the screen, save it to a Numpy array
6         img = numpy.array(sct.grab(monitor))
图像识别
上一步我们通过监控屏幕上的指定区域可以获取到一帧一帧的图片,我们的目的是识别屏幕上出现的障碍物,以及障碍物的相对位置,这里主要是用OpenCV的matchTemplate方法在目标截图中查找已知的图像元素,所以我们要先截取一些障碍物的图片,如下图所示:
然后在目标图像中查找,这里我们设定图片比对的相似度阈值为65%,这样相当于是做模糊匹配,虽然可能会降低识别精准度,但可以少准备几个截图
1 res2 = cv2.matchTemplate(img_gray, tree1, cv2.TM_CCOEFF_NORMED) 2 threshold = 0.65 3 loc2 = numpy.where(res2 >= threshold)
识别到相应的障碍物以后我们希望在物体周围画一个矩形框,这样方便调试和查看效果
1 for pt in zip(*loc2[::-1]):
2 cv2.rectangle(img, pt, (pt[0] + tw, pt[1] + th), (0, 0, 255), 2)
识别到屏幕上的障碍物以后,我们要控制鼠标和键盘做出相应的操作,这里我们使用pyautogui和pynput实现鼠标键盘的模拟
 1 def startgame():
 2     pyautogui.click(web)
 3     time.sleep(0.03)
 4     pyautogui.keyDown(‘space‘)
 5     time.sleep(0.03)
 6     pyautogui.keyUp(‘space‘)
 7     print(‘game start‘)
 8
 9 def jump():
10     key.release(Key.down)
11     key.press(Key.space)
12     print(‘jump‘)
13     time.sleep(0.3)
14     key.release(Key.space)
15     key.press(Key.down)
效果演示
 1 import time
 2 import pyautogui
 3 from pynput.keyboard import Key, Controller
 4 import cv2
 5 import mss
 6 import numpy
 7
 8 # use browser to visit http://www.trex-game.skipser.com/
 9 # put the browser to the left side and run the programme
10
11 key = Controller()
12
13 web = (200, 400)
14
15 tree1 = cv2.imread(‘tree1.png‘, 0)
16 tw, th = tree1.shape[::-1]
17
18 tree4 = cv2.imread(‘tree4.png‘, 0)
19 tw4, th4 = tree4.shape[::-1]
20
21 birdie = cv2.imread(‘birdie1.png‘, 0)
22 nw, nh = birdie.shape[::-1]
23
24
25 def startgame():
26     pyautogui.click(web)
27     time.sleep(0.03)
28     pyautogui.keyDown(‘space‘)
29     time.sleep(0.03)
30     pyautogui.keyUp(‘space‘)
31     print(‘game start‘)
32
33
34 def jump():
35     key.release(Key.down)
36     key.press(Key.space)
37     print(‘jump‘)
38     time.sleep(0.3)
39     key.release(Key.space)
40     key.press(Key.down)
41
42
43 startgame()
44
45 with mss.mss() as sct:
46     # Part of the screen to capture
47
48     monitor = {‘top‘: 280, ‘left‘: 100, ‘width‘: 660, ‘height‘: 300}
49
50     while ‘Screen capturing‘:
51         key.press(Key.down)
52         # Get raw pixels from the screen, save it to a Numpy array
53         img = numpy.array(sct.grab(monitor))
54
55         img_gray = cv2.cvtColor(img, cv2.COLOR_BGR2GRAY)
56
57         res2 = cv2.matchTemplate(img_gray, tree1, cv2.TM_CCOEFF_NORMED)
58         res5 = cv2.matchTemplate(img_gray, tree4, cv2.TM_CCOEFF_NORMED)
59         res3 = cv2.matchTemplate(img_gray, birdie, cv2.TM_CCOEFF_NORMED)
60
61         threshold = 0.65
62
63         loc2 = numpy.where(res2 >= threshold)
64         for pt in zip(*loc2[::-1]):
65             cv2.rectangle(img, pt, (pt[0] + tw, pt[1] + th), (0, 0, 255), 2)
66             if pt[0] + tw < 280:
67                 jump()
68                 break
69
70         loc2 = numpy.where(res3 >= threshold)
71         for pt in zip(*loc2[::-1]):
72             cv2.rectangle(img, pt, (pt[0] + nw, pt[1] + nh), (0, 0, 255), 2)
73             print("{0},{1}".format(pt[0], pt[1]))
74             if pt[1] + nh > 280 and pt[0] + nw < 420:
75                 jump()
76                 break
77
78         loc5 = numpy.where(res5 >= threshold)
79         for pt in zip(*loc5[::-1]):
80             cv2.rectangle(img, pt, (pt[0] + tw4, pt[1] + th4), (0, 0, 255), 2)
81             if pt[0] + tw4 < 280:
82                 jump()
83                 break
84
85         # Display the picture
86         cv2.imshow(‘OpenCV/Numpy normal‘, img)
87
88         # Press "q" to quit
89         if cv2.waitKey(25) & 0xFF == ord(‘q‘):
90             cv2.destroyAllWindows()
91             break
HDC.Cloud 华为开发者大会2020 即将于2020年2月11日-12日在深圳举办,是一线开发者学习实践鲲鹏通用计算、昇腾AI计算、数据库、区块链、云原生、5G等ICT开放能力的最佳舞台。
欢迎报名参会(https://www.huaweicloud.com/HDC.Cloud.html?utm_source=&utm_medium=&utm_campaign=&utm_content=techcommunity)

标签:说明 quit pytho plot 系统 medium 监控 https 安装
原文地址:https://www.cnblogs.com/huaweicloud/p/12229581.html