标签:设备 min 脚本 iss scratch 通过 知识 特殊 cti
本篇博客先介绍在仿真过程中会使用到的一些关键概念,然后介绍便于调试仿真脚本的常用技术:日志、命令行参数。
节点
在因特网术语中,主机(终端)是指任何一台连接到网络的计算设备。ns-3并非一个专门的因特网模拟器,而是一个网络模拟器。为此不采用术语“主机”,因为这个词太容易让人联想到因特网以及相关协议。因此,选用其他术语:节点。
可以将节点理解为一个空的机箱,我们可以向其中添加各种功能,将其变成我们想要的主机或者交换机。
节点由C++中的Node类来描述。Node类提供了用于管理仿真器网络组件表示的各种方法。例如NodeContainer类,用于管理一组节点指针。
应用
在ns-3中,需要被仿真的用户程序被抽象为应用。应用在C++中用Application类来描述。这个类提供了管理仿真时用户层应用的各种方法。
信道
通常把网络中数据流流过的媒介称为信道。在ns-3的模拟环境中,可以把节点连接到代表数据交换信道的对象上。在这里,基本的通信子网这一抽象的概念被称为信道,在C++中用Channel类来描述。
Channel类提供了管理通信子网对象和把节点连接至他们的各种方法。信道类同样可以由开发者以面向对象的方法自定义。一个信道实例可以模拟一条简单的线缆(wire),也可以是一个复杂的巨型以太网交换机,甚至是无线网络中充满障碍物的三维空间。
我曾用到的ns-3仿真的两种信道模型:CsmaChannel、PointToPointChannel。
CsmaChannel信道模拟了一个可以用于实现载波侦听多路访问通信子网中的媒介,这个信道具有和以太网相似的功能。
PointToPointChannel这个类代表一个简单的点对点信道,此信道没有多点通信能力,可以最多2个点到点连接的网络设备。
网络设备
在Unix(或者linux)系统中,外围硬件被称为“设备”。设备通过驱动程序来控制,而网卡通过网卡驱动程序来控制。在Unix系统中,网卡被称为像eth0这样的名字。在ns-3中,网络设备这一抽象概念相当于硬件设备和软件驱动的总和。
ns-3仿真环境中,网络设备安装在节点上,使得节点通过信道和其他节点通信。与真实的计算机一样,一个节点可以通过多个网络设备同时连接到多条信道上。
网络设备由C++中的NetDevice类来描述。NetDevice提供了管理连接其他节点和信道对象的各种方法,并且允许开发者以面向对象的方法来自定义。
拓扑帮助
很多模块都有帮助类来帮助我们快速构建仿真程序,类似于帮助我们快速配置应用程序的BulkSendHelper。要好好利用帮助类来帮我们编写仿真脚本。
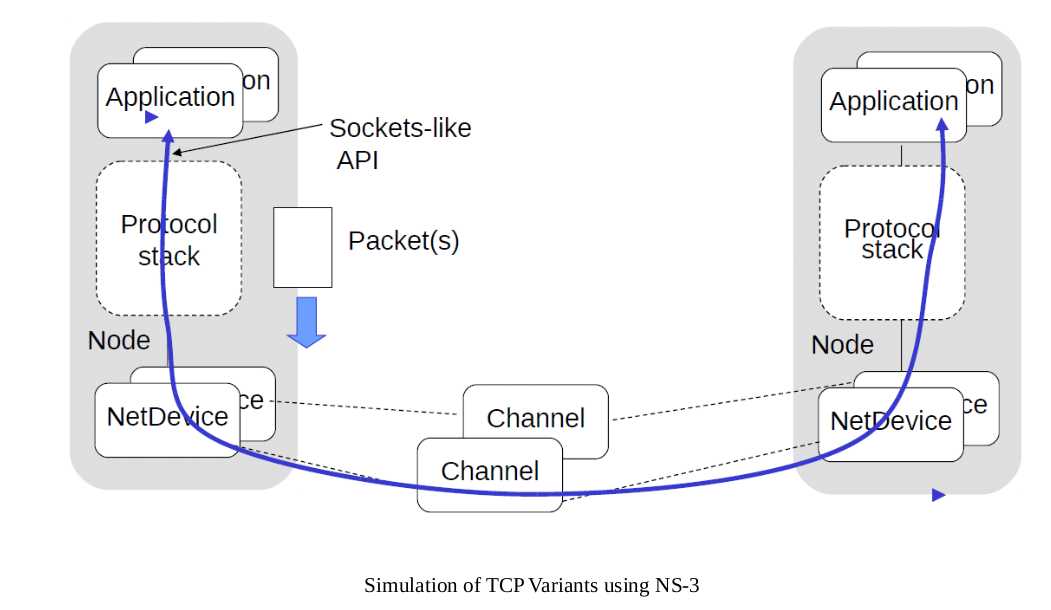
附图一张:ns-3仿真中两个节点通信所要经历的模块。
在很多大型系统中,都会提供一种基于控制台的消息记录模块,用来向用户及时反馈命令的执行情况或者系统的运行情况,ns-3采用这种机制实现了一种可选的、多等级的消息记录模块——日志系统。在ns-3中,日志系统主要用于提供程序调试的信息或者输出程序中间结果用于验证我们的思路。
日志系统有7个等级,有低到高依次为:
还有一种特殊的级别需要注意,NS_LOG_UNCOND,这种输出方式不会绑定到上述任何一个级别当中,只要所属组件的日志开启,不论当前显示哪个级别,都将输出日志信息。
想要输出日志,首先要定义一个日志组件:
NS_LOG_COMPONENT_DEFINE("MyTestLoggingComponent");注意,日志组件的名字不要重复,一般加上前缀。
然后是启用日志,启用日志有很多方式。这里介绍一种简单的,即在代码中启用。语法如下:
LogComponentEnable("MyTestLoggingComponent", LOG_INFO);这样就启用了MyTestLoggingComponent组件当中的INFO级别的日志。
下面是使用日志的一个示例:
#include "ns3/core-module.h"
using namespace ns3;
NS_LOG_COMPONENT_DEFINE ("MyTestLoggingComponent");

int
main (int argc, char *argv[])
{
    LogComponentEnable("MyTestLoggingComponent", LOG_INFO);

    NS_LOG_ERROR("test error");
    NS_LOG_WARN("test warn");
    NS_LOG_DEBUG("test debug");
    NS_LOG_INFO("test info");
    NS_LOG_FUNCTION("test function");
    NS_LOG_LOGIC("test logic");
    NS_LOG_UNCOND("test uncond");
}
sakura@sakura-pc:ns3-load-balance-origin$ ./waf --run "testlog"
Waf: Entering directory `/home/sakura/Application/ns3-load-balance-origin/build'
[ 985/2302] Compiling scratch/testlog.cc
[ 986/2302] Compiling scratch/scratch-simulator.cc
[ 987/2302] Compiling scratch/MyTest.cc
[ 988/2302] Compiling scratch/hidden-terminal.cc
[2279/2302] Linking build/scratch/testlog
[2287/2302] Linking build/scratch/scratch-simulator
[2290/2302] Linking build/scratch/hidden-terminal
[2291/2302] Linking build/scratch/MyTest
Waf: Leaving directory `/home/sakura/Application/ns3-load-balance-origin/build'
Build commands will be stored in build/compile_commands.json
'build' finished successfully (23.377s)
test info
test uncond从输出可以看出,我们启用了LOG_INFO级别的日志,输出INFO级别的日志内容和只有开启日志就可以输出的UNCOND信息。
如果想禁用所有日志输出,可以不启用日志或者使用LOG_NONE。
LogComponentEnable("MyTestLoggingComponent", LOG_NONE);输出:
sakura@sakura-pc:ns3-load-balance-origin$ ./waf --run "testlog"
Waf: Entering directory `/home/sakura/Application/ns3-load-balance-origin/build'
[ 986/2302] Compiling scratch/testlog.cc
[2287/2302] Linking build/scratch/testlog
Waf: Leaving directory `/home/sakura/Application/ns3-load-balance-origin/build'
Build commands will be stored in build/compile_commands.json
'build' finished successfully (2.119s)
test uncond
但是需要注意,NS_LOG_UNCOND是依旧会输出信息的,除非注释掉日志启用那一行代码。
以上的LOG_TYPE都是输出单一级别的日志信息,我们还可以输出LOG_LEVEL_INFO或者LOG_LEVEL_DEBUG这样的累积日志级别。
其累计原则是,高等级的级别会使比其等级低的日志都输出。如LOG_LEVEL_INFO除了输出INFO信息,还会输出DEBUG、WARN、ERROR信息。
将启动日志的行改为:
LogComponentEnable("MyTestLoggingComponent", LOG_LEVEL_INFO);输出:
sakura@sakura-pc:ns3-load-balance-origin$ ./waf --run "testlog"
Waf: Entering directory `/home/sakura/Application/ns3-load-balance-origin/build'
[ 985/2302] Compiling scratch/testlog.cc
[2291/2302] Linking build/scratch/testlog
Waf: Leaving directory `/home/sakura/Application/ns3-load-balance-origin/build'
Build commands will be stored in build/compile_commands.json
'build' finished successfully (2.207s)
test error
test warn
test debug
test info
test uncondns-3还提供了日志前缀,来控制显示日志的来源,从而更加方便我们进行调试。ns-3中可用的前缀有如下几种:
可以使用LogComponentEnable和级别叠加使用,例如:
LogComponentEnable("MyTestLoggingComponent", LOG_LEVEL_INFO);
LogComponentEnable("MyTestLoggingComponent", LOG_PREFIX_LEVEL);
完整程序如下:
#include "ns3/core-module.h"
using namespace ns3;
NS_LOG_COMPONENT_DEFINE ("MyTestLoggingComponent");

int
main (int argc, char *argv[])
{
    LogComponentEnable("MyTestLoggingComponent", LOG_LEVEL_INFO);
    LogComponentEnable("MyTestLoggingComponent", LOG_PREFIX_LEVEL);

    NS_LOG_ERROR("test error");
    NS_LOG_WARN("test warn");
    NS_LOG_DEBUG("test debug");
    NS_LOG_INFO("test info");
    NS_LOG_FUNCTION("test function");
    NS_LOG_LOGIC("test logic");
    NS_LOG_UNCOND("test uncond");
}
sakura@sakura-pc:ns3-load-balance-origin$ ./waf --run "testlog"
Waf: Entering directory `/home/sakura/Application/ns3-load-balance-origin/build'
[ 985/2302] Compiling scratch/testlog.cc
[2281/2302] Linking build/scratch/testlog
Waf: Leaving directory `/home/sakura/Application/ns3-load-balance-origin/build'
Build commands will be stored in build/compile_commands.json
'build' finished successfully (2.142s)
[ERROR] test error
[WARN ] test warn
[DEBUG] test debug
[INFO ] test info
test uncondns-3提供了一种不需要重修编辑和构建脚本就可以改变脚本运行行为的方法。这种方法就是通过命令行传递参数来改变脚本中的变量。
在使用命令行系统时,首先要声明一个命令行类的对象,然后调用函数Parse。如下:
int main(int argc, char* argv[])
{
? ? ...
? ? CommandLine cmd;
? ? cmd.Parse(argc, argv);
? ? ...
}这两行代码代表,现在用户可以命令行来访问代码中的变量和ns-3中的属性系统。
我们在使用./waf 运行脚本使,可以加上参数--PrintHelp来显示可以使用的参数。
例如,我们运行代码中examples/tutorial/first.cc。(这里将first.cc复制到了scratch目录下)
root@iZuf6c029wyeq0gfy84vcuZ:~/Applications/ns-allinone-3.29/ns-3.29# ./waf --run "scratch/first --PrintHelp"
Waf: Entering directory `/root/Applications/ns-allinone-3.29/ns-3.29/build'
Waf: Leaving directory `/root/Applications/ns-allinone-3.29/ns-3.29/build'
Build commands will be stored in build/compile_commands.json
'build' finished successfully (16.088s)
first [General Arguments]


General Arguments:
????--PrintGlobals:??????????????Print the list of globals.
????--PrintGroups:???????????????Print the list of groups.
????--PrintGroup=[group]:????????Print all TypeIds of group.
????--PrintTypeIds:??????????????Print all TypeIds.
????--PrintAttributes=[typeid]:??Print all attributes of typeid.
????--PrintHelp:?????????????????Print this help message.参数--PrintAttributes的功能就是挂载用户想要修改的属性系统的属性名。
在first.cc脚本中,如下几行代码就使用到了属性系统,即配置属性系统中的一些属性的值。
PointToPointHelper pointToPoint;
pointToPoint.SetDeviceAttribute ("DataRate", StringValue ("5Mbps"));
pointToPoint.SetChannelAttribute ("Delay", StringValue ("2ms"));脚本中使用到的类是PointToPoint类,通过命令行显示该类在使用中所定义的默认值,在操作过程中是使用已经和网络设备绑定的类PointToPointNetDevice中所涉及的属性的默认值:
root@iZuf6c029wyeq0gfy84vcuZ:~/Applications/ns-allinone-3.29/ns-3.29# ./waf --run "scratch/first --PrintAttributes=ns3::PointToPointNetDevice"
Waf: Entering directory `/root/Applications/ns-allinone-3.29/ns-3.29/build'
Waf: Leaving directory `/root/Applications/ns-allinone-3.29/ns-3.29/build'
Build commands will be stored in build/compile_commands.json
'build' finished successfully (16.326s)
Attributes for TypeId ns3::PointToPointNetDevice
????--ns3::PointToPointNetDevice::Address=[ff:ff:ff:ff:ff:ff]
????????The MAC address of this device.
????--ns3::PointToPointNetDevice::DataRate=[32768bps]
????????The default data rate for point to point links
????--ns3::PointToPointNetDevice::InterframeGap=[+0.0ns]
????????The time to wait between packet (frame) transmissions
????--ns3::PointToPointNetDevice::Mtu=[1500]
????????The MAC-level Maximum Transmission Unit
????--ns3::PointToPointNetDevice::ReceiveErrorModel=[0]
????????The receiver error model used to simulate packet loss
????--ns3::PointToPointNetDevice::TxQueue=[0]
????????A queue to use as the transmit queue in the device.这里显示默认值为32768bps,我们在脚本文件中定义的5Mbit/s会在实际运行时覆盖该默认值。我们比较一下使用自定义值(5Mbit/s)和默认值的运行结果。
使用自定义值:
root@iZuf6c029wyeq0gfy84vcuZ:~/Applications/ns-allinone-3.29/ns-3.29# ./waf --run "scratch/first"
Waf: Entering directory `/root/Applications/ns-allinone-3.29/ns-3.29/build'
Waf: Leaving directory `/root/Applications/ns-allinone-3.29/ns-3.29/build'
Build commands will be stored in build/compile_commands.json
'build' finished successfully (16.072s)
At time 2s client sent 1024 bytes to 10.1.1.2 port 9
At time 2.00369s server received 1024 bytes from 10.1.1.1 port 49153
At time 2.00369s server sent 1024 bytes to 10.1.1.1 port 49153
At time 2.00737s client received 1024 bytes from 10.1.1.2 port 9
使用默认值:
root@iZuf6c029wyeq0gfy84vcuZ:~/Applications/ns-allinone-3.29/ns-3.29# ./waf --run "scratch/first"
Waf: Entering directory `/root/Applications/ns-allinone-3.29/ns-3.29/build'
[2558/2609] Compiling scratch/first.cc
[2569/2609] Linking build/scratch/first
Waf: Leaving directory `/root/Applications/ns-allinone-3.29/ns-3.29/build'
Build commands will be stored in build/compile_commands.json
'build' finished successfully (19.405s)
At time 2s client sent 1024 bytes to 10.1.1.2 port 9
At time 2.25932s server received 1024 bytes from 10.1.1.1 port 49153
At time 2.25932s server sent 1024 bytes to 10.1.1.1 port 49153
At time 2.51865s client received 1024 bytes from 10.1.1.2 port 9
由于客户端应用程序的开始运行时间没有改变,因此我们可以发现客户端发送数据的时间还是在2s时刻。然后,由于把数据的发送速率从5Mbit/s降到了32768bit/s,所以服务器接收到数据的时间相应的推迟了一段时间。
我们除了可以修改应用程序的数据发送速率,还可以修改其他的属性变量,比如延迟、最大分组发送数量等。
接下来我们就看看如何通过命令行来修改这些属性值。
挂钩自定义变量
在ns-3中我们可以添加自己的变量,然后通过挂钩将其余命令行相关联。
以first.cc中下面这句代码为例讲解:
echoClient.SetAttribute ("MaxPackets", UintegerValue (1));这句话限制了MaxPackets属性是固定的,如果要将这句话改成在命令行编译脚本时自定义,那么做以下改动:
在first.cc开头
uint32_t nPackets = 1; //这里添加一个变量
CommandLine cmd;
cmd.AddValue("nPackets", "Number of packets to echo", nPackets);
//这上面代码使得变量nPackets在命令行中可以修改
cmd.Parse (argc, argv);
在修改代码:
echoClient.SetAttribute ("MaxPackets", UintegerValue(nPackets));运行first.cc脚本:
root@iZuf6c029wyeq0gfy84vcuZ:~/Applications/ns-allinone-3.29/ns-3.29# ./waf --run "scratch/first --PrintHelp"
Waf: Entering directory `/root/Applications/ns-allinone-3.29/ns-3.29/build'
[2558/2609] Compiling scratch/first.cc
[2569/2609] Linking build/scratch/first
Waf: Leaving directory `/root/Applications/ns-allinone-3.29/ns-3.29/build'
Build commands will be stored in build/compile_commands.json
'build' finished successfully (19.032s)
first [Program Options] [General Arguments]


Program Options:
????--nPackets:??Number of packets to echo [1]


General Arguments:
????--PrintGlobals:??????????????Print the list of globals.
????--PrintGroups:???????????????Print the list of groups.
????--PrintGroup=[group]:????????Print all TypeIds of group.
????--PrintTypeIds:??????????????Print all TypeIds.
????--PrintAttributes=[typeid]:??Print all attributes of typeid.
????--PrintHelp:?????????????????Print this help message.
尝试修改这个参数的值:
root@iZuf6c029wyeq0gfy84vcuZ:~/Applications/ns-allinone-3.29/ns-3.29# ./waf --run "scratch/first --nPackets=2"
Waf: Entering directory `/root/Applications/ns-allinone-3.29/ns-3.29/build'
Waf: Leaving directory `/root/Applications/ns-allinone-3.29/ns-3.29/build'
Build commands will be stored in build/compile_commands.json
'build' finished successfully (16.033s)
At time 2s client sent 1024 bytes to 10.1.1.2 port 9
At time 2.25932s server received 1024 bytes from 10.1.1.1 port 49153
At time 2.25932s server sent 1024 bytes to 10.1.1.1 port 49153
At time 2.51865s client received 1024 bytes from 10.1.1.2 port 9
At time 3s client sent 1024 bytes to 10.1.1.2 port 9
At time 3.25932s server received 1024 bytes from 10.1.1.1 port 49153
At time 3.25932s server sent 1024 bytes to 10.1.1.1 port 49153
At time 3.51865s client received 1024 bytes from 10.1.1.2 port 9
与之前的结果比较可以发现,客户端发送了两次。参数修改成功!
本篇文章又零零散散地继续介绍了NS-3的相关知识。重点介绍了日志系统,日志的输出对于我们调试仿真脚本是十分重要的,要好好掌握。日志中还有一些部分没有提例如函数日志的详细使用和启用日志组件的其他方式,这些都可以参考[2]。NS-3中还有一个对我们分析脚本非常重要的功能,即追踪框架(可参考[3])。这个跟踪某些事件的发生,帮助我们调试脚本。NS3的知识暂且介绍这些。一是后面没有那么多的时间让我来写这些学习笔记,二是附着的参考博客链接可以是说非常好的学习资源(我老师写的当然好( ̄^ ̄)ゞ,这令文笔拙劣的我怎么还敢写下去)。关于NS-3有任何的疑问,各位看官可以私聊我,我们共同进步!
参考:
[1]马春光.姚建盛.ns-3网络模拟器基础及应用[M].北京:人民邮电出版社,2014
[2]NS-3学习笔记(二):NS-3的日志系统.http://rainsia.github.io/2018/03/30/ns3-002/
[3]NS-3学习笔记(九):NS-3的对象框架 之 追踪框架.http://rainsia.github.io/2018/10/22/ns3-009/
【NS-3学习】ns3-模拟基础:关键概念,日志,命令行参数
标签:设备 min 脚本 iss scratch 通过 知识 特殊 cti
原文地址:https://www.cnblogs.com/myworld7/p/12231611.html