标签:lis automatic hooks tco https 用户 lang auto mic
Git是一个分布式的版本控制软件
相当于QQ,office等需要安装到电脑上才可以使用的工具
版本控制:类似于毕业论文,写文案等,需要反复修改和保留历史的数据
要保留之前的数据,方便回滚和修改
https://git-scm.com/book/zh/v2/%E8%B5%B7%E6%AD%A5-%E5%AE%89%E8%A3%85-Git
#安装Git
yum install git -y
#配置git使用用户
git config --global user.name "yfc"
#配置git使用邮箱
git config --global user.email "12345678@qq.com"
#语法高亮显示
git config --global color.ui true
#查看有哪些用户
git config --list
#查看设置的用户
cat .gitconfig
mkdir /data
cd /data
git init
[root@git data]# ll .git
total 12
drwxr-xr-x 2 root root   6 Mar 23 21:14 branches              #分支目录
-rw-r--r-- 1 root root  92 Mar 23 21:14 config                #定义项目特有的配置选项
-rw-r--r-- 1 root root  73 Mar 23 21:14 description           #仅供git web程序使用
-rw-r--r-- 1 root root  23 Mar 23 21:14 HEAD                  #指示当前的分支
drwxr-xr-x 2 root root 242 Mar 23 21:14 hooks                 #包含git钩子文件
drwxr-xr-x 2 root root  21 Mar 23 21:14 info                  #包含一个全局排除文件(exclude文件)
drwxr-xr-x 4 root root  30 Mar 23 21:14 objects               #存放所有数据内容,有info和pack两个子文件夹
drwxr-xr-x 4 root root  31 Mar 23 21:14 refs                  #存放指向数据(分支)的提交对象的指针
cd /data
touch file{1,2,3}
git add .
git commit -m "新增3个文件"
git status
git mv file1 file4
git commit -m "修改file1为file4"
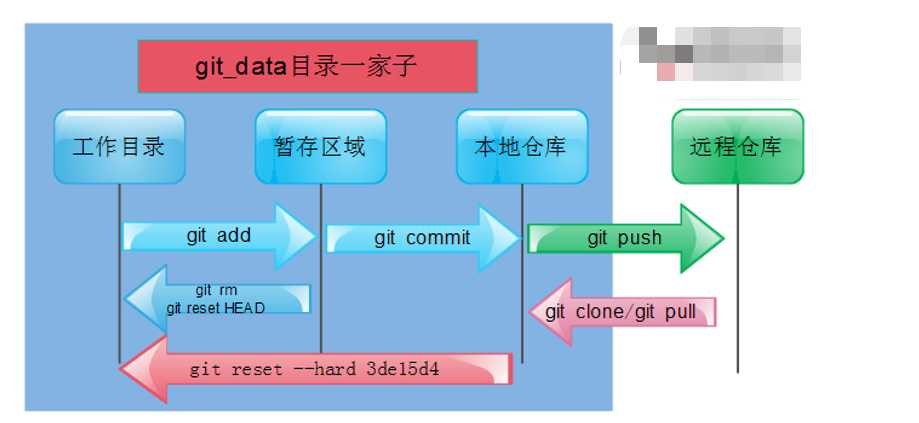
1. 此时git的三个区域都有file2文件,往file2文件写入内容
echo 123 > file2
2. 进行文件比对
git diff file2
1. 把工作区的文件提交到暂存区
[root@gitlab data]# git add .
2. 进行文件比对
git diff --cached file2
3. 提交后在比对则暂存区和本地仓库(内容相同)
git commit -m "file2"
git diff --cached file2
相当于虚拟机的镜像、任何操作都被做了一次快照,可恢复到任意一个位置
[root@gitlab data]# git log
commit 97f0c9afe1af1fb7251ed93f5283475fb7ca9620
Author: yfc <yfc@qq.com>
Date:   Mon Mar 23 22:15:24 2020 +0800

    file2

commit b236e2fe006fc8d7428da6fa920ab2a40c2985da
Author: yfc <yfc@qq.com>
Date:   Mon Mar 23 21:54:43 2020 +0800

    修改file1为file4

commit 89f5a806cf57c10ebc97c7ed70078ec174695f4f
Author: yfc <yfc@qq.com>
Date:   Mon Mar 23 21:30:13 2020 +0800

    新增3个文件
git log --oneline
#就是把上面的信息,以一行显示出来且把每次对应的hash值,取前7位!结果如下
[root@git data]# git log --oneline
0a819ad file2
28bc994 修改file1为file4
65154df 新增3个文件
[root@git data]# cat file2
123
[root@git data]# >file2
思路
用暂存区的目录覆盖本地目录
命令如下
[root@gitlab data]# git checkout file2
[root@gitlab data]# cat file2
123
[root@git data]# cat file2
123
[root@git data]# >file2
[root@git data]# git add .
思路
先用本地仓库的目录覆盖暂存区的,在用暂存区的覆盖本地目录
命令如下
1. 先覆盖暂存区
[root@git data]# git reset HEAD file2
2. 再覆盖本地目录
[root@git data]# git checkout -- file2
3. 检查file2文件
[root@git data]# cat file2
123
[root@git data]# echo yfc >> file2
[root@git data]# cat file2
123
yfc
[root@git data]# git add .
[root@git data]# git commit -m "file2文件新增内容yfc"
[root@git data]# echo yfc.com >> file2
[root@git data]# cat file2
123
yfc
yfc.com
[root@git data]# git add .
[root@git data]# git commit -m "file2文件新增内容yfc.com"
需求1:回退到file2文件最初始的状态
[root@git data]# git log --oneline
61f27d6 file2文件新增yfc.com
79da77b file2文件新增yfc
97f0c9a file2
b236e2f 修改file1为file4
89f5a80 新增file1-3
[root@git data]# git reset --hard 97f0c9a
[root@git data]# cat file2
123
需求2:回退到file2文件中有yfc内容时的状态
[root@git data]# git reflog
97f0c9a HEAD@{0}: reset: moving to 97f0c9a
61f27d6 HEAD@{1}: commit: file2文件新增yfc.com
79da77b HEAD@{2}: commit: file2文件新增yfc
97f0c9a HEAD@{3}: commit: file2
b236e2f HEAD@{4}: commit: 修改file1为file4
89f5a80 HEAD@{5}: commit (initial): 新增file1-3
[root@gitlab data]# git reset --hard 79da77b
HEAD is now at 79da77b file2文件新增yfc
[root@gitlab data]# cat file2
123
yfc
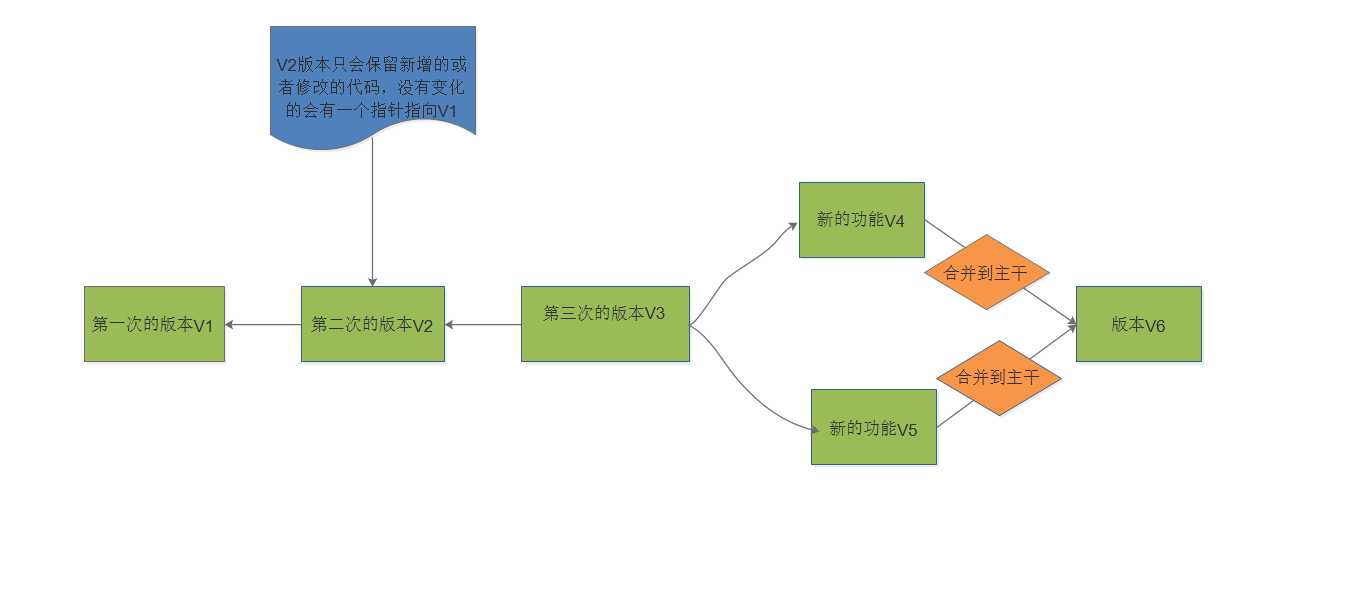
分支可以给使用者提供与主干隔离的环境,以免影响到主干,在分支上开发完新功能测试好以后,可以合并到主干,这样即不影响主干也不会耽误开发的进度
git branch
git branch 分支名称
#例如
git branch dev
git checkout dev
git branch -d 分支名称
#例如
git branch -d dev
注意:删除分支一定要在主干上去删除分支
git branch dev
touch file{6,7}
git add .
git commit -m "新增文件file5和file6"
git checkout master
touch file{9,10}
git add .
git commit -m "新增文件file9和file10"
#因为此时可能有别的人员提交了代码到master上,所以我们要先把自己master上的内容合并到master上
记得切换分支在合并
例如,想要把master的内容合并到dev上,要先切换到dev上,在合并
git checkout dev
git megre  master -m "dev合并master内容"
[root@git data]# git branch
* dev
  master
[root@gitlab data]# git checkout master
Switched to branch ‘master‘
[root@gitlab data]# ls
file2  file3  file4  file7  file8
[root@gitlab data]# git merge dev
Updating 697395f..15cde5e
Fast-forward
 file5 | 0
 file6 | 0
 2 files changed, 0 insertions(+), 0 deletions(-)
 create mode 100644 file5
 create mode 100644 file6
[root@gitlab data]# ls
file2  file3  file4  file5  file6  file7  file8
#可以看到现在master有全部的文件了
[root@git data]# git branch dev
[root@git data]# git branch
  dev
* master
[root@git data]# ls
file2  file3  file4  file5  file6  file7  file8
[root@gitlab data]# cat file2
123
yfc
[root@git data]# echo 111 >> file2
[root@git data]# git add .
[root@git data]# git commit -m "修改file2文件"
[root@git data]# git checkout dev
[root@git data]# echo 111 >> file2
[root@git data]# git add .
[root@git data]# git commit -m "修改file2文件"
[root@git data]# git checkout dev
[root@git data]# git merge master
Auto-merging file2
CONFLICT (content): Merge conflict in file2
Automatic merge failed; fix conflicts and then commit the result.
[root@gitlab data]# git merge master
error: ‘merge‘ is not possible because you have unmerged files.
hint: Fix them up in the work tree,
hint: and then use ‘git add/rm <file>‘ as
hint: appropriate to mark resolution and make a commit,
hint: or use ‘git commit -a‘.
fatal: Exiting because of an unresolved conflict.
#此时会报错
修改文件
[root@git data]# cat file2
123
yfc
<<<<<<< HEAD
222
=======
111
>>>>>>> master
[root@git data]# vim file2
123
yfc
222
111
[root@git data]# git add .
[root@git data]# git commit -m "megre 合并"
[root@git data]# git checkout master
Switched to branch ‘master‘
[root@gitlab data]# git merge dev
Updating 179bd1c..f5bb452
Fast-forward
 file2 | 1 +
 1 file changed, 1 insertion(+)
标签也是指向了一次commit提交,是一个里程碑式的标签,回滚打标签直接加标签号,不需要加唯一字符串不好记
#格式
git tag -a "标签名字" -m "描述信息"
[root@gitlab data]# git tag -a "v1.0" -m "第一版本"
git tag
git show 标签名字
#例如
git show v1.0
git tag -d 标签名字
#例如
git tag -d v2.0
此处步骤略
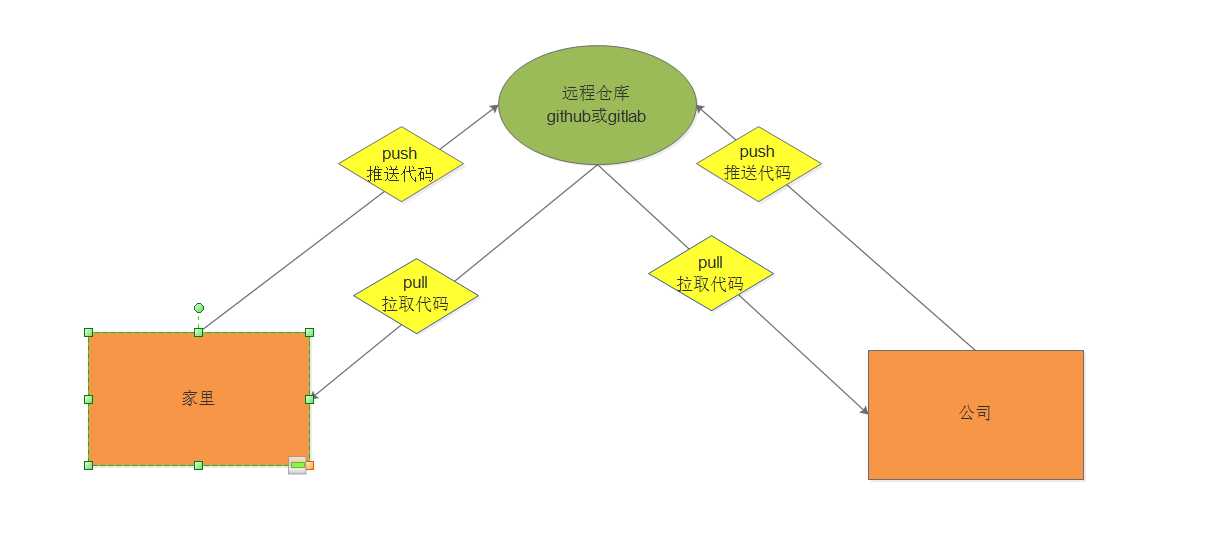
1. 克隆远程仓库代码
git clone 远程仓库地址
2. 切换分支进行开发
git checkout dev
3. 开发完毕,提交代码
git add .
git commit -m ‘xx‘
git push origin dev
1. 切换到
git checkout dev
2. 拉取最新代码
git pull origin dev
3. 进行开发
4. 提交代码
git add .
git commit -m ‘xx‘
git push origin dev
标签:lis automatic hooks tco https 用户 lang auto mic
原文地址:https://www.cnblogs.com/yufenchi/p/13069294.html