标签:pie adb evel cti running -- cst docker replicat
1.基础设置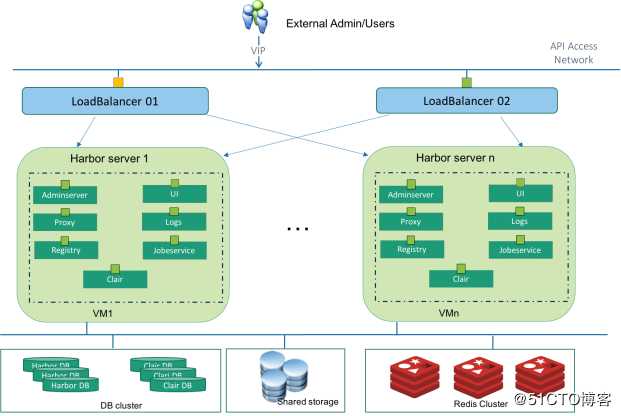
1.2.主机角色
主机角色 IP地址 操作系统 备注
harbor01 10.7.132.243 linux7 安装docker-ce、redis、postgresql、mysql、keepalived
harbor02 10.7.132.219 linux7 安装docker-ce、redis、postgresql、mysql、keepalived
vip 10.7.132.253 harbor01是keepalived的master节点
harbor02是keepalived的slave节点
1.3.软件包
名称 版本 备注
linux centos7 操作系统
keepalived 1.3.5 用于vip
docker-ce 18.09.6 运行镜像基础环境
docker-compose 1.21.2 用于编译yml
mariadb 10.2.24 存储registry
redis 3.2.1 存储消息缓存
postgresql 9.6 存储镜像扫描,功能未开启
harbor 1.5.4 基础包
1.4.hosts解析
cat >> /etc/hosts <<-‘EOF‘
10.7.132.243 harbor01
10.7.132.219 harbor02
10.7.132.253 reg.xgmin.com
EOF
1.5.指定yum源
harbor01和harbor02两台主机都需要操作
rm -f /etc/yum.repos.d/*.repo
wget -O /etc/yum.repos.d/centos7.repo http://mirror.XXXXXXX.com/other/repo/centos7.repo
wget -O /etc/yum.repos.d/docker-ce.repo http://mirror.XXXXXXX.com/other/repo/docker-ce.repo
wget -O /etc/yum.repos.d/epel7.repo http://mirror.XXXXXXX.com/other/repo/epel7.repo
yum clean all && yum repolist
yum install vim tree -y
1.6.建立证书
1.生成CA证书,只在harbor01上操作
mkdir /root/cert && cd /root/cert
openssl req -newkey rsa:4096 -nodes -sha256 -keyout ca.key -x509 -days 3650 -out ca.crt
2.生成证书签名请求
openssl req -newkey rsa:4096 -nodes -sha256 -keyout reg.xgmin.com.key -out reg.xgmin.com.csr
3.生成注册证书
openssl x509 -req -days 3650 -in reg.xgmin.com.csr -CA ca.crt -CAkey ca.key -CAcreateserial -out reg.xgmin.com.crt
4.拷贝harbor01生成的证书到harbor02
scp -r /root/cert root@10.7.132.219:/root
1.7.替换防火墙
此步骤必须操作
1.将centos7默认的防火墙关闭,harbor01和harbor02都操作
systemctl stop firewalld
systemctl disable firewalld
2.在centos7安装iptables防火墙,harbor01和harbor02都操作
yum install iptables iptables-services -y
systemctl start iptables
systemctl status iptables
systemctl enable iptables.service
3.添加允许规则,harbor01,harbor02都执行
iptables -I INPUT -p tcp --dport 6379 -j ACCEPT
iptables -I INPUT -p tcp --dport 5432 -j ACCEPT
iptables -I INPUT -p tcp --dport 20197 -j ACCEPT
iptables -I INPUT -p tcp --dport 3306 -j ACCEPT
iptables -I INPUT -p vrrp -j ACCEPT
iptables -I INPUT -p tcp --dport 80 -j ACCEPT
iptables -I INPUT -p tcp --dport 443 -j ACCEPT
service iptables save
1.8.网络权限开通
由于harbor01与harbor02节点为测试环境,青云s3对象存储在生产环境。需要开通如下跨区网络访问权限
2.Docker配置
2.1.Pip源搭建
1.在harbor01和harbor02上安装pip源
yum -y install python-pip
2.在harbor01上安装pypiserver
tar xf pip-pkg.tar.gz
cd pip-pkg
pip install pypiserver-1.2.1-py2.py3-none-any.whl
3.启动pypiserver
cat > /root/pip.sh<<-‘EOF‘
#!/bin/bash
/usr/bin/pypi-server -p 20197 /root/pip-pkg/ >/dev/null 2>&1 &
EOF
sh pip.sh
4.pip加速设置,harbor01使用本地的pip源,harbor02只需要执行此步骤
mkdir ~/.pip
cat > ~/.pip/pip.conf <<-‘EOF‘
[global]
index-url = http://10.7.132.243:20197/simple/
trusted-host = 10.7.132.243
EOF
pip install --upgrade pip
pip install docker-compose
2.2.Docker安装
1.本地安装docker,harbor01和harbor02都需要执行此步骤
yum install -y yum-utils device-mapper-persistent-data lvm2
yum -y install docker-ce
2.拷贝自定义的证书到dcker目录,如果以后在其它节点docker login 需要拷贝这个证书
mkdir -p /etc/docker/certs.d/reg.xgmin.com
cp -a /root/cert/reg.xgmin.com.crt /etc/docker/certs.d/reg.xgmin.com/
ll /etc/docker/certs.d/reg.xgmin.com/
3.启动docker并验证
systemctl restart docker
systemctl status docker
systemctl enable docker
docker info
3.Redis配置
3.1. harbor01节点
yum install redis -y
cat >/etc/redis.conf <<-‘EOF‘
bind 0.0.0.0
protected-mode yes
port 6379
tcp-backlog 511
timeout 0
tcp-keepalive 300
daemonize yes
supervised no
pidfile /var/run/redis_6379.pid
loglevel notice
logfile /var/log/redis/redis.log
databases 16
save 900 1
save 300 10
save 60 10000
stop-writes-on-bgsave-error yes
rdbcompression yes
rdbchecksum yes
dbfilename dump.rdb
dir /var/lib/redis
slave-serve-stale-data yes
slave-read-only yes
repl-diskless-sync no
repl-diskless-sync-delay 5
repl-disable-tcp-nodelay no
slave-priority 100
appendonly no
appendfilename "appendonly.aof"
appendfsync everysec
no-appendfsync-on-rewrite no
auto-aof-rewrite-percentage 100
auto-aof-rewrite-min-size 64mb
aof-load-truncated yes
lua-time-limit 5000
slowlog-log-slower-than 10000
slowlog-max-len 128
latency-monitor-threshold 0
notify-keyspace-events ""
hash-max-ziplist-entries 512
hash-max-ziplist-value 64
list-max-ziplist-size -2
list-compress-depth 0
set-max-intset-entries 512
zset-max-ziplist-entries 128
zset-max-ziplist-value 64
hll-sparse-max-bytes 3000
activerehashing yes
client-output-buffer-limit normal 0 0 0
client-output-buffer-limit slave 256mb 64mb 60
client-output-buffer-limit pubsub 32mb 8mb 60
hz 10
aof-rewrite-incremental-fsync yes
EOF
systemctl restart redis
systemctl enable redis
3.2.harbor02节点
yum install redis -y
cat > /etc/redis.conf<<-‘EOF‘
bind 0.0.0.0
protected-mode yes
port 6379
tcp-backlog 511
timeout 0
tcp-keepalive 300
daemonize yes
supervised no
pidfile /var/run/redis_6379.pid
loglevel notice
logfile /var/log/redis/redis.log
databases 16
save 900 1
save 300 10
save 60 10000
stop-writes-on-bgsave-error yes
rdbcompression yes
rdbchecksum yes
dbfilename dump.rdb
dir /var/lib/redis
slaveof 10.7.132.243 6379
slave-serve-stale-data yes
slave-read-only yes
repl-diskless-sync no
repl-diskless-sync-delay 5
repl-disable-tcp-nodelay no
slave-priority 100
appendonly no
appendfilename "appendonly.aof"
appendfsync everysec
no-appendfsync-on-rewrite no
auto-aof-rewrite-percentage 100
auto-aof-rewrite-min-size 64mb
aof-load-truncated yes
lua-time-limit 5000
slowlog-log-slower-than 10000
slowlog-max-len 128
latency-monitor-threshold 0
notify-keyspace-events ""
hash-max-ziplist-entries 512
hash-max-ziplist-value 64
list-max-ziplist-size -2
list-compress-depth 0
set-max-intset-entries 512
zset-max-ziplist-entries 128
zset-max-ziplist-value 64
hll-sparse-max-bytes 3000
activerehashing yes
client-output-buffer-limit normal 0 0 0
client-output-buffer-limit slave 256mb 64mb 60
client-output-buffer-limit pubsub 32mb 8mb 60
hz 10
aof-rewrite-incremental-fsync yes
EOF
systemctl restart redis
systemctl enable redis
3.3.主从验证
1.在harbor01和harbor02上登录查看
redis-cli -h 127.0.0.1
info Replication
2.检查harbor01节点为
role:master
connected_slaves:1
slave0:ip=10.7.132.219,port=6379,state=online,offset=15,lag=0
master_repl_offset:15
repl_backlog_active:1
repl_backlog_size:1048576
repl_backlog_first_byte_offset:2
repl_backlog_histlen:14
3.检查harbor02节点为
role:slave
master_host:10.7.132.243
master_port:6379
master_link_status:up
master_last_io_seconds_ago:5
master_sync_in_progress:0
slave_repl_offset:43
slave_priority:100
slave_read_only:1
connected_slaves:0
master_repl_offset:0
repl_backlog_active:0
repl_backlog_size:1048576
repl_backlog_first_byte_offset:0
repl_backlog_histlen:0
4.harbor01节点创建keyharbor02节点查看
keys
set name xgmin
keys
4.MariaDB配置
4.1.harbor01节点
1.安装软件包
tar xf /root/mariadb-10.2.24-linux-systemd-x86_64.tar.gz -C /usr/local/
useradd -s /sbin/nologin -M mysql
ln -s /usr/local/mariadb-10.2.24-linux-systemd-x86_64 /usr/local/mariadb
mkdir -p /usr/local/mariadb/data
mkdir -p /usr/local/mariadb/data/mysqlbinlog
chown -R mysql:mysql /usr/local/mariadb /usr/local/mariadb-10.2.24-linux-systemd-x86_64
/usr/local/mariadb/scripts/mysql_install_db --basedir=/usr/local/mariadb \
--datadir=/usr/local/mariadb/data \
--user=mysql
cp /usr/local/mariadb/support-files/mysql.server /usr/lib/systemd/system/
vim /usr/lib/systemd/system/mysql.server
basedir=/usr/local/mariadb
datadir=/usr/local/mariadb/data
2.配置数据库
cat > /etc/my.cnf <<-‘EOF‘
[client]
#password = your_password
port = 3306
socket = /tmp/mysql.sock
[mysqld]
user = mysql
datadir = /usr/local/mariadb/data
port = 3306
pid-file = /tmp/mysql.pid
socket = /tmp/mysql.sock
log-bin = /usr/local/mariadb/data/mysqlbinlog
binlog_format = ROW
slow-query-log = 1
slow-query-log-file = /usr/local/mariadb/logs/mysql_slow.log
default_storage_engine = InnoDB
skip-external-locking
key_buffer_size = 384M
max_allowed_packet = 1M
table_open_cache = 512
sort_buffer_size = 2M
read_buffer_size = 2M
read_rnd_buffer_size = 8M
myisam_sort_buffer_size = 64M
thread_cache_size = 8
query_cache_size = 32M
thread_concurrency = 8
server-id = 1
innodb_log_file_size = 100M
innodb_log_buffer_size = 8M
innodb_flush_log_at_trx_commit = 1
innodb_lock_wait_timeout = 50
[mysqldump]
quick
max_allowed_packet = 16M
[mysql]
no-auto-rehash
[myisamchk]
key_buffer_size = 256M
sort_buffer_size = 256M
read_buffer = 2M
write_buffer = 2M
[mysqlhotcopy]
interactive-timeout
[mysqld_safe]
log-error=/usr/local/mariadb/logs/mysqld.log
EOF
3.启动服务
systemctl daemon-reload
/usr/lib/systemd/system/mysql.server start
netstat -lntup | grep 3306
4.数据库初始化
/usr/local/mariadb/bin/mysql_secure_installation --basedir=/usr/local/mariadb/
ln -s /usr/local/mariadb/bin/mysql /usr/local/bin/mysql
cd ~/ && tar xf harbor-offline-installer-v1.5.4.tgz
5.给最大权限,并可以远程连接
mysql -uroot -p‘Wab1IJvdHurMbPUp‘
grant all privileges on . to root@"%" identified by "Wab1IJvdHurMbPUp";
source /root/harbor/ha/registry.sql
6.创建同步数据的账号,该账户只能进行主从同步
grant replication slave on . to "rep"@"%" identified by "UUqBT7LwgqULoq6g";
flush privileges;
7.查看master的binlog信息
MariaDB [(none)]> show master status;
+--------------------+----------+--------------+------------------+
| File | Position | Binlog_Do_DB | Binlog_Ignore_DB |
+--------------------+----------+--------------+------------------+
| mysqlbinlog.000001 | 16281 | | |
+--------------------+----------+--------------+------------------+
1 row in set (0.00 sec)
4.2.harbor02节点
1.安装软件包
tar xf /root/mariadb-10.2.24-linux-systemd-x86_64.tar.gz -C /usr/local/
useradd -s /sbin/nologin -M mysql
ln -s /usr/local/mariadb-10.2.24-linux-systemd-x86_64 /usr/local/mariadb
mkdir -p /usr/local/mariadb/data
mkdir -p /usr/local/mariadb/data/mysqlbinlog
chown -R mysql:mysql /usr/local/mariadb /usr/local/mariadb-10.2.24-linux-systemd-x86_64
/usr/local/mariadb/scripts/mysql_install_db --basedir=/usr/local/mariadb \
--datadir=/usr/local/mariadb/data \
--user=mysql
cp /usr/local/mariadb/support-files/mysql.server /usr/lib/systemd/system/
sed -i ‘45s#basedir=#basedir=/usr/local/mariadb#g‘ /usr/lib/systemd/system/mysql.server
sed -i ‘46s#datadir=#datadir=/usr/local/mariadb/data#g‘ /usr/lib/systemd/system/mysql.server
2.配置数据库
cat > /etc/my.cnf <<-‘EOF‘
[client]
#password = your_password
port = 3306
socket = /tmp/mysql.sock
[mysqld]
user = mysql
datadir = /usr/local/mariadb/data
port = 3306
pid-file = /tmp/mysql.pid
socket = /tmp/mysql.sock
log-bin = /usr/local/mariadb/data/mysqlbinlog
binlog_format = ROW
slow-query-log = 1
slow-query-log-file = /usr/local/mariadb/logs/mysql_slow.log
default_storage_engine = InnoDB
skip-external-locking
key_buffer_size = 384M
max_allowed_packet = 1M
table_open_cache = 512
sort_buffer_size = 2M
read_buffer_size = 2M
read_rnd_buffer_size = 8M
myisam_sort_buffer_size = 64M
thread_cache_size = 8
query_cache_size = 32M
thread_concurrency = 8
server-id = 2
innodb_log_file_size = 100M
innodb_log_buffer_size = 8M
innodb_flush_log_at_trx_commit = 1
innodb_lock_wait_timeout = 50
[mysqldump]
quick
max_allowed_packet = 16M
[mysql]
no-auto-rehash
[myisamchk]
key_buffer_size = 256M
sort_buffer_size = 256M
read_buffer = 2M
write_buffer = 2M
[mysqlhotcopy]
interactive-timeout
[mysqld_safe]
log-error=/usr/local/mariadb/logs/mysqld.log
EOF
3.启动服务
systemctl daemon-reload
/usr/lib/systemd/system/mysql.server start
netstat -lntup | grep 3306
4.数据库初始化
/usr/local/mariadb/bin/mysql_secure_installation --basedir=/usr/local/mariadb/
ln -s /usr/local/mariadb/bin/mysql /usr/local/bin/mysql
5.给最大权限,并可以远程连接
mysql -uroot -p‘Wab1IJvdHurMbPUp‘
grant all privileges on . to root@"%" identified by "Wab1IJvdHurMbPUp";
6.在harbor02的mysql终端中输入master的信息
CHANGE MASTER TO
MASTER_HOST=‘10.7.132.243‘,
MASTER_PORT=3306,
MASTER_USER=‘rep‘,
MASTER_PASSWORD=‘UUqBT7LwgqULoq6g‘,
MASTER_LOG_FILE=‘mysqlbinlog.000001‘,
MASTER_LOG_POS=16281;
7.启动主从同步进程
MariaDB [(none)]> start slave;
Query OK, 0 rows affected (0.00 sec)
4.3.主从验证
查看主从同步状态
MariaDB [(none)]> show slave status \G
1. row
Slave_IO_State: Waiting for master to send event
Master_Host: 10.7.132.243
Master_User: rep
Master_Port: 3306
Connect_Retry: 60
Master_Log_File: mysqlbinlog.000001
Read_Master_Log_Pos: 16281
Relay_Log_File: mysql-relay-bin.000002
Relay_Log_Pos: 557
Relay_Master_Log_File: mysqlbinlog.000001
Slave_IO_Running: Yes
Slave_SQL_Running: Yes
Replicate_Do_DB:
Replicate_Ignore_DB:
Replicate_Do_Table:
Replicate_Ignore_Table:
Replicate_Wild_Do_Table:
Replicate_Wild_Ignore_Table:
Last_Errno: 0
Last_Error:
Skip_Counter: 0
Exec_Master_Log_Pos: 16281
Relay_Log_Space: 866
Until_Condition: None
Until_Log_File:
Until_Log_Pos: 0
Master_SSL_Allowed: No
Master_SSL_CA_File:
Master_SSL_CA_Path:
Master_SSL_Cert:
Master_SSL_Cipher:
Master_SSL_Key:
Seconds_Behind_Master: 0
Master_SSL_Verify_Server_Cert: No
Last_IO_Errno: 0
Last_IO_Error:
Last_SQL_Errno: 0
Last_SQL_Error:
Replicate_Ignore_Server_Ids:
Master_Server_Id: 1
Master_SSL_Crl:
Master_SSL_Crlpath:
Using_Gtid: No
Gtid_IO_Pos:
Replicate_Do_Domain_Ids:
Replicate_Ignore_Domain_Ids:
Parallel_Mode: conservative
SQL_Delay: 0
SQL_Remaining_Delay: NULL
Slave_SQL_Running_State: Slave has read all relay log; waiting for the slave I/O thread to update it
1 row in set (0.00 sec)
5.PostgreSQL配置
5.1.harbor01节点
1.安装并启动并初始化
cd ~/postgresql96
rpm -ivh *.rpm
/usr/pgsql-9.6/bin/postgresql96-setup initdb
systemctl start postgresql-9.6
systemctl enable postgresql-9.6
2.设置密码,添加同步的用户
su - postgres
psql -U postgres
ALTER USER postgres with encrypted password ‘bXTCUL5BIz5a4liM‘;
CREATE ROLE replica login replication encrypted password ‘V7MqYaP9ogzgAfad‘;
#输入\q并回车, 退出数据库。
#输入exit并回车,退出用户。
3.修改postgresql.conf,监听任意端口
vim /var/lib/pgsql/9.6/data/postgresql.conf
listen_addresses = ‘*‘ # what IP address(es) to listen on
wal_level = hot_standby
max_wal_senders = 32
wal_keep_segments = 256
wal_sender_timeout = 60s
max_connections = 100
4.允许指定的远程访问
vim /var/lib/pgsql/9.6/data/pg_hba.conf
host all all 127.0.0.1/32 ident
host all all 0.0.0.0/0 md5
host replication replica 10.7.132.219/32 md5
5.重启master节点
systemctl restart postgresql-9.6.service
5.2.harbor02节点
1.安装并启动并初始化
cd ~/postgresql96
rpm -ivh *.rpm
/usr/pgsql-9.6/bin/postgresql96-setup initdb
systemctl start postgresql-9.6
systemctl enable postgresql-9.6
2.设置密码,添加同步的用户
su - postgres
psql -U postgres
ALTER USER postgres with encrypted password ‘bXTCUL5BIz5a4liM‘;
#输入\q并回车, 退出数据库。
#输入exit并回车,退出用户。
3.修改postgresql.conf,监听任意端口
vim /var/lib/pgsql/9.6/data/postgresql.conf
将wal_level,max_wal_senders与wal_keep_segments等参数注释
listen_addresses = ‘*‘ # what IP address(es) to listen on
#在备份的同时允许查询
hot_standby = on
#可选,流复制最大延迟
max_standby_streaming_delay = 30s
#可选,从向主报告状态的最大间隔时间
wal_receiver_status_interval = 10s
#可选,查询冲突时向主反馈
hot_standby_feedback = on
#默认参数,非主从配置相关参数,表示到数据库的连接数,一般从库做主要的读服务时,设置值需要高于主库
max_connections = 1000
4.允许指定的远程访问
vim /var/lib/pgsql/9.6/data/pg_hba.conf
host all all 127.0.0.1/32 ident
host all all 0.0.0.0/0 md5
5.重启master节点
systemctl restart postgresql-9.6.service
6.从库安装postgresql后,暂不初始化,如果从库已初始化,可以清空其data目录(默认安装是/ /var/lib/pgsql/9.6/data/目录)。
[root@harbor02 ~]# cd /var/lib/pgsql/9.6/data/
[root@harbor02 data]# rm -rf *
[root@harbor02 data]# pg_basebackup -h 10.7.132.243 -p 5432 -U replica -F p -P -D /var/lib/pgsql/9.6/data/
口令: V7MqYaP9ogzgAfad
22853/22853 kB (100%), 1/1 表空间
NOTICE: WAL archiving is not enabled; you must ensure that all required WAL segments are copied through other means to complete the backup
#-h,主库主机,-p,主库服务端口;
#-U,复制用户;
#-F,p是默认输出格式,输出数据目录和表空间相同的布局,t表示tar格式输出;
#-P,同--progress,显示进度;
#-D,输出到指定目录;
#因为主库采用的是md5认证,这里需要密码认证。
chown -R postgres:postgres /var/lib/pgsql/9.6/data/
7.恢复文件recovery.conf
cp /usr/pgsql-9.6/share/recovery.conf.sample /var/lib/pgsql/9.6/data/recovery.conf
chown postgres:postgres /var/lib/pgsql/9.6/data/recovery.conf
vim /var/lib/pgsql/9.6/data/recovery.conf
#指明从库身份
standby_mode = on
#连接到主库信息
primary_conninfo = ‘host=10.7.132.243 port=5432 user=replica password=V7MqYaP9ogzgAfad‘
#同步到最新数据
recovery_target_timeline = ‘latest‘
5.3.主从验证
1.主库sender进程
[root@harbor01 ~]# ps -ef | grep postgres
root 19734 4368 0 21:50 pts/0 00:00:00 su - postgres
postgres 19735 19734 0 21:50 pts/0 00:00:00 -bash
postgres 19777 19735 0 21:51 pts/0 00:00:00 psql -U postgres
postgres 25118 1 0 22:11 ? 00:00:00 /usr/pgsql-9.6/bin/postmaster -D /var/lib/pgsql/9.6/data/
postgres 25120 25118 0 22:11 ? 00:00:00 postgres: logger process
postgres 25122 25118 0 22:11 ? 00:00:00 postgres: checkpointer process
postgres 25123 25118 0 22:11 ? 00:00:00 postgres: writer process
postgres 25124 25118 0 22:11 ? 00:00:00 postgres: wal writer process
postgres 25125 25118 0 22:11 ? 00:00:00 postgres: autovacuum launcher process
postgres 25126 25118 0 22:11 ? 00:00:00 postgres: stats collector process
postgres 26927 25118 0 22:17 ? 00:00:00 postgres: wal sender process replica 10.7.132.219(45796) streaming 0/50003A8
root 27277 25001 0 22:18 pts/1 00:00:00 grep --color=auto postgres
2.从库receiver过程
[root@harbor02 ~]# ps -ef | grep postgres
postgres 31852 1 0 22:17 ? 00:00:00 /usr/pgsql-9.6/bin/postmaster -D /var/lib/pgsql/9.6/data/
postgres 31854 31852 0 22:17 ? 00:00:00 postgres: logger process
postgres 31855 31852 0 22:17 ? 00:00:00 postgres: startup process recovering 000000010000000000000005
postgres 31856 31852 0 22:17 ? 00:00:00 postgres: wal receiver process streaming 0/50003A8
postgres 31857 31852 0 22:17 ? 00:00:00 postgres: checkpointer process
postgres 31858 31852 0 22:17 ? 00:00:00 postgres: writer process
postgres 31859 31852 0 22:17 ? 00:00:00 postgres: stats collector process
root 32440 26384 0 22:19 pts/0 00:00:00 grep --color=auto postgres
3.查看复制状态(主库)
[root@harbor01 ~]# su - postgres
上一次登录:四 8月 1 21:50:58 CST 2019pts/0 上
-bash-4.2$ psql -U postgres
psql (9.6.14)
Type "help" for help.
postgres=# select * from pg_stat_replication;
pid | usesysid | usename | application_name | client_addr | client_hostname | client_port | backend_start | backend_xmin | state
| sent_location | write_location | flush_location | replay_location | sync_priority | sync_state
-------+----------+---------+------------------+--------------+-----------------+-------------+------------------------------+--------------+----------
-+---------------+----------------+----------------+-----------------+---------------+------------
26927 | 16384 | replica | walreceiver | 10.7.132.219 | | 45796 | 2019-08-01 22:17:39.33801+08 | 1759 | streaming
| 0/5000488 | 0/5000488 | 0/5000488 | 0/5000488 | 0 | async
(1 row)
标签:pie adb evel cti running -- cst docker replicat
原文地址:https://blog.51cto.com/10901766/2504010