标签:文件目录结构 password 主机 otp 复制 mat one timeout keyboard
1、配置chrony服务,实现服务器时间自动同步因chrony服务在centos7系统自带,所以这边先将系统时间改为错误的时候后再编辑chrony主配置文件添加同步服务端地址重启服务验证看是否能够正常同步
,步骤如下:
(1)、将系统时间修改为错误时间: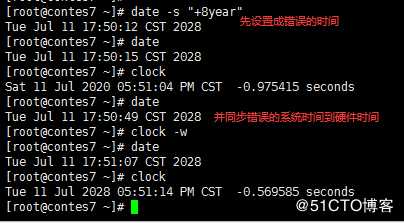
(2)、chrony.conf可以同时作为服务端以及客户的配置文件,修改主配置文件编辑如下:
vim /etc/chrony.conf
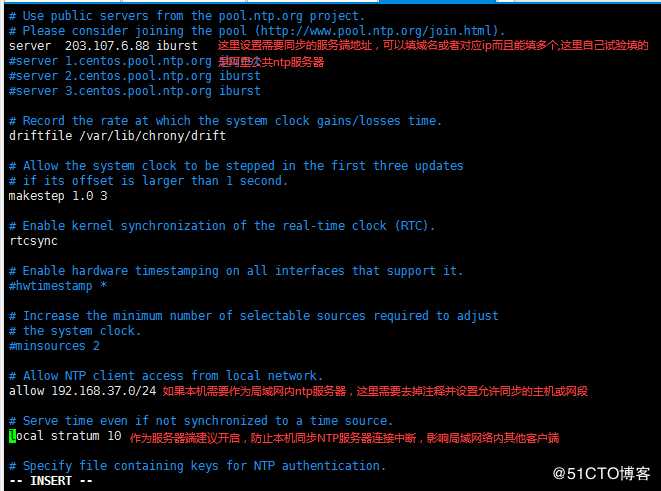
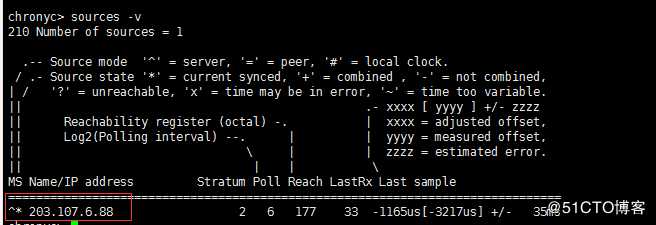
(3)、启动chrony服务验证结果同步成功:

也可以使用ntp客户端命令chronyc查看其状态:
2、实现cobbler+pxe自动化装机
一、pxe自动化装机centos7
环境:
两台主机
一台DHCP,HTTPD,TFTP服务器(一个网卡,仅主机或NET模式),一台测试机(一个网卡,仅主机或NET模式)关闭vmware中的dhcp服务,所以需要自己配置ip、dns、网关地址
1、yum源安装相关服务并启动
yum install httpd tftp-server dhcp syslinux
systemctl start httpd tftp
2、准备yum 源
mkdir /var/www/html/centos/7/os/x86_64 -pv
mount /dev/sr0 /var/www/html/centos/7/os/x86_64
3、yum安装生成ks应答文件的工具
yum install system-config-kickstart
4、centos7中需要配置base.repo源,进去配置文件修改仓库名:[development]
vim /etc/yum.repos.d/CentOS-Base.repo
5、用工具生成应答文件自己设置相关参数
system-config-kickstart
配置完成后查看配置文件内容如下:
#platform=x86, AMD64, or Intel EM64T
#version=DEVEL
#Install OS instead of upgrade
install
#Keyboard layouts
keyboard ‘us‘
#Root password
rootpw --plaintext P@ssw0rd
#Use network installation
url --url="http://192.168.37.101/centos/7/os/x86_64/"
#System language
lang en_US
#System authorization information
auth --useshadow --passalgo=sha512
#Use text mode install
text
firstboot --disable
#SELinux configuration
selinux --disabled
#Firewall configuration
firewall --disabled
#Network information
network --bootproto=dhcp --device=eth0
#Reboot after installation
reboot
#System timezone
timezone Africa/Abidjan
#System bootloader configuration
bootloader --append="net.ifnames=0" --location=mbr
#Clear the Master Boot Record
zerombr
#Partition clearing information
clearpart --all --initlabel
#Disk partitioning information
part /boot --fstype="xfs" --size=1000
part / --fstype="xfs" --size=100000
part swap --fstype="swap" --size=2000
%packages
#可以不用配置默认最小化安装
%end
6、将应答文件移动到http服务目录下
mkdir /var/www/html/ksdir/
ls /var/www/html/ksdir/
ks7_mini.cfg
7、配置dhcp服务 67是dhcp服务器的端口号;68是dhcp客户端的端口号
cp /usr/share/doc/dhcp-4.2.5/dhcpd.conf.example /etc/dhcp/dhcpd.conf (复制dhcp配置文件模板自己改)
vim /etc/dhcp/dhcpd.conf
option domain-name "magedu.com";
option domain-name-servers 114.114.114.114, 180.76.76.76;
default-lease-time 86400; (默认租期时间单位秒)
max-lease-time 864000; (最大租期时间单位秒)
subnet 192.168.37.0 netmask 255.255.255.0 { #设置网络及掩码
range 192.168.37.50 192.168.37.100; #设置自动分配ip地址池的范围
option routers 192.168.37.1; #设置网关
next-server 192.168.37.101; #下一跳服务器ip
filename "pxelinux.0"; # pxe 启动引导器pxelinux.0在syslinux包中之前已安装(把它拷贝到 /var/lib/tftpboot/ 下, 客户机会从此目录读取该文件安装)
}
systemctl start dhcpd
8、准备相关的文件
cp /usr/share/syslinux/pxelinux.0 /var/lib/tftpboot/
cp /usr/share/syslinux/menu.c32 /var/lib/tftpboot/
mkdir /var/lib/tftpboot/centos7
cp /var/www/html/centos/7/os/x86_64/isolinux/{vmlinuz,initrd.img} /var/lib/tftpboot/centos7
mkdir /var/lib/tftpboot/pxelinux.cfg/
cp /var/www/html/centos/7/os/x86_64/isolinux/isolinux.cfg /var/lib/tftpboot/pxelinux.cfg/default
完成后tftp文件目录结构如下:
[root@contes7 ~]# tree /var/lib/tftpboot/
/var/lib/tftpboot/
├── centos7
│?? ├── initrd.img
│?? └── vmlinuz
├── menu.c32
├── pxelinux.0
└── pxelinux.cfg
└── default
2 directories, 5 files9、准备启动菜单
vim /var/lib/tftpboot/pxelinux.cfg/default
default menu.c32
timeout 600
menu title CentOS Auto Install
label mini7
menu label Install CentOS ^Mini 7
kernel centos7/vmlinuz
append initrd=centos7/initrd.img ks=http://192.168.37.101/ksdir/ks7_mini.cfg
label local
menu default
menu label Boot from ^local drive
localboot 0xffff
10、测式机网卡启动验证
二、cobbler自动化装机centos7
环境
装备一台centos7的虚拟机,因cobbler依赖epel的yum源所以需要首先安装配置
1、配置epel的yum源
自己用的阿里云EPEL源配置:vim /etc/yum.repos.d/epel.repo
[epel]
name=EPEL
baseurl=https://mirrors.aliyun.com/epel/7/x86_64/
gpgcheck=0
enabled=1
配置完成后重新加载yum源:yum repolist
2、安装cobbler、dhcp httpd、tftp并启动
yum install cobbler dhcp httpd tftp -y
systemctl start cobblerd dhcpd httpd #先启动各个服务进行验证
clobber check #进行cobbler检测
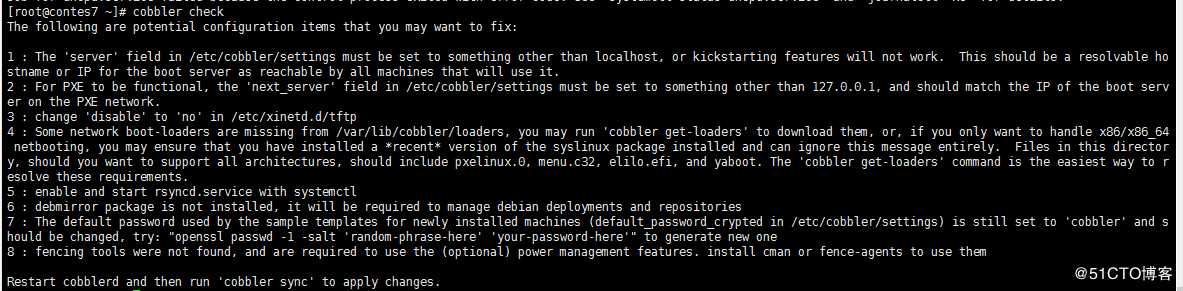
如上图的提示配置相关文件
3、编辑配置cobbler配置文件
vim /etc/cobbler/settings
server: 192.168.37.101 #修改serverIP地址为虚拟机本机地址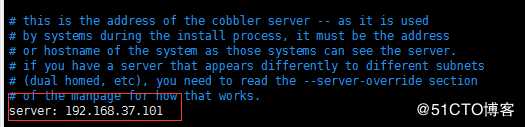
next_server: 192.168.37.101 #修改next_server地址为虚拟机地址

manage_dhcp: 1 #修改dhcp服务器选项,1表示同意让cobbler来管理dhcp服务器
default_password_crypted: "$1$RFO.hOYF$g79MJdrxFJMgpggQlhjev/" # 用openssl passwd -1 生成加密后的字符加入到配置文件
最后重启cobber服务:systemctl restart cobblerd
4、通过cobbler管理配置dhcp,配置如下:
vim /etc/cobbler/dhcp.template
subnet 192.168.37.0 netmask 255.255.255.0 {
option routers 192.168.37.2;
option domain-name-servers 192.168.37.2;
option subnet-mask 255.255.255.0;
range dynamic-bootp 192.168.37.100 192.168.37.254;
5、下载启动菜单cobbler get-loaders #如果当前服务节点可以联网,直接执行“cobbler getloaders”命令下载即可;否则,需要安装syslinux程序包,yum install syslinux;而后复制/usr/share/syslinux/{pxelinux.0,memu.c32}等文件至/var/lib/cobbler/loaders/目录中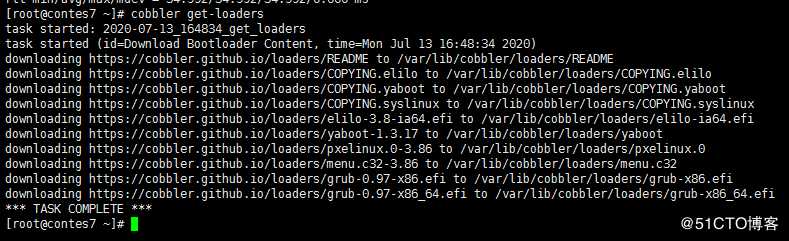
6、导入系统安装源文件
mkdir /media/cdrom mount /dev/sr0 /media/cdrom #先将系统镜像文件挂载到指定目录以备后用
cobbler import --path=/media/cdrom --name=CentOS7.6-x86_64 --arch=x86_64 #镜像文件较大需要足够的空间来存放文件,导入时间会比较长
cobbler profile list #列出导入到本机的yum源
cobbler distro list #kickstar应答文件
导入的文件会放在/var/www/cobbler目录,以后系统安装会用到这里的源文件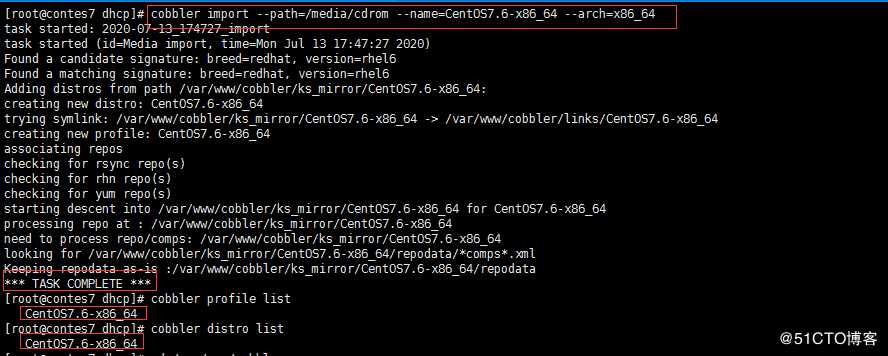
7、准备CentOS7的kickstar应答文件
用之前制作的ks文件 vim ks7_mini.cfg 编辑修改如下:
#platform=x86, AMD64, or Intel EM64T #操作系统版本
#version=DEVEL
#Install OS instead of upgrade
install
#Keyboard layouts
keyboard ‘us‘
#Root password
rootpw --plaintext P@ssw0rd #root账号的密码
#Use network installation
url --url=$tree #这里需要用到cobbler自带的$tree变量,它能自动找到系统之前导入的对应的yum源
#System language
lang en_US # 系统使用语言
#System authorization information
auth --useshadow --passalgo=sha512 #系统认证相关参数
#Use text mode install
text
firstboot --disable
#SELinux configuration
selinux --disabled #禁用selinux
#Firewall configuration
firewall --disabled #禁用防火墙
#Network information
network --bootproto=dhcp --device=eth0 #定义开机后网卡自动到局域网内dhcp服务器获取ip
#Reboot after installation
reboot #重启选项
#System timezone
timezone Asia/Shanghai #时间区域
#System bootloader configuration
bootloader --append="net.ifnames=0" --location=mbr #设置网卡名及MBR主引导文件
#Clear the Master Boot Record
zerombr #清空磁盘分区
#Partition clearing information
clearpart --all --initlabel
#Disk partitioning information
part /boot --fstype="xfs" --size=1000 #配置分区大小及分区文件系统类型
part / --fstype="xfs" --size=100000 #配置分区大小及分区文件系统类型
part swap --fstype="swap" --size=2000 #配置分区大小及分区文件系统类型
%packages
#这中间加需要安装的各种包,不配置默认最小化安装
%end
cp ks7_mini.cfg /var/lib/cobbler/kickstarts/ #移动kickstart文件到cobbler指定目录
8、导入到cobbler中有多个yum源的话,需要设置系统yum源和kickstart文件一一对应关系
cobbler profile add --name CentOS7.6-x86_64_mini --distro=CentOS7.6-x86_64 --kickstart=/var/lib/cobbler/kickstarts/ks7_mini.cfg #设置导入到cobbler中的系统yum源和kickstart文件一一对应
--name:安装系统界面的显示名称 --distro:指定导入的系统yum源版本 --kickstart:自己的kickstart文件路径
9、重启cobbler、dhcp、tftp、httpd服务
systemctl restart cobblerd dhcpd tftp httpd
cobbler sync #同步cobbler配置命令
10、测试安装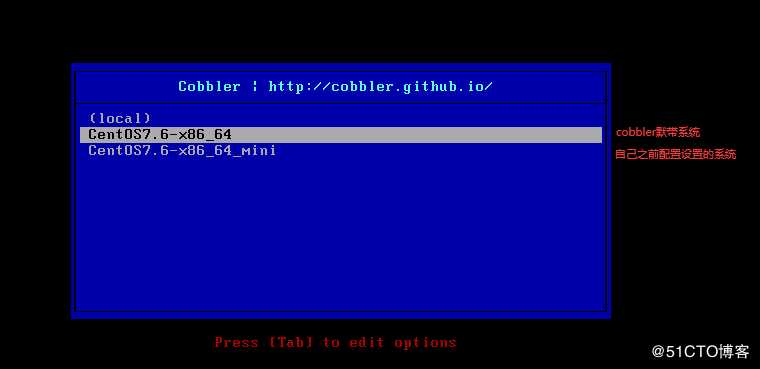
标签:文件目录结构 password 主机 otp 复制 mat one timeout keyboard
原文地址:https://blog.51cto.com/12783727/2510442