标签:neu cli eset center img border custom class function
写在前面的话
由于近日公司项目要升级使用Vue3,很多插件就需要去更新版本,首先想到的就是FullCalendar日历插件,于是便去对应的官网查看插件是否支持Vue3,结果 o(╥﹏╥)o 官方暂时还没更新Vue3.0版本,紧接着去github上查看大神们的解决方案,皇天不负有心人,找到了部分大神们的意见【文档地址一】【文档地址二】,可以前往查看,我在这里稍微整理了一下,使得FullCalendar插件可以在Vue3中正常运行
1、Vue版本和FullCalendar版本
"vue": "^3.0.0"

"@fullcalendar/core": "^5.6.0",

"@fullcalendar/daygrid": "^5.6.0",

"@fullcalendar/interaction": "^5.6.0",

"@fullcalendar/timegrid": "^5.6.0",

"@fullcalendar/vue": "^5.6.0",
2、安装
npm install --save @fullcalendar/vue @fullcalendar/core @fullcalendar/daygrid @fullcalendar/interaction @fullcalendar/timegrid
3、修改custom-content-type.js文件
找到安装之后的文件,文件路径为\node_modules\@fullcalendar\vue\dist\custom-content-type.js
import { createPlugin } from ‘@fullcalendar/core‘
import { createApp } from ‘vue‘


/*
wrap it in an object with a `vue` key, which the custom content-type handler system will look for
*/
export function wrapVDomGenerator(vDomGenerator) {
    return function (props) {
        return { vue: vDomGenerator(props) }
    }
}


export function createVueContentTypePlugin(parent){
   return createPlugin({
        contentTypeHandlers: {
            vue: function () { return buildVDomHandler(parent); },
        }
    });
}


function buildVDomHandler() {
    let currentEl
    let v // the Vue instance

    return function (el, vDomContent) { // the handler

        if (currentEl !== el) {
            if (currentEl && v) { // if changing elements, recreate the vue
                v.$destroy()
            }
            currentEl = el
        }

        if (!v) {
            v = initVue(vDomContent)

            // vue‘s mount method *replaces* the given element. create an artificial inner el
            let innerEl = document.createElement(‘span‘)
            el.appendChild(innerEl)
            v.$mount(innerEl)

        } else {
            v.content = vDomContent
        }
    }
}


function initVue(initialContent) {
    return createApp({
        props: {
            content: Array
        },
        propsData: {
            content: initialContent
        },
        render(h) {
            let { content } = this

            // the slot result can be an array, but the returned value of a vue component‘s
            // render method must be a single node.
            if (content.length === 1) {
                return content[0]

            } else {
                return h(‘span‘, {}, content)
            }
        }
    })
}
4、修改FullCalendar.js文件
找到安装之后的文件,文件路径为\node_modules\@fullcalendar\vue\dist\FullCalendar.js
import { __assign } from "tslib";
import {defineComponent,h} from ‘vue‘;
import { Calendar } from ‘@fullcalendar/core‘;
import { OPTION_IS_COMPLEX } from ‘./options‘;
import { shallowCopy, mapHash } from ‘./utils‘;
import { wrapVDomGenerator, createVueContentTypePlugin } from ‘./custom-content-type‘;
const FullCalendar={
    props: {
        options: Object
    },
    data: initData,
    render(){
        return h(‘div‘, {
            // when renderId is changed, Vue will trigger a real-DOM async rerender, calling beforeUpdate/updated
            attrs: { ‘data-fc-render-id‘: this.renderId }
        });
    },
    mounted: function () {
        var internal = this.$options;
        internal.scopedSlotOptions = mapHash(this.$scopedSlots, wrapVDomGenerator); // needed for buildOptions
        var calendar = new Calendar(this.$el, this.buildOptions(this.options, this));
        internal.calendar = calendar;
        calendar.render();
    },
    methods: {
        getApi: getApi,
        buildOptions: buildOptions,
    },
    beforeUpdate: function () {
        this.getApi().resumeRendering(); // the watcher handlers paused it
    },
    beforeDestroy: function () {
        this.getApi().destroy();
    },
    watch: buildWatchers()
};
function initData() {
    return {
        renderId: 0
    };
}
function buildOptions(suppliedOptions, parent) {
    var internal = this.$options;
    suppliedOptions = suppliedOptions || {};
    // return __assign(__assign(__assign({}, internal.scopedSlotOptions), suppliedOptions), { plugins: (suppliedOptions.plugins || []).concat([
    //         createVueContentTypePlugin(parent)
    //     ]) });
     return {
    ...internal.scopedSlotOptions,
    ...suppliedOptions, // spread will pull out the values from the options getter functions
    plugins: (suppliedOptions.plugins || []).concat([
      createVueContentTypePlugin(parent)
    ])
  }
}
function getApi() {
    var internal = this.$options;
    return internal.calendar;
}
function buildWatchers() {
    var watchers = {
        // watches changes of ALL options and their nested objects,
        // but this is only a means to be notified of top-level non-complex options changes.
        options: {
            deep: true,
            handler: function (options) {
                var calendar = this.getApi();
                calendar.pauseRendering();
                calendar.resetOptions(this.buildOptions(options, this));
                this.renderId++; // will queue a rerender
            }
        }
    };
    var _loop_1 = function (complexOptionName) {
        // handlers called when nested objects change
        watchers["options." + complexOptionName] = {
            deep: true,
            handler: function (val) {
                var _a;
                // unfortunately the handler is called with undefined if new props were set, but the complex one wasn‘t ever set
                if (val !== undefined) {
                    var calendar = this.getApi();
                    calendar.pauseRendering();
                    calendar.resetOptions((_a = {},
                        // the only reason we shallow-copy is to trick FC into knowing there‘s a nested change.
                        // TODO: future versions of FC will more gracefully handle event option-changes that are same-reference.
                        _a[complexOptionName] = shallowCopy(val),
                        _a), true);
                    this.renderId++; // will queue a rerender
                }
            }
        };
    };
    for (var complexOptionName in OPTION_IS_COMPLEX) {
        _loop_1(complexOptionName);
    }
    return watchers;
}
export default defineComponent(FullCalendar);
5、修改完上面两个文件之后,就可以进行测试了
<script>
import FullCalendar from "@fullcalendar/vue";
import dayGridPlugin from "@fullcalendar/daygrid";
import timeGridPlugin from "@fullcalendar/timegrid";
import interactionPlugin from "@fullcalendar/interaction";

export default {
  components: {
    FullCalendar, // make the <FullCalendar> tag available
  },

  data: function () {
    return {
      calendarOptions: {
        allDayText: "全天",
        buttonText: {
          today: "今天",
          month: "月视图",
          week: "周视图",
          day: "天视图",
          list: "列表",
        },
        locale: "zh-cn",
        weekMode: "variable",
        plugins: [
          dayGridPlugin,
          timeGridPlugin,
          interactionPlugin, // needed for dateClick
        ],
        headerToolbar: {
          left: "prev,next today",
          center: "title",
          right: "dayGridMonth,timeGridWeek,timeGridDay",
        },
        initialView: "dayGridMonth",
        initialEvents: [
          {
            id: this.createEventId(),
            title: "All-day event",
            start: new Date().toISOString().replace(/T.*$/, "") + "T12:00:00",
          },
          {
            id: this.createEventId(),
            title: "Timed event",
            start: new Date().toISOString().replace(/T.*$/, "") + "T12:00:00",
          },
        ], // alternatively, use the `events` setting to fetch from a feed
        editable: true,
        selectable: true,
        selectMirror: true,
        dayMaxEvents: true,
        weekends: true,
        select: this.handleDateSelect,
        eventClick: this.handleEventClick,
        eventsSet: this.handleEvents,
        /* you can update a remote database when these fire:
        eventAdd:
        eventChange:
        eventRemove:
        */
      },
      currentEvents: [],
      eventGuid: 0,
    };
  },

  methods: {
    handleWeekendsToggle() {
      this.calendarOptions.weekends = !this.calendarOptions.weekends; // update a property
    },

    handleDateSelect(selectInfo) {
      let title = prompt("Please enter a new title for your event");
      let calendarApi = selectInfo.view.calendar;

      calendarApi.unselect(); // clear date selection

      if (title) {
        calendarApi.addEvent({
          id: this.createEventId(),
          title,
          start: selectInfo.startStr,
          end: selectInfo.endStr,
          allDay: selectInfo.allDay,
        });
      }
    },

    handleEventClick(clickInfo) {
      if (
        confirm(
          `Are you sure you want to delete the event ‘${clickInfo.event.title}‘`
        )
      ) {
        clickInfo.event.remove();
      }
    },

    handleEvents(events) {
      this.currentEvents = events;
    },
    createEventId() {
      return String(this.eventGuid++);
    },
  },
  mounted() {
    this.initialEvents = [
      {
        id: this.createEventId(),
        title: "All-day event",
        start: this.todayStr,
      },
      {
        id: this.createEventId(),
        title: "Timed event",
        start: this.todayStr + "T12:00:00",
      },
    ];
  },
};
</script>

<template>
  <div class="demo-app">
    <div class="demo-app-sidebar">
      <div class="demo-app-sidebar-section">
        <h2>Instructions</h2>
        <ul>
          <li>Select dates and you will be prompted to create a new event</li>
          <li>Drag, drop, and resize events</li>
          <li>Click an event to delete it</li>
        </ul>
      </div>
      <div class="demo-app-sidebar-section">
        <label>
          <input
            type="checkbox"
            :checked="calendarOptions.weekends"
            @change="handleWeekendsToggle"
          />
          toggle weekends
        </label>
      </div>
      <div class="demo-app-sidebar-section">
        <h2>All Events ({{ currentEvents.length }})</h2>
        <ul>
          <li v-for="event in currentEvents" :key="event.id">
            <b>{{ event.startStr }}</b>
            <i>{{ event.title }}</i>
          </li>
        </ul>
      </div>
    </div>
    <div class="demo-app-main">
      <FullCalendar class="demo-app-calendar" :options="calendarOptions">
        <template v-slot:eventContent="arg">
          <b>{{ arg.timeText }}</b>
          <i>{{ arg.event.title }}</i>
        </template>
      </FullCalendar>
    </div>
  </div>
</template>

<style lang="css">
h2 {
  margin: 0;
  font-size: 16px;
}

ul {
  margin: 0;
  padding: 0 0 0 1.5em;
}

li {
  margin: 1.5em 0;
  padding: 0;
}

b {
  /* used for event dates/times */
  margin-right: 3px;
}

.demo-app {
  display: flex;
  min-height: 100%;
  font-family: Arial, Helvetica Neue, Helvetica, sans-serif;
  font-size: 14px;
}

.demo-app-sidebar {
  width: 300px;
  line-height: 1.5;
  background: #eaf9ff;
  border-right: 1px solid #d3e2e8;
}

.demo-app-sidebar-section {
  padding: 2em;
}

.demo-app-main {
  flex-grow: 1;
  padding: 3em;
}

.fc {
  /* the calendar root */
  max-width: 1100px;
  margin: 0 auto;
}
</style>
6、运行界面
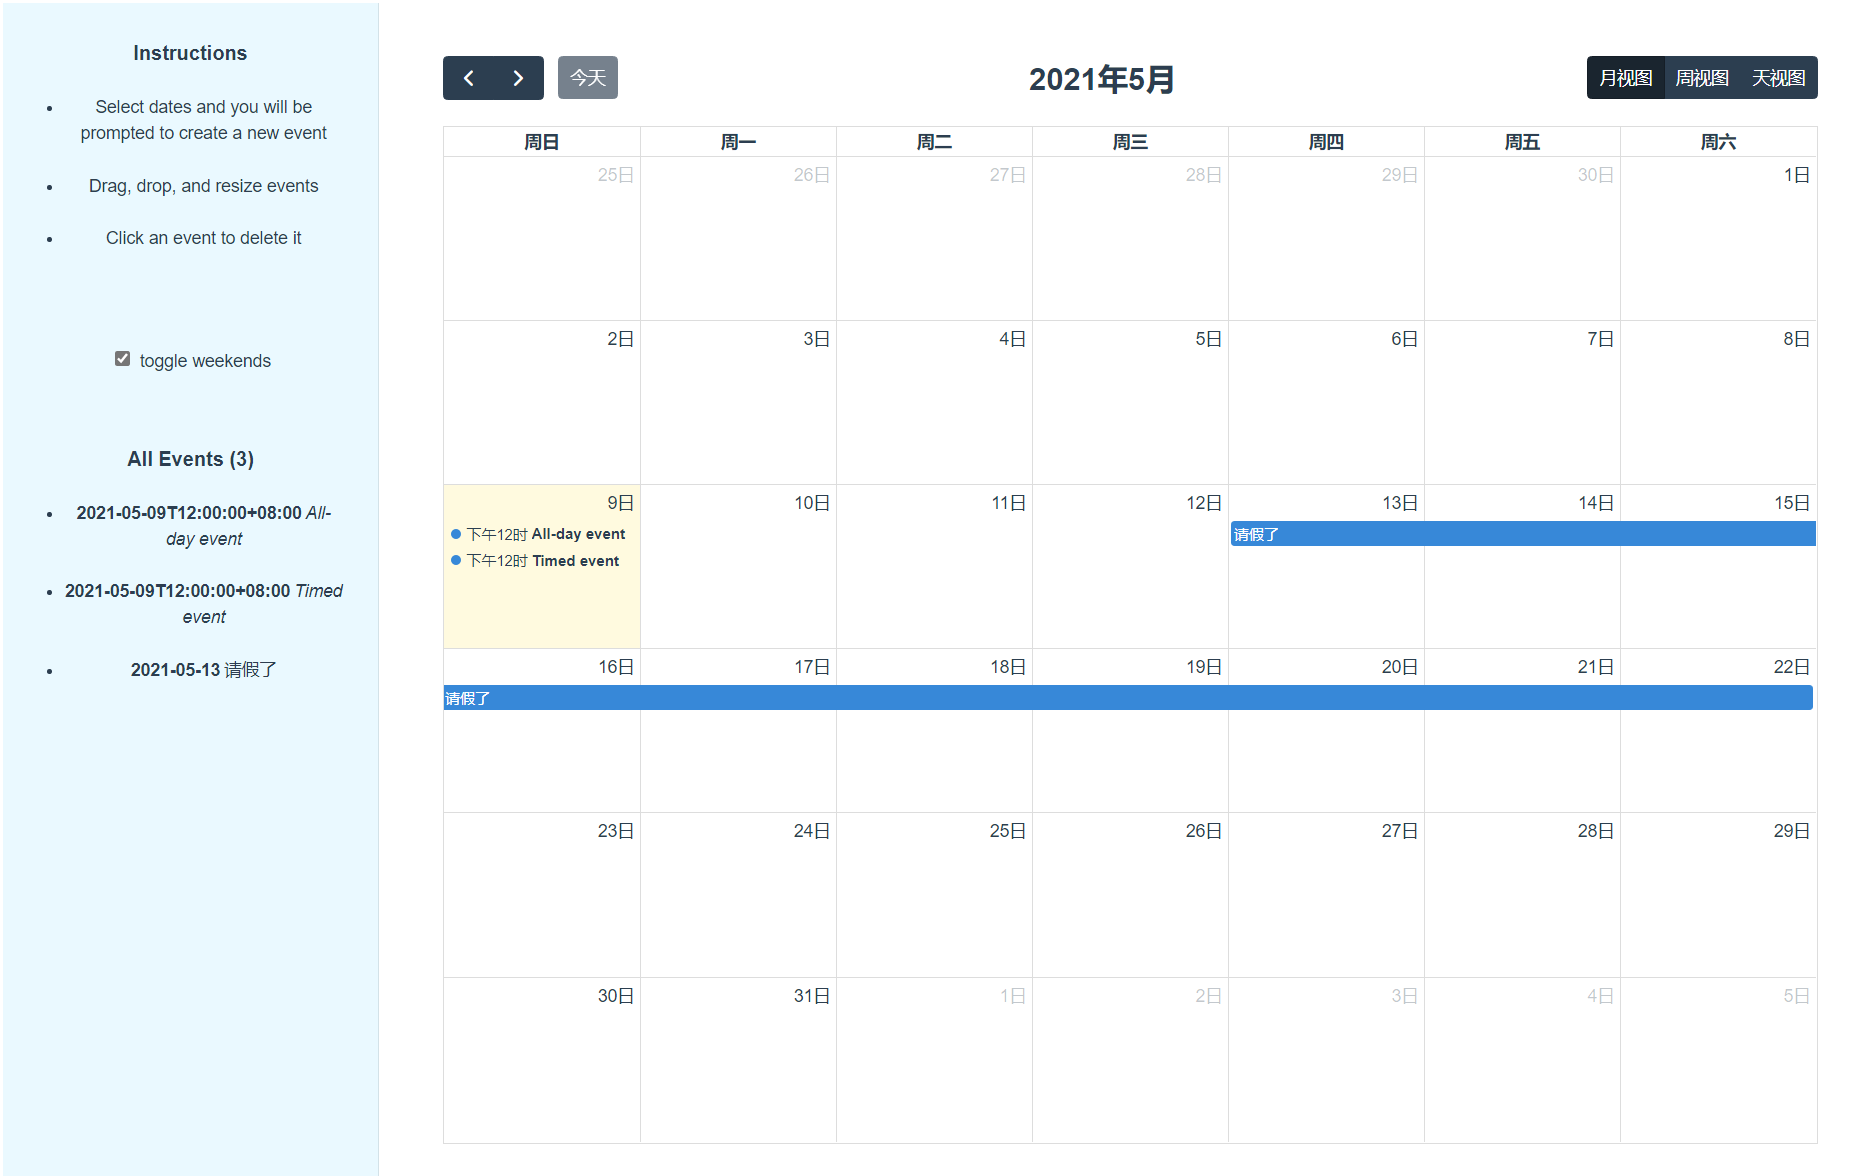
由于每次重新安装FullCalendar插件之后都需要重新修改一遍文件,这里就不提供案例了
平时积累,用于复习,如有问题,请留言,谢谢
标签:neu cli eset center img border custom class function
原文地址:https://www.cnblogs.com/sas1231/p/14747902.html