标签:file ini 单位 imu space argc line 范围 end
CMakeLists.txt
# cmake needs this line
cmake_minimum_required(VERSION 3.1)

# Define project name
project(Pangolin_project)

#添加Pangolin画图依赖库
find_package(Pangolin REQUIRED)
include_directories(${Pangolin_INCLUDE_DIRS})

#编译可执行文件
add_executable(plotTrajectory plotTrajectory.cpp)
#连接Pangolin库
target_link_libraries(plotTrajectory ${Pangolin_LIBRARIES})
plotTrajectory.cpp
#include <pangolin/pangolin.h>
#include <Eigen/Core>
#include <unistd.h>
// 本例演示了如何画出一个预先存储的轨迹
using namespace std;
using namespace Eigen;
// path to trajectory file
string trajectory_file = "./trajectory.txt";
void DrawTrajectory(vector<Isometry3d, Eigen::aligned_allocator<Isometry3d>>);
int main(int argc, char **argv) {
//1定义容器-保存轨迹数据
vector<Isometry3d, Eigen::aligned_allocator<Isometry3d>> poses;
//2打开文件,读取轨迹数据
ifstream fin(trajectory_file);
if (!fin) {
cout << "cannot find trajectory file at " << trajectory_file << endl;
return 1;
}
//3将文件数据赋值给容器
while (!fin.eof()) {
double time, tx, ty, tz, qx, qy, qz, qw;
fin >> time >> tx >> ty >> tz >> qx >> qy >> qz >> qw;
// 用Eigen::Isometry表示欧氏变换矩阵
Eigen::Isometry3d Twr = Eigen::Isometry3d::Identity( ); // 三维变换矩阵
Twr.rotate( Quaterniond(qw, qx, qy, qz) ); // 旋转部分赋值
//Isometry3d Twr(Quaterniond(qw, qx, qy, qz));
Twr.pretranslate(Vector3d(tx, ty, tz));// 设置平移向量
//cout << "Transform matrix = \n" << Twr.matrix( ) << endl;
poses.push_back(Twr);
}
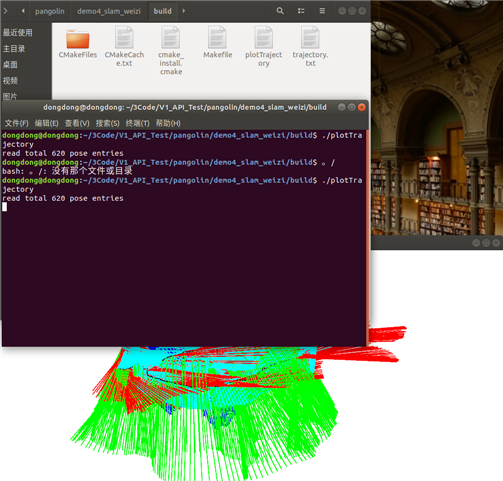
cout << "read total " << poses.size() << " pose entries" << endl;
//4执行画图
// draw trajectory in pangolin
DrawTrajectory(poses);
return 0;
}
/*******************************************************************************************/
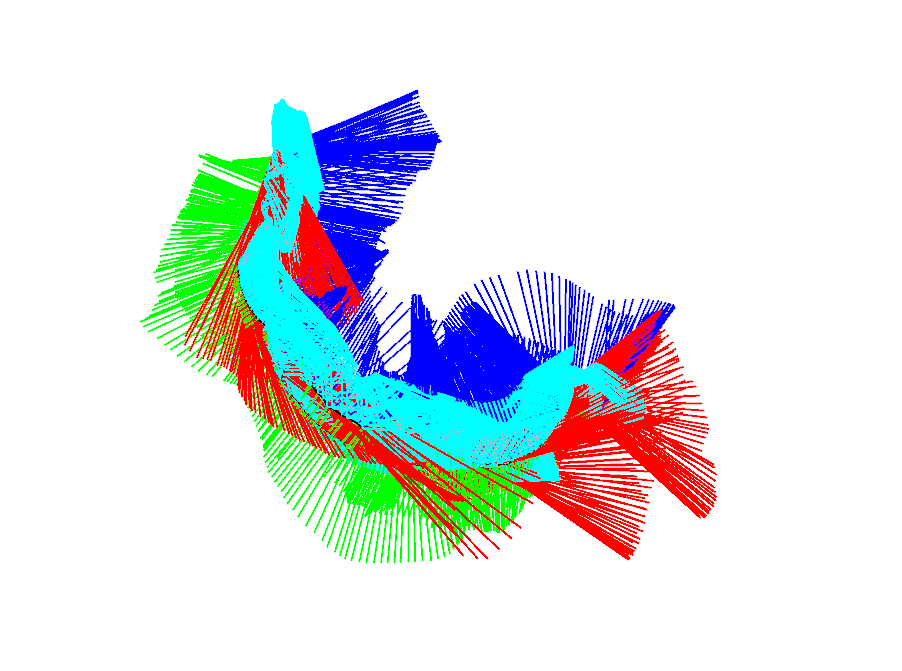
void DrawTrajectory(vector<Isometry3d, Eigen::aligned_allocator<Isometry3d>> poses) {
// create pangolin window and plot the trajectory
// 1创建名称为“Main”的GUI窗口,1024×768
pangolin::CreateWindowAndBind("Trajectory Viewer", 1024, 768);
// 2启动深度测试
glEnable(GL_DEPTH_TEST);
//该功能会使得pangolin只会绘制朝向镜头的那一面像素点,避免容易混淆的透视关系出现,因此在任何3D可视化中都应该开启该功能
glEnable(GL_BLEND);
glBlendFunc(GL_SRC_ALPHA, GL_ONE_MINUS_SRC_ALPHA);
// 3创建一个观察相机视图
pangolin::OpenGlRenderState s_cam(
pangolin::ProjectionMatrix(1024, 768, 500, 500, 512, 389, 0.1, 1000), //摄像机的内参矩阵ProjectionMatrix Pangolin会自动根据内参矩阵完成对应的透视变换
pangolin::ModelViewLookAt(0, -0.1, -1.8, 0, 0, 0, 0.0, -1.0, 0.0) //摄像机初始时刻所处的位置 摄像机的视点位置(即摄像机的光轴朝向哪一个点)以及摄像机的本身哪一轴朝上
);
//4创建交互视图用于显示上一步摄像机所“拍摄”到的内容
pangolin::View &d_cam = pangolin::CreateDisplay()
.SetBounds(0.0, 1.0, 0.0, 1.0, -1024.0f / 768.0f)//前四个参数依次表示视图在视窗中的范围(下、上、左、右),可以采用相对坐标(0~1)以及绝对坐标(使用Attach对象)。 //
.SetHandler(new pangolin::Handler3D(s_cam));
//5 开始画图
while (pangolin::ShouldQuit() == false) {
// 5-1 清空颜色和深度缓存 否则视窗内会保留上一帧的图形
glClear(GL_COLOR_BUFFER_BIT | GL_DEPTH_BUFFER_BIT);
d_cam.Activate(s_cam);
glClearColor(1.0f, 1.0f, 1.0f, 1.0f);
// 0 画出轨迹连线
for (size_t i = 0; i < poses.size(); i++) {
glColor3f(0.0, 0.0, 0.0);
glBegin(GL_LINES);
auto p1 = poses[i], p2 = poses[i + 1];
glVertex3d(p1.translation()[0], p1.translation()[1], p1.translation()[2]);
glVertex3d(p2.translation()[0], p2.translation()[1], p2.translation()[2]);
glEnd();
}
//1-1设置每个位置相机视角三维轴 自己写计算过程
for (size_t i = 0; i < poses.size(); i++) {
// 计算变换后的点
Vector3d Ow = poses[i].translation();//获取平移矩阵
Vector3d Xw = poses[i] * (0.1 * Vector3d(1, 0, 0));//单位坐标1的线段变换到指定位置
Vector3d Yw = poses[i] * (0.1 * Vector3d(0, 1, 0));
Vector3d Zw = poses[i] * (0.1 * Vector3d(0, 0, 1));
//开始画图
glBegin(GL_LINES);
glLineWidth(2);
glColor3f(1.0, 0.0, 0.0);//定义颜色
glVertex3d(Ow[0], Ow[1], Ow[2]); glVertex3d(Xw[0], Xw[1], Xw[2]);
glColor3f(0.0, 1.0, 0.0);
glVertex3d(Ow[0], Ow[1], Ow[2]); glVertex3d(Yw[0], Yw[1], Yw[2]);
glColor3f(0.0, 0.0, 1.0);
glVertex3d(Ow[0], Ow[1], Ow[2]); glVertex3d(Zw[0], Zw[1], Zw[2]);
glEnd();
}
//1-2划出相机位置 使用库中的矩阵计算
for (size_t i = 0; i < poses.size(); i++) {
//1创建矩阵
glPushMatrix();
//2矩阵赋值,后续所有操作都乘上这个系数
Eigen::Isometry3d R =poses[i];
std::vector<GLdouble> Twc = {
R(0, 0), R(1,0), R(2, 0), 0.,
R(0, 1), R(1, 1), R(2, 1), 0.,
R(0, 2), R(1, 2), R(2, 2), 0.,
R(0, 3), R(1, 3), R(2, 3), 1.};
glMultMatrixd(Twc.data());//pangolin后续绘制中的所有坐标均需要乘以这个矩阵
//具体画框
glBegin(GL_LINES);//4-1
glLineWidth(2); //4-2
glColor3f(1.0, 0.0, 0.0);//4-3定义颜色
glVertex3f(0,0,0); glVertex3f(0.1,0,0);
glColor3f(0.0, 1.0, 0.0);//4-3定义颜色
glVertex3f(0,0,0); glVertex3f(0,0.1,0);
glColor3f(0.0, 0.0, 1.0);//4-3定义颜色
glVertex3f(0,0,0); glVertex3f(0,0,0.1);
glEnd();
//3更新矩阵
glPopMatrix();
}
//2划出相机位置
for (size_t i = 0; i < poses.size(); i++) {
//1创建矩阵
glPushMatrix();
//2矩阵赋值,后续所有操作都乘上这个系数
Eigen::Isometry3d R =poses[i];
std::vector<GLdouble> Twc = {
R(0, 0), R(1,0), R(2, 0), 0.,
R(0, 1), R(1, 1), R(2, 1), 0.,
R(0, 2), R(1, 2), R(2, 2), 0.,
R(0, 3), R(1, 3), R(2, 3), 1.};
glMultMatrixd(Twc.data());//pangolin后续绘制中的所有坐标均需要乘以这个矩阵
//3绘制相机轮廓线
const float w = 0.2;
const float h = w * 0.75;
const float z = w * 0.6;
glLineWidth(2); //4-1
glBegin(GL_LINES);//4-2
glColor3f(0.0f,1.0f,1.0f);//4-3
glVertex3f(0,0,0); glVertex3f(w,h,z);
glVertex3f(0,0,0); glVertex3f(w,-h,z);
glVertex3f(0,0,0); glVertex3f(-w,-h,z);
glVertex3f(0,0,0); glVertex3f(-w,h,z);
glVertex3f(w,h,z); glVertex3f(w,-h,z);
glVertex3f(-w,h,z); glVertex3f(-w,-h,z);
glVertex3f(-w,h,z); glVertex3f(w,h,z);
glVertex3f(-w,-h,z); glVertex3f(w,-h,z);
//5
glEnd();
//3更新矩阵
glPopMatrix();
}
// 运行帧循环以推进窗口事件
pangolin::FinishFrame();
usleep(5000); // sleep 5 ms
}
} // 清空颜色和深度缓存
trajectory.txt
1305031526.671473 0.000000000 0.000000000 0.000000000 0.000000000 0.000000000 0.000000000 1.000000000
1305031526.707547 0.002883195 -0.004662100 -0.002254304 0.011409802 0.010697415 0.002189494 0.999875307
1305031526.771481 0.013978966 -0.013082317 -0.010869596 0.043280017 0.032526672 0.003260542 0.998528004
1305031526.807455 -0.001601209 -0.011404546 -0.026841529 0.073491804 0.052071322 0.000915701 0.995935082
1305031526.871446 -0.004428456 -0.001333938 -0.042973492 0.115341254 0.070847765 -0.006601509 0.990774155
1305031526.907484 -0.006487503 -0.003464771 -0.058195263 0.135408968 0.081248961 -0.010381512 0.987398207
1305031526.939618 -0.014331216 -0.013660092 -0.078787915 0.147756621 0.091927201 -0.015138508 0.984625876
1305031526.971510 -0.018625503 -0.015494643 -0.089080200 0.165385425 0.100416750 -0.017430481 0.980948687
1305031527.007595 -0.020048823 -0.005540572 -0.097900160 0.181910872 0.106515355 -0.017926607 0.977364600
1305031527.039512 -0.023435375 -0.009148147 -0.106970325 0.195644155 0.113224901 -0.019022474 0.973931015
编译过程
# 创建编译文件夹(在Pangolin文件夹下)
mkdir build && cd build
# 配置编译选项
cmake ..
make
./plotTrajectory
camke(6)配置pangolin 4slam划轨迹和相机位置姿态
标签:file ini 单位 imu space argc line 范围 end
原文地址:https://www.cnblogs.com/gooutlook/p/14855782.html