标签:android style class blog c code
TextView直接继承了View,他还是EditText、Button两个UI组件的父类,TextView的作用就是在界面上显示文字(相当于Java中AWT中标签[JLabel],但有比他强大些)。
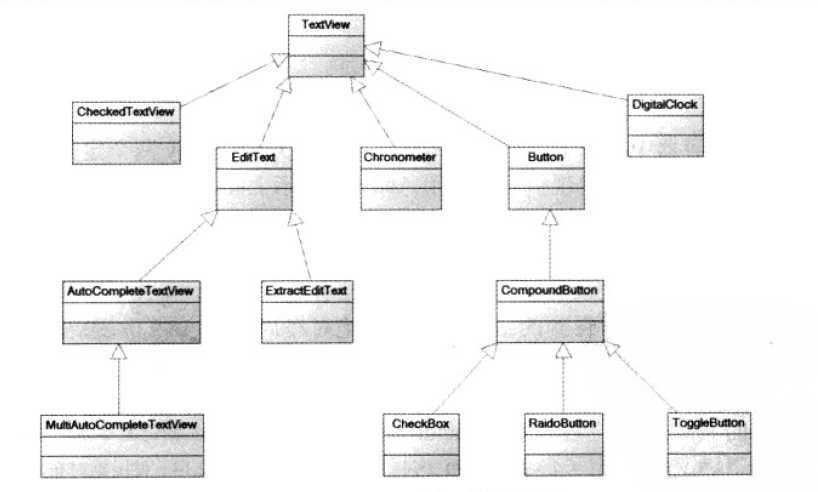
TextView类及其子类的类图如图所示:
TextView的XML属性及相关方法和说明:
| XML属性 | 相关方法 | 说明 |
| android:autoLink | setAutoLinkMask(int) | 是否符合指定格式的文本转换为可单击的超链接形式 |
| android:cursorVisible | setCursorVisible(boolean) | 设置该文本框的光标是否可见 |
| android:drawableBottom |
setCompounDrawablesWithIntrinsicBounds (Drawable,Drawable,Drawable,Drawable) |
在文本框内文本的底端绘制指定图像 |
| android:drawableLeft |
setCompounDrawablesWithIntrinsicBounds (Drawable,Drawable,Drawable,Drawable) |
在文本框内文本的左边绘制指定图像 |
| android:drawablePadding |
setCompounDrawablesWithIntrinsicBounds (Drawable,Drawable,Drawable,Drawable) |
设置文本框内文本与图形之间的间距 |
| android:drawableRight |
setCompounDrawablesWithIntrinsicBounds (Drawable,Drawable,Drawable,Drawable) |
在文本框内文本的右边绘制指定图像 |
| android:drawableTop |
setCompounDrawablesWithIntrinsicBounds (Drawable,Drawable,Drawable,Drawable) |
在文本框内文本的顶端绘制指定图像 |
| android:editable | 设置该文本是否允许编辑 | |
| android:ellipsize | 设置当显示的文本超过TextView的长度是如何处理文本内容 | |
| android:gracity | setGravity(int) | 设置文本框内文本的对齐方式 |
| android:height | setHeight(int) | 设置该文本框的高度(以pixel为单位) |
| android:hint | setHint(int) | 设置当该文本框内容为空时,文本框内默认显示的提示文本 |
| android:minHeight | setMinHeight(int) | 设置该文本框的最小高度(以pixel为单位) |
| android:maxHeight | setMaxHeight(int) | 设置该文本框的最大高度(以pixel为单位) |
| android:minWidth | setMinWidth(int) | 设置该文本框的最小宽度(以pixel为单位) |
| android:maxWidth | setMaxWidth(int) | 设置该文本框的最大宽度(以pixel为单位) |
| android:lines | setLines(int) | 设置该文本框默认占几行 |
| android:MiLines | setMiLines(int) | 设置该文本框最少占几行 |
| android:MaxLines | setMaxLines(int) | 设置该文本框最多占几行 |
| android:password | setTransformationMethod(TransfirmationMethod) | 设置该文本框是一个密码框(以点代替字符) |
| android:phoneNumber | setKevListener(KeyListener) | 设置该文本框只能接受电话号码 |
| android:scrollHorizontally | setHorizontallyScorlling(boolean) | 设置当该文本框不够显示全部内容时是否允许水平滚动 |
| android:selectAllOnFocus | setSelectAllOnFocus(boolean) | 如果文本框的内容可选择,设置当它获得焦点时是否自动选中所有文本 |
| android:singleLine | setTransformationMethod | 设置该文本框是否为单行模式。如果设为true,文本框不会换行 |
| android:shadowColor | setShadowLayer(float,float,float,int) | 设置文本框内文本的阴影的颜色 |
| android:shadowDx | setShadowLayer(float,float,float,int) | 设置文本框内文本的阴影在水平方向的偏移 |
| android:shadowDy | setShadowLayer(float,float,float,int) | 设置文本框内文本的阴影在垂直方向的偏移 |
| android:shadowRadius | setShadowLayer(float,float,float,int) | 设置文本框内文本的阴影的角度 |
| android:text | setText(CharSequence) | 设置文本框内文本的内容 |
| android:textColor | setTextColor(ColorStateList) | 设置该文本框内文本的颜色 |
| android:tetColorHighlight | setHighlightColor(int) | 设置该文本框内文本被选中时的颜色 |
| android:textScaleX | setTextScaleX(float) | 设置该文本框内文本水平方向上的缩放因子 |
| android:textSize | setTextSize(float) | 设置该文本框内文本的字体大小 |
| android:textStyle | setTypeface(Typeface) | 设置该文本框内文本的字体风格,如粗体,斜体 |
| android:typeface | setTypeface(Typeface) | 设置该文本框内文本的字体 |
| android:width | setWidth(int) | 设置该文本框的宽度 |
上表中android:autoLink属性值是如下几个属性值的一个或几个,多个属性值之间用竖线隔开:
上表中android:ellipsize属性可支持如下几个属性值。
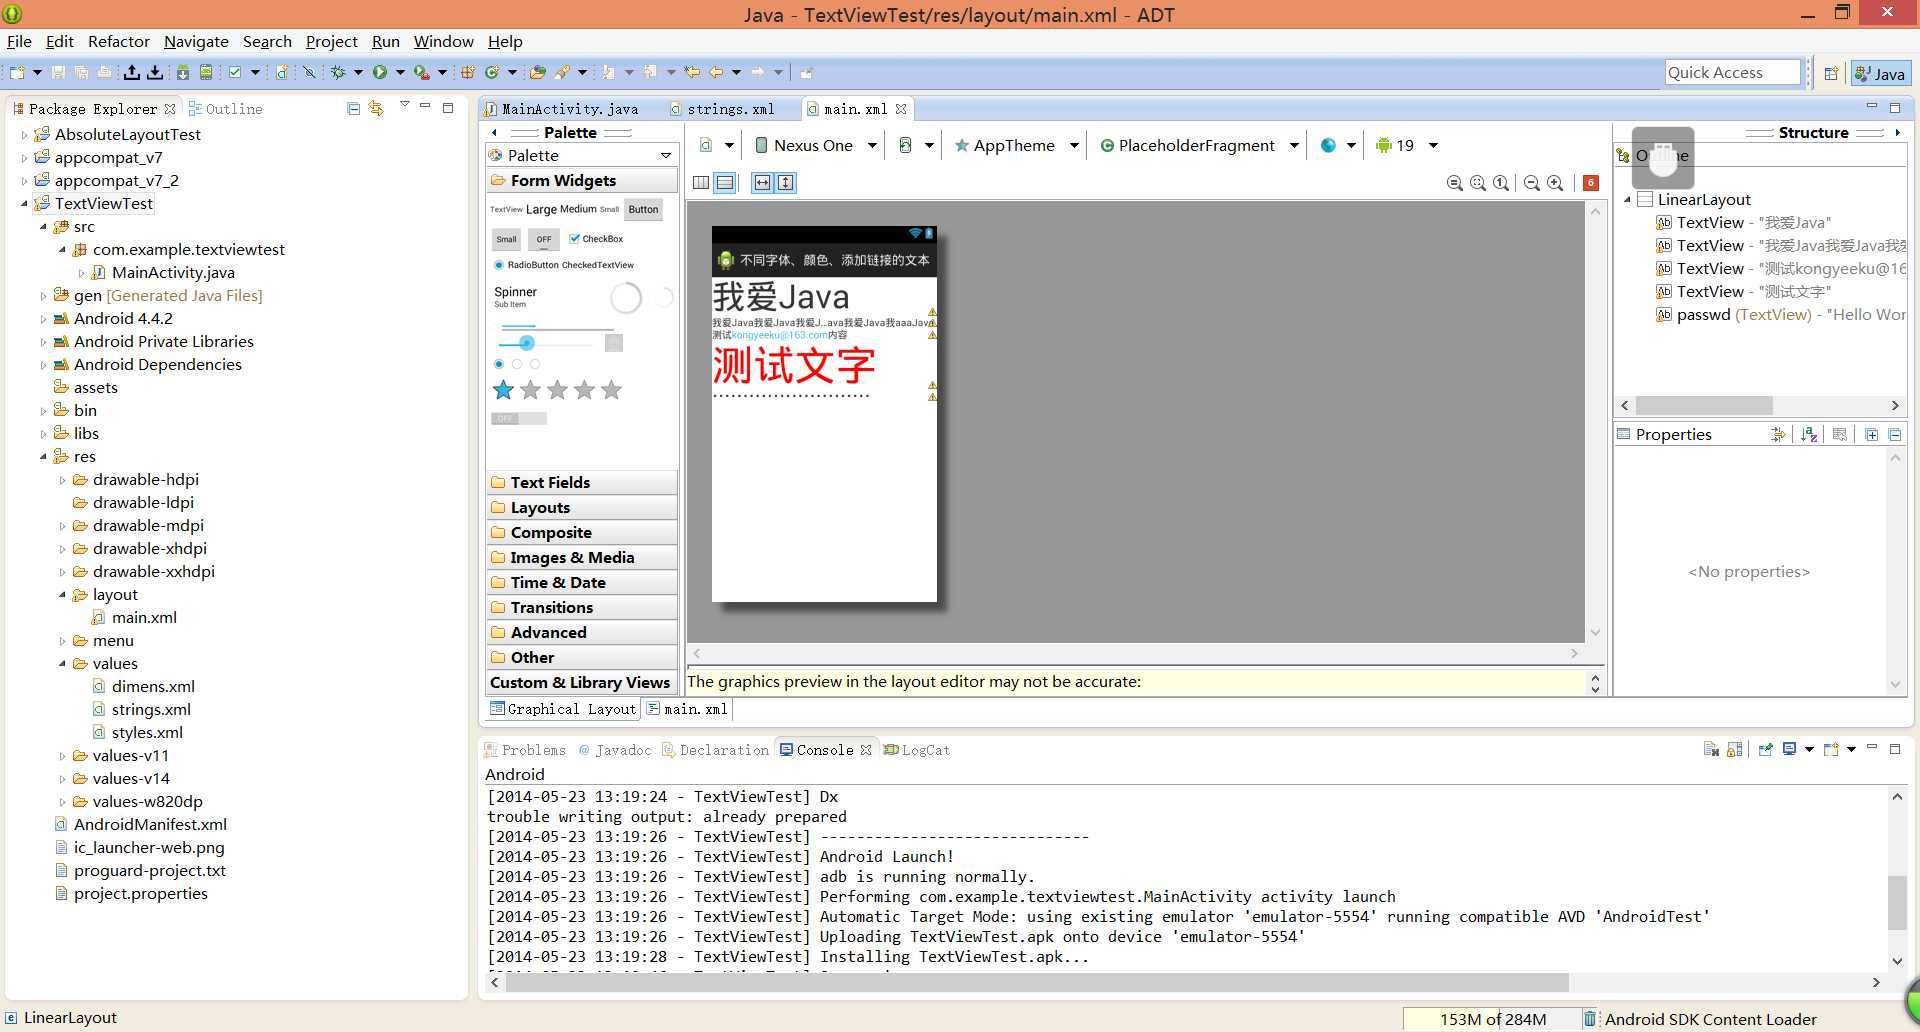
下面我们用例子来例举上表中的一些属性:不同字体、不同颜色的文本、URL
layout/main.xml

 1 <LinearLayout xmlns:android="http://schemas.android.com/apk/res/android"
 2     xmlns:tools="http://schemas.android.com/tools"
 3     android:orientation="vertical"
 4     android:layout_width="fill_parent"
 5     android:layout_height="fill_parent">
 6
 7     <!-- 设置字体为20pt  -->
 8     <TextView
 9     android:layout_width="fill_parent"
10     android:layout_height="wrap_content"
11     android:text="我爱Java"
12     android:textSize="20pt"
13     />
14     <!-- 设置中间省略 -->
15     <TextView
16     android:layout_width="fill_parent"
17     android:layout_height="wrap_content"
18     android:singleLine="true"
19     android:text="我爱Java我爱Java我爱Java我爱Java我爱Java我aaaJava"
20     android:ellipsize="middle"
21     />
22     <!-- 对邮件增加链接 -->
23     <TextView
24     android:layout_width="fill_parent"
25     android:layout_height="wrap_content"
26     android:singleLine="true"
27     android:text="测试kongyeeku@163.com内容"
28     android:autoLink="email"
29     />
30     <!-- 设置文字颜色 、大小,并使用阴影 -->
31     <TextView
32     android:layout_width="fill_parent"
33     android:layout_height="wrap_content"
34     android:text="测试文字"
35     android:shadowColor="#0000ff"
36     android:shadowDx="15.0"
37     android:shadowDy="20.0"
38     android:shadowRadius="45.0"
39     android:textColor="#ff0000"
40     android:textSize="25pt"
41     />
42     <!-- 测试密码框 -->
43     <TextView android:id="@+id/passwd"
44     android:layout_width="fill_parent"
45     android:layout_height="wrap_content"
46     android:text="@string/hello"
47     android:password="true"
48     />
49
50 </LinearLayout>
所展现的效果图如下:
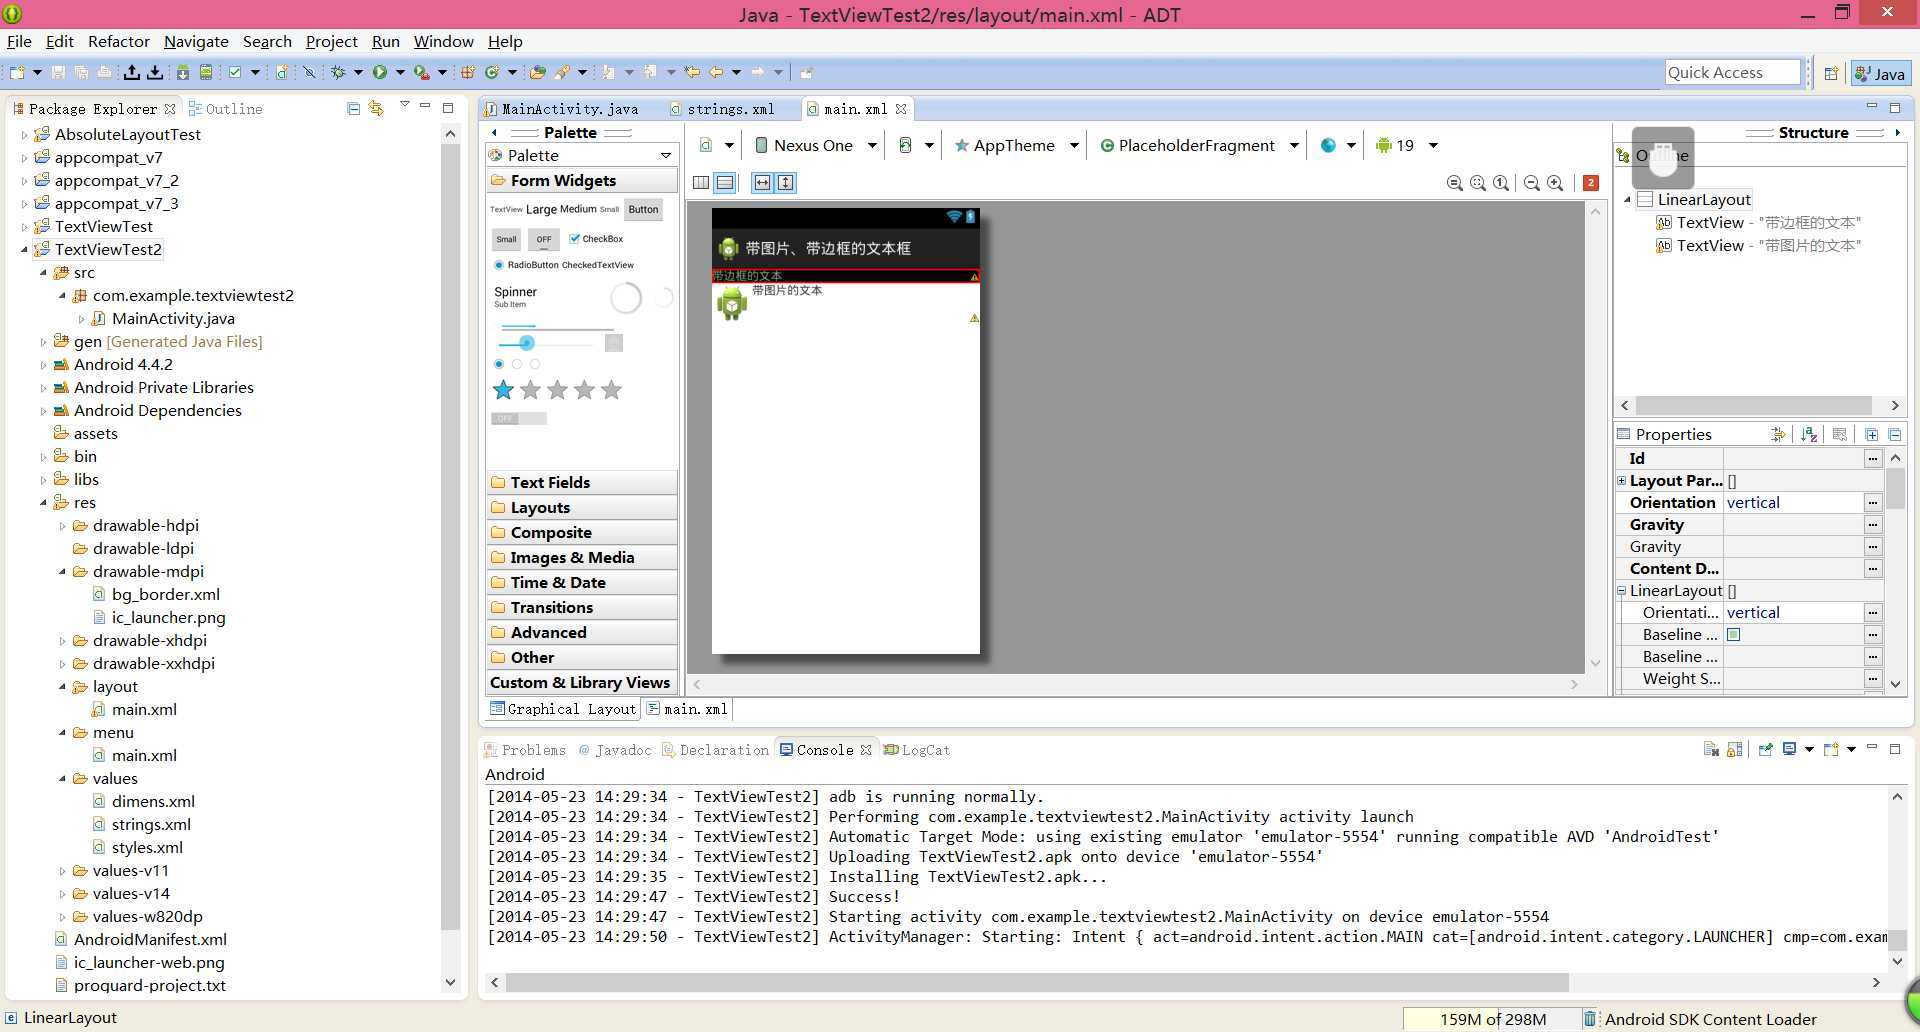
范例:带边框、图片的TextView
 1 <LinearLayout xmlns:android="http://schemas.android.com/apk/res/android"
 2     xmlns:tools="http://schemas.android.com/tools"
 3     android:orientation="vertical"
 4     android:layout_width="fill_parent"
 5     android:layout_height="fill_parent">
 6
 7     <!-- 通过android:background指定背景 -->
 8 <TextView
 9     android:layout_width="fill_parent"
10     android:layout_height="wrap_content"
11     android:text="带边框的文本"
12     android:background="@drawable/bg_border"
13     android:textColor="@color/abc_search_url_text_holo"
14     />
15
16 <!-- 通过android:drawableLeft绘制一张图片 -->
17 <TextView
18     android:layout_width="fill_parent"
19     android:layout_height="wrap_content"
20     android:text="带图片的文本"
21     android:drawableLeft="@drawable/ic_launcher"
22     />
23
24 </LinearLayout>
效果图:
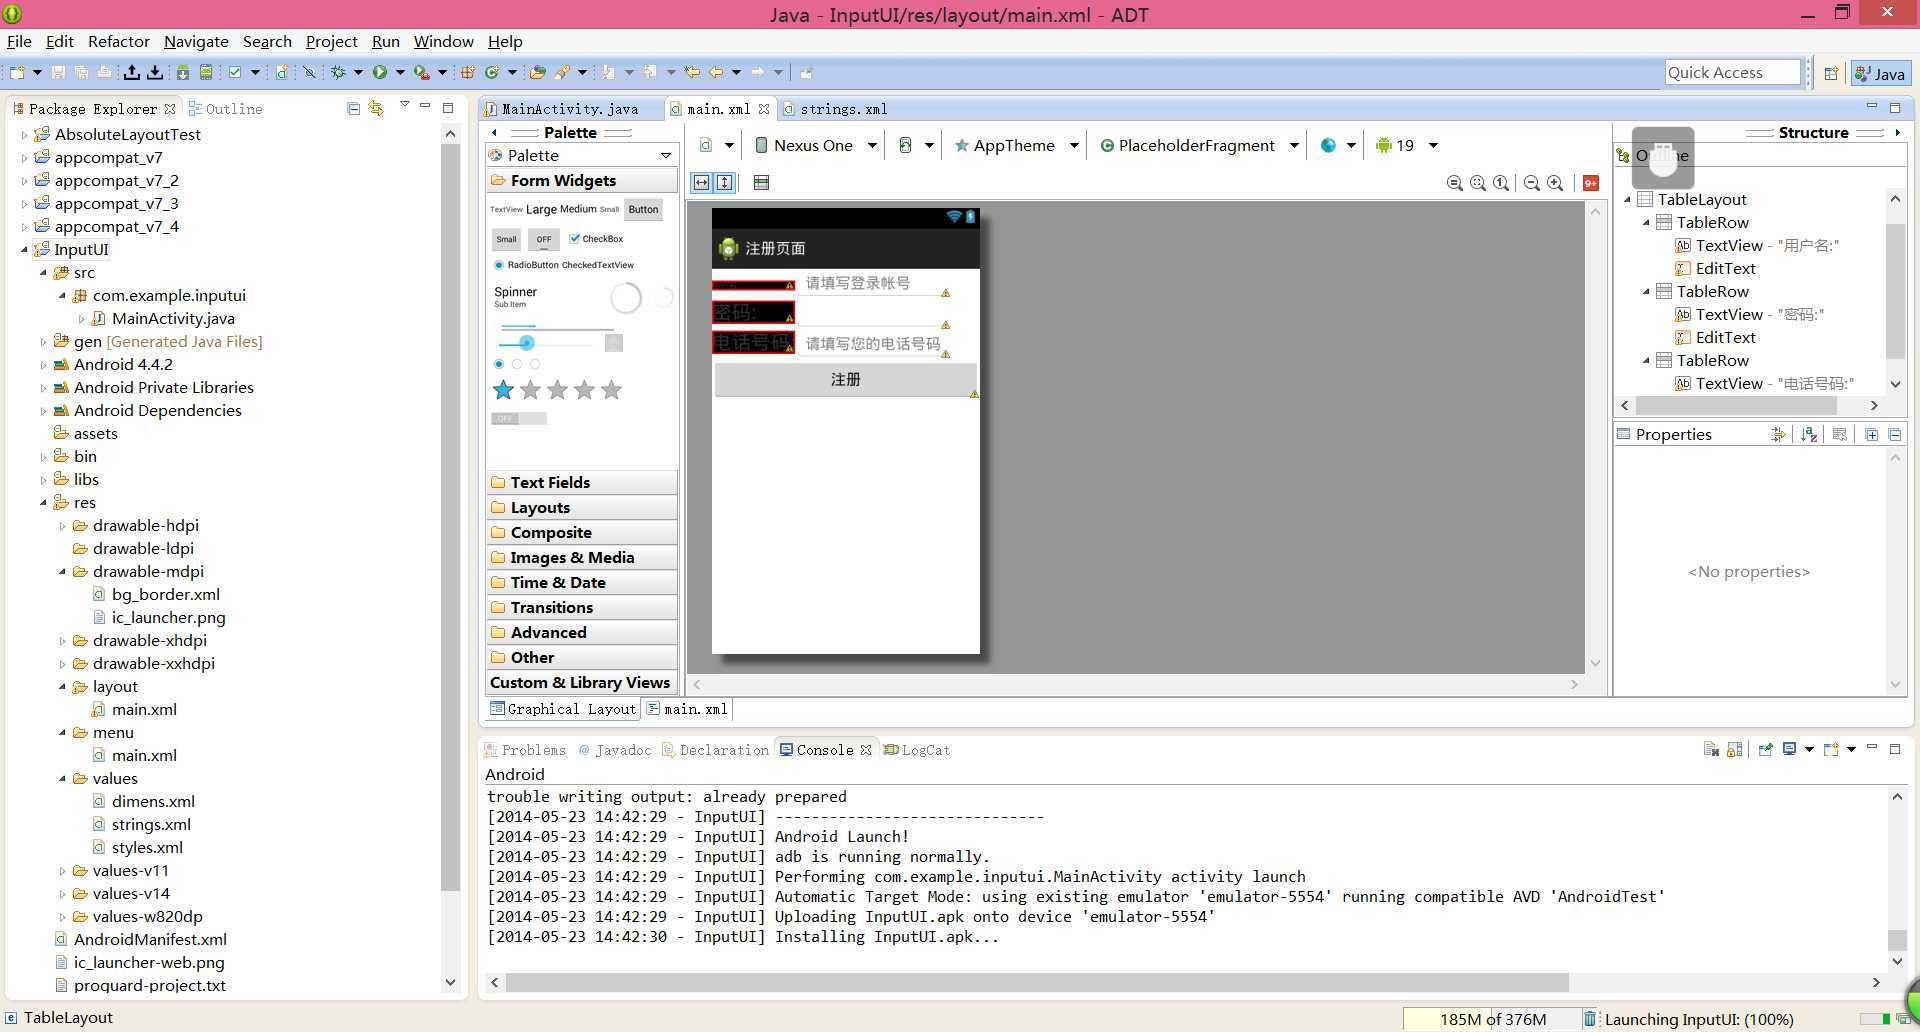
范例:一个注册界面
 1 <TableLayout xmlns:android="http://schemas.android.com/apk/res/android"
 2     xmlns:tools="http://schemas.android.com/tools"
 3     android:orientation="vertical"
 4     android:layout_width="fill_parent"
 5     android:layout_height="fill_parent">
 6 <TableRow>
 7 <TextView
 8     android:layout_width="fill_parent"
 9     android:layout_height="wrap_content"
10     android:text="用户名:"
11     android:textSize="10sp"
12     android:background="@drawable/bg_border"
13     />
14 <EditText
15     android:layout_width="fill_parent"
16     android:layout_height="wrap_content"
17     android:hint="请填写登录帐号"
18     android:selectAllOnFocus="true"
19     />
20 </TableRow>
21 <TableRow>
22 <TextView
23     android:layout_width="fill_parent"
24     android:layout_height="wrap_content"
25     android:text="密码:"
26     android:textSize="10pt"
27     android:background="@drawable/bg_border"
28     />
29 <EditText
30     android:layout_width="fill_parent"
31     android:layout_height="wrap_content"
32     android:password="true"
33     />
34 </TableRow>
35 <TableRow>
36 <TextView
37     android:layout_width="fill_parent"
38     android:layout_height="wrap_content"
39     android:text="电话号码:"
40     android:textSize="10pt"
41     android:background="@drawable/bg_border"
42     />
43 <EditText
44     android:layout_width="fill_parent"
45     android:layout_height="wrap_content"
46     android:hint="请填写您的电话号码"
47     android:selectAllOnFocus="true"
48     android:phoneNumber="true"
49     />
50 </TableRow>
51 <Button
52     android:layout_width="wrap_content"
53     android:layout_height="wrap_content"
54     android:text="注册"
55     />
56
57
58 </TableLayout>
上面代码里面的TextView是设置了背景图片的,所以在展示的效果图上你们呢会看到三个黑的框框,为什么三个框框的会有一个比另外两个小,那是因为我设置的宽度单位不一样(用户名的宽度是sp,其他的是用的pt);所展示的效果,效果图如下:
Android 自学之基本界面组件(上),布布扣,bubuko.com
标签:android style class blog c code
原文地址:http://www.cnblogs.com/Yang-jing/p/3747469.html