标签:模式 read mat 多边形 des osi 序列 有一个 二值图像
cv2.findContours(img,mode,method)

import cv2 as cv
import numpy as np


img = cv.imread(‘contours.png‘)
gray = cv.cvtColor(img, cv.COLOR_BGR2GRAY)
ret, thresh = cv.threshold(gray, 127, 255, cv.THRESH_BINARY) # 为了更高的准确率,使用二值图像。当值大于127时,值赋予255,否则为0.
binary, contours, hierarchy = cv.findContours(thresh, cv.RETR_TREE, cv.CHAIN_APPROX_NONE)
draw_img = img.copy()# 之所以copy原图,是因为绘制轮廓时,原图会被改变。
finally_img = cv.drawContours(draw_img, contours, -1, (0, 0, 255), 2) # 绘制轮廓。传入绘制图像,轮廓,轮廓索引,颜色模式((0, 0, 255)按照BGR来说就是红色),线条厚度

res = np.hstack((img, finally_img))
cv.imshow(‘img‘, res)
cv.waitKey(0)
cv.destroyAllWindows()

cv2.contourArea(参数)
cv2.arcLength(参数,True) # True表示闭合的
import cv2 as cv
import numpy as np


img = cv.imread(‘contours.png‘)
gray = cv.cvtColor(img, cv.COLOR_BGR2GRAY)
ret, thresh = cv.threshold(gray, 127, 255, cv.THRESH_BINARY) # 为了更高的准确率,使用二值图像。当值大于127时,值赋予255,否则为0.
binary, contours, hierarchy = cv.findContours(thresh, cv.RETR_TREE, cv.CHAIN_APPROX_NONE)
cnt = contours[0]
Area = cv.contourArea(cnt)
Length = cv.arcLength(cnt, True)
print(‘面积是:{},周长是:{}‘.format(Area, Length))

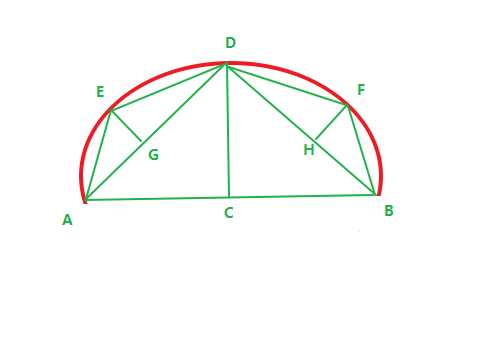
假设曲线AB是一段轮廓。现在我们要对它做轮廓近似。
首先我们设置一个阈值T。
第一步,先找到垂线DC,DC是垂直于AB的最长垂线,只有一条。判断DC是否大于T,若小于T,则AB就是近似轮廓,否则继续下一步。
第二步,连接AD和DB,同理找到最长垂线EG和FH。判断他们是否大于阈值T,若小于阈值,则AD或者DB就是近似轮廓,否则继续找。
cv2.approxPolyDP(传入图, 阈值, True) :轮廓近似函数
import cv2 as cv
import numpy as np


img = cv.imread(‘contours2.png‘)
gray_img = cv.cvtColor(img, cv.COLOR_BGR2GRAY) # 转换为灰度图
ret, thresh = cv.threshold(gray_img, 127, 255, cv.THRESH_BINARY) #二值图
binary, contours, hierarchy = cv.findContours(thresh, cv.RETR_TREE, cv.CHAIN_APPROX_NONE) # 找到轮廓图
cnt = contours[0] # 获取第一个轮廓,这是一个外轮廓,还有一个内轮廓。
draw_img1 = img.copy()
res1 = cv.drawContours(draw_img, [cnt], -1, (0, 0, 255), 2) # 绘制第一个轮廓
epsilon = 0.1*cv.arcLength(cnt, True) # 设置一个阈值,阈值取的是轮廓周长的0.1,0.1可改变成其他值。
approx = cv.approxPolyDP(cnt, epsilon, True)
draw_img2 = img.copy()
res2 = cv.drawContours(draw_img2, [approx], -1, (0, 0, 255), 2)
res = np.hstack((res1, res2))
cv.imshow(‘res‘, res)
cv.waitKey(0)
cv.destroyAllWindows()

x, y, w, h = boundingRect(输入图像)
rectangle(img,(x,y),(x+w,y+h),(0,255,0),2)
import cv2 as cv
import numpy as np


img = cv.imread(‘contours2.png‘)
gray_img = cv.cvtColor(img, cv.COLOR_BGR2GRAY)
ret, thresh = cv.threshold(gray_img, 127, 255, cv.THRESH_BINARY)
binary, contours, hierarchy = cv.findContours(thresh, cv.RETR_TREE, cv.CHAIN_APPROX_NONE)
cnt = contours[0]

x, y, w, h = cv.boundingRect(cnt)
rect_img = cv.rectangle(img, (x, y), (x+w, y+h), (0, 255, 0), 2)
cv.imshow(‘img‘, rect_img)
cv.waitKey(0)
cv.destroyAllWindows()
(x, y), radius = cv.minEnclosingCircle(cnt) # 得到中心点和半径
circle_img = cv.circle(img, center, radius, (0, 0, 255), 2) # 绘制边界圆
import cv2 as cv
import numpy as np


img = cv.imread(‘contours.png‘)
gray_img = cv.cvtColor(img, cv.COLOR_BGR2GRAY)
ret, thresh = cv.threshold(gray_img, 127, 255, cv.THRESH_BINARY)
binary, contours, hierarchy = cv.findContours(thresh, cv.RETR_TREE, cv.CHAIN_APPROX_NONE)
cnt = contours[0]

x, y, w, h = cv.boundingRect(cnt)
(x, y), radius = cv.minEnclosingCircle(cnt) # 得到中心点和半径
center = (int(x), int(y))
radius = int(radius)
circle_img = cv.circle(img, center, radius, (0, 0, 255), 2) # 绘制边界圆
cv.imshow(‘img‘, circle_img)
cv.waitKey(0)
cv.destroyAllWindows()
标签:模式 read mat 多边形 des osi 序列 有一个 二值图像
原文地址:https://www.cnblogs.com/missdx/p/12386189.html