标签:users ssh start block vim pull top may ble
本文整理于 bilibili传智播客Git
git是分布式版本控制系统。
(1)新建目录git_test ,在git_test目录下执行命令git init 。
Initialized empty Git repository in /home/guo/git-test/.git/
(2)在目录git_test 下创建文件code.txt ,并编辑内容"this is first time!"。
touch code.txt
vim code.txt
cat code.txt
(3)创建新版本 git add git commit
[guo@localhost git-test]$ git add code.txt
[guo@localhost git-test]$ git commit -m "version 1"
[master (root-commit) 0aa3958] version 1
 Committer: centos7
Your name and email address were configured automatically based
on your username and hostname. Please check that they are accurate.
You can suppress this message by setting them explicitly:
    git config --global user.name "Your Name"
    git config --global user.email you@example.com
After doing this, you may fix the identity used for this commit with:
    git commit --amend --reset-author
 1 file changed, 1 insertion(+)
 create mode 100644 code.txt
(4)查看版本记录 git log
[guo@localhost git-test]$ git log
commit 0aa3958bfd2feb084e9aac00ce2519ee1fbdede4
Author: centos7 <guo@localhost.localdomain>
Date:   Thu Jun 11 20:06:34 2020 +0800

    version 1
commit后是创建版本的序列号
(5)添加内容"this is second time!",并创建新版本
[guo@localhost git-test]$ git add code.txt
[guo@localhost git-test]$ git commit -m "version 2"
[master 190a322] version 2
 Committer: centos7
Your name and email address were configured automatically based
on your username and hostname. Please check that they are accurate.
You can suppress this message by setting them explicitly:
    git config --global user.name "Your Name"
    git config --global user.email you@example.com
After doing this, you may fix the identity used for this commit with:
    git commit --amend --reset-author
 1 file changed, 1 insertion(+)
[guo@localhost git-test]$ git log
commit 190a32256adfc27535c4f46c7e827bd537d792fb
Author: centos7
Date:   Thu Jun 11 20:13:50 2020 +0800
    version 2
commit 0aa3958bfd2feb084e9aac00ce2519ee1fbdede4
Author: centos7
Date:   Thu Jun 11 20:06:34 2020 +0800
    version 1
(6)若想回退到某一个版本,使用命令git reset --hard HEAD^
[guo@localhost git-test]$ git reset --hard HEAD^
HEAD is now at 0aa3958 version 1
?? 总有一个指针HEAD 指向最新的版本。
?? HEAD 的前一个版本由HEAD^ 或HEAD~1 表示,类似的前三个版本由HEAD^^^ 或HEAD~3 表示。
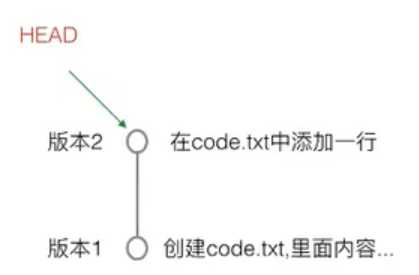
注意:版本2记录的是与版本1的不同之处,即修改了什么。
(7)回到版本2 git reset --hard 版本2序列号(commit后的序列号)
[guo@localhost git-test]$ git reset --hard 190a32256adfc
HEAD is now at 190a322 version 2
序列号只要粘贴前一段字符即可,无需全部粘贴。
(8)如果终端关闭,则不能知道版本2的序列号。使用git reflog 查看操作记录,可以观察到版本2创建时的序列号。
[guo@localhost git-test]$ git reflog
190a322 HEAD@{0}: reset: moving to 190a32256adfc
0aa3958 HEAD@{1}: reset: moving to HEAD^
190a322 HEAD@{2}: commit: version 2
0aa3958 HEAD@{3}: commit (initial): version 1
电脑中的目录,比如上述创建的git_test 就是一个工作区。
??工作区有一个隐藏目录.git ,这个不是工作区,而是git的版本库。
??git版本库中存有
stage index)masterHEAD??创建git版本库时,git自动创建了唯一一个master分支。所以,git commit 就是往master分支 上提交修改。
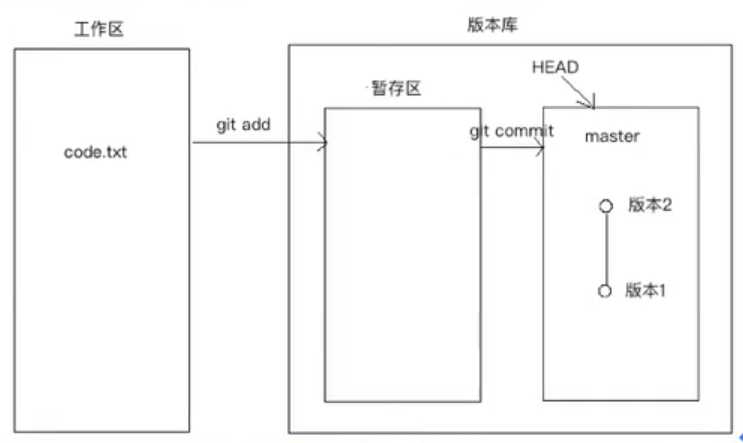
??把文件像git版本库添加时,是分两步执行的:
git add 把文件添加进去,实际上就是把文件修改添加到暂存区;git commit 提交更改,实际上就是把暂存区的所有内容提交到当前分支。在创建一个版本之前(git commit)可以多次把文件的修改添加到暂存区,然后一起提交版本记录。
示例:
[guo@localhost git-test]$ ls -al
total 8
drwxrwxr-x.  3 guo guo   34 Jun 11 20:27 .
drwx------. 16 guo guo 4096 Jun 11 20:12 ..
-rw-rw-r--.  1 guo guo   41 Jun 11 20:27 code.txt
drwxrwxr-x.  8 guo guo  183 Jun 11 20:27 .git   #版本库
[guo@localhost git-test]$ touch code2.txt
[guo@localhost git-test]$ vi code2.txt
[guo@localhost git-test]$ cat code2.txt
the code2 first line!
[guo@localhost git-test]$ vi code.txt
[guo@localhost git-test]$ cat code.txt
this is first time!
this is second time!
this is third line!
[guo@localhost git-test]$ git status  #查看当前工作状态命令
# On branch master
# Changes not staged for commit:
#   (use "git add ..." to update what will be committed)
#   (use "git checkout -- ..." to discard changes in working directory)
#
#	modified:   code.txt
#
# Untracked files:
#   (use "git add ..." to include in what will be committed)
#
#	code2.txt
no changes added to commit (use "git add" and/or "git commit -a")
[guo@localhost git-test]$ git add code.txt code2.txt
[guo@localhost git-test]$ git status
# On branch master
# Changes to be committed:
#   (use "git reset HEAD ..." to unstage)
#
#	modified:   code.txt
#	new file:   code2.txt
#
[guo@localhost git-test]$ git commit -m "version3"
[master d4002ab] version3
 Committer: centos7
Your name and email address were configured automatically based
on your username and hostname. Please check that they are accurate.
You can suppress this message by setting them explicitly:
    git config --global user.name "Your Name"
    git config --global user.email you@example.com
After doing this, you may fix the identity used for this commit with:
    git commit --amend --reset-author
 2 files changed, 2 insertions(+)
 create mode 100644 code2.txt
[guo@localhost git-test]$ git status
# On branch master
nothing to commit, working directory clean
git管理的文件修改,它只会提交暂存区的修改来创建版本。已修改但未由git add 添加至暂存区的文件,git commit 提交时并不会提交这些文件。
?? 使用git checkout -- <文件> 丢弃/撤销 工作区 的改动。
[guo@localhost git-test]$ git status
# On branch master
# Changes not staged for commit:
#   (use "git add <file>..." to update what will be committed)
#   (use "git checkout -- <file>..." to discard changes in working directory)
#
#	modified:   code.txt
#
no changes added to commit (use "git add" and/or "git commit -a")
[guo@localhost git-test]$ git checkout -- code.txt#丢弃工作区改动
[guo@localhost git-test]$ git status
# On branch master
nothing to commit, working directory clean
?? 撤销暂存区的改动,分为两步:
git reset HEAD <file name> 把 暂存区 的修改撤销掉,重新放回到工作区。git checkout -- <文件> 撤销 工作区 的改动。?? 对比工作区与某个版本中文件的不同:
(1)继续编辑文件code.txt ,在其中添加一行内容。
[guo@localhost git-test]$ vi code.txt
[guo@localhost git-test]$ cat code.txt
this is first time!
this is second time!
this is third line!
this is forth line!
this is the new line    #新添加的行!
(2)对比工作区中code.txt 与HEAD 版本中code.txt 的不同,使用如下命令 git diff HEAD -- <file name>:
[guo@localhost git-test]$ git diff HEAD -- code.txt
diff --git a/code.txt b/code.txt
index 1ad94ce..7dbc8b3 100644
--- a/code.txt
+++ b/code.txt
@@ -2,3 +2,4 @@ this is first time!
 this is second time!
 this is third line!
 this is forth line!
+this is the new line #工作区code.txt多了一行
(3)丢弃上述改动
?? 对比两个版本间文件的不同
(1)对比HEAD 与HEAD^ 两个版本中code.txt 的不同,使用如下命令 git diff HEAD HEAD^ -- <file name>:
[guo@localhost git-test]$ git diff HEAD HEAD^ -- code.txt
diff --git a/code.txt b/code.txt
index 1ad94ce..694349e 100644
--- a/code.txt
+++ b/code.txt
@@ -1,4 +1,3 @@
 this is first time!
 this is second time!
 this is third line!
-this is forth line!   # HEAD^少了一行
(1)使用rm <file name> 在工作区删除文件。
[guo@localhost git-test]$ rm code2.txt
[guo@localhost git-test]$ git status
# On branch master
# Changes not staged for commit:
#   (use "git add/rm <file>..." to update what will be committed)
#   (use "git checkout -- <file>..." to discard changes in working directory)
#
#	deleted:    code2.txt
#
no changes added to commit (use "git add" and/or "git commit -a")
取消删除
git checkout -- <file>
(2)提交到暂存区,命令git rm <file name> ,并使用git commit 提交。
[guo@localhost git-test]$ git rm code2.txt
rm ‘code2.txt‘
[guo@localhost git-test]$ git status
# On branch master
# Changes to be committed:
#   (use "git reset HEAD <file>..." to unstage)
#
#	deleted:    code2.txt
[guo@localhost git-test]$ git commit -m "delete code2.txt"
[master bb5a223] delete code2.txt
... ...
git log版本过多时,屏幕显示不全,可以使用上下箭头翻看。键入q退出查看模式。
git log可以通过指定参数过滤要显示的内容。[guo@localhost git-test]$ git log --pretty=oneline bb5a2230b06ede9bfd894b1a4ef82bdc812504ad delete code2.txt c86fb4aa618fb6241e3a89ae33fae34d407e2842 version4 d4002ab7a666d34d014adf67481984572ee55c65 version3 190a32256adfc27535c4f46c7e827bd537d792fb version 2 0aa3958bfd2feb084e9aac00ce2519ee1fbdede4 version 1
分支实际开发中的应用:
? 假设A准备开发一个新功能,但是需要两周才能完成,第一周写了50%的代码,如果立刻提交,由于代码还没写完,不完整的代码库会导致别人不能干活。但如果等代码全部写完再一次提交,又存在丢失每天进度的巨大风险。
? 解决:创建属于A自己的分支,别人看不到,还继续在原来的分支上正常工作,而A在自己的分支上干活,想提交就提交,直到开发完毕后,再一次性合并到原来的分支上,这样,既安全又不影响别人工作。
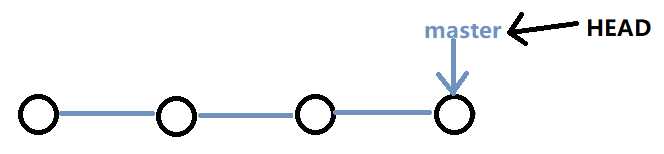
git把我们之前提交的版本串成一条时间线,这条时间线就是一个分支。截止到目前只有一条时间线,在git里,这个分支叫主分支,即master分支。HEAD严格来说并不是指向提交,而是指向master,master才是指向提交的,所以HEAD指向的就是当前分支。
(1)一开始的时候,master分支是一条线,git用master指向最新的提交,再用HEAD指向master。因此可以知道当前分支,以及当前分支的提交点;

每次提交(commit),master都会增加一个节点,向前移动一步。这样随着不断提交,master分支的线也越来越长。
(2)当创建新的分支,如dev 时,git新建了一个指针叫dev ,其指向master相同的提交,再把HEAD指向dev,就表示当前分支在dev上;
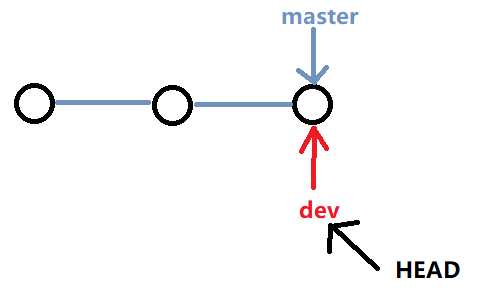
git创建分支:添加新指针,修改HEAD指向,工作区没有发生任何变化。
(3)此时,对工作区的修改和提交就是针对 dev 分支了,比如新提交一次后, dev 指针向前移动一步,而 master指针不变;
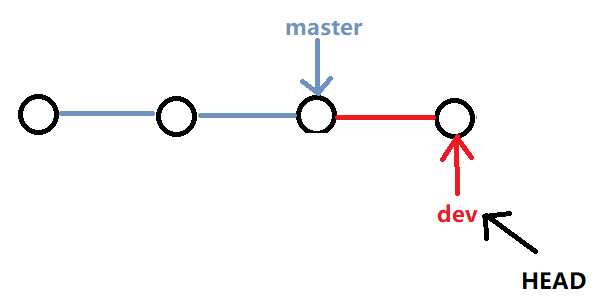
(4)如果在dev分支上的工作完成了,可以把dev合并到master上。最简单的合并方法,直接把master指向dev当前提交。
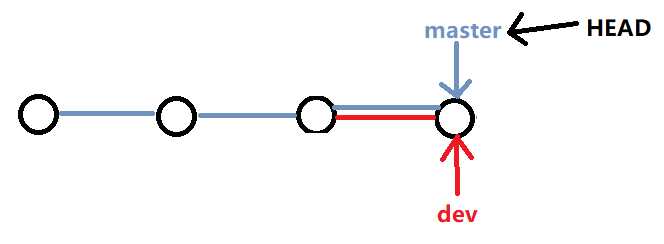
(5)合并完分支后,可以删除dev分支。删除dev分支就是把dev指针给删掉,删掉后,就剩下一条master分支。
? 案例
(1)查看当前有几个分支,且在哪个分支下工作。命令git branch
[guo@localhost git-test]$ git branch
* master
(2)创建新分支dev ,并切换到其上进行工作。创建并切换分支命令git checkout -b <branch name>
[guo@localhost git-test]$ git checkout -b dev
Switched to a new branch ‘dev‘
[guo@localhost git-test]$ git branch
* dev
master
(3)向新分支dev提交
[guo@localhost git-test]$ git log --pretty=oneline
bb5a2230b06ede9bfd894b1a4ef82bdc812504ad delete code2.txt
c86fb4aa618fb6241e3a89ae33fae34d407e2842 version4
d4002ab7a666d34d014adf67481984572ee55c65 version3
190a32256adfc27535c4f46c7e827bd537d792fb version 2
0aa3958bfd2feb084e9aac00ce2519ee1fbdede4 version 1
[guo@localhost git-test]$ vi code.txt #添加新行:new line
[guo@localhost git-test]$ git add code.txt
[guo@localhost git-test]$ git commit -m "branch dev commit"
[guo@localhost git-test]$ git log --pretty=oneline
c1eb2f67b35e62aaece03a3e4caa7cc84191914f branch dev commit
bb5a2230b06ede9bfd894b1a4ef82bdc812504ad delete code2.txt
... ...
(4)dev 工作完成,切换回 master 分支。命令 git checkout <branch name> 。
[guo@localhost git-test]$ git checkout master
Switched to branch ‘master‘
[guo@localhost git-test]$ git branch
dev
* master
master分支上,code.txt文件并没有添加新内容 "new line",也没有新的提交 "branch dev commit"。
(5)合并dev到master,快速合并命令 git merge <branch name>
[guo@localhost git-test]$ git merge dev
Updating bb5a223..c1eb2f6
Fast-forward
code.txt | 1 +
1 file changed, 1 insertion(+)
[guo@localhost git-test]$ cat code.txt
this is first time!
this is second time!
this is third line!
this is forth line!
new line #在dev分支上添加的行
快速合并,直接将master指向dev的当前提交,所以合并速度非常快。
有的情况下,是不能使用快速合并的。
(6)合并完成后,删除dev分支。git branch -b <branch name> 。
[guo@localhost git-test]$ git branch -d dev
Deleted branch dev (was c1eb2f6).
[guo@localhost git-test]$ git branch
* master
? 分支命令小结
查看分支:git branch
创建分支:git branch <name>
删除分支:git branch -d <name>
切换分支:git checkout <name>
创建+切换分支:git checkout -b <name>
合并某分支到当前分支:git merge <name>
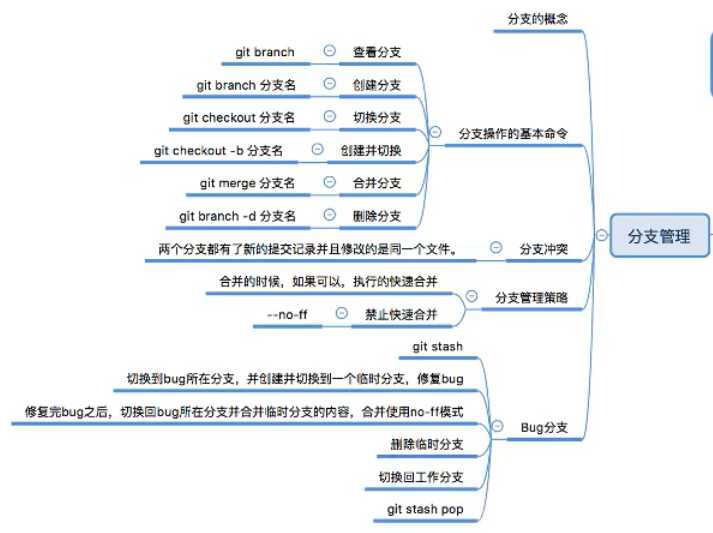
合并分支并不是总是成功的,可能发生冲突。
(1)创建新分支 dev ,修改code.txt文件(添加一行 add one more line),并进行提交。
[guo@localhost git-test]$ git checkout -b dev
Switched to a new branch ‘dev‘
[guo@localhost git-test]$ git branch
* dev
  master
[guo@localhost git-test]$ vi code.txt
[guo@localhost git-test]$ git add code.txt
[guo@localhost git-test]$ git commit -m "branch dev commit 2"
(2)切换到master分支,在该分支上修改code.txt文件(添加一行 add one more line in master),并进行提交。
[guo@localhost git-test]$ git checkout master
Switched to branch ‘master‘
[guo@localhost git-test]$ vi code.txt
[guo@localhost git-test]$ git add code.txt
[guo@localhost git-test]$ git commit -m "master branch commit"
(3)合并会报错
[guo@localhost git-test]$ git merge dev
Auto-merging code.txt
CONFLICT (content): Merge conflict in code.txt
Automatic merge failed; fix conflicts and then commit the result.
git status 查看冲突
[guo@localhost git-test]$ git status
# On branch master
# You have unmerged paths.
#   (fix conflicts and run "git commit")
#
# Unmerged paths:
#   (use "git add <file>..." to mark resolution)
#
#	both modified:      code.txt
#
no changes added to commit (use "git add" and/or "git commit -a")
(4)修改冲突文件,查看并修改冲突 code.txt 文件
vi code.txt
this is first time!
this is second time!
this is third line!
this is forth line!
new line
<<<<<<< HEAD                            # 手动删除
add one more line in master
=======                                 # 手动删除
add one more line
>>>>>>> dev                             # 手动删除
(5)重新提交融合
[guo@localhost git-test]$ git add code.txt
[guo@localhost git-test]$ git commit -m "solve question"
[guo@localhost git-test]$ git log --pretty=oneline
c68a39e0e25b41ad1993e09f7ac6f95e5164fb5e solve question
ab658e7e47989c50ca6d6279bc3ff7d19142f91a master branch commit
5edea62a09485e725b1311eb5e39ce37a61b21bb branch dev commit 2
c1eb2f67b35e62aaece03a3e4caa7cc84191914f branch dev commit
... ...
也可以使用命令git log --graph --pretty=oneline查看分支图
[guo@localhost git-test]$ git log --graph --pretty=oneline
*   c68a39e0e25b41ad1993e09f7ac6f95e5164fb5e solve question
|\
| * 5edea62a09485e725b1311eb5e39ce37a61b21bb branch dev commit 2
* | ab658e7e47989c50ca6d6279bc3ff7d19142f91a master branch commit
|/
* c1eb2f67b35e62aaece03a3e4caa7cc84191914f branch dev commit
* bb5a2230b06ede9bfd894b1a4ef82bdc812504ad delete code2.txt
... ...
(6)删除dev分支
[guo@localhost git-test]$ git branch -d dev
Deleted branch dev (was 5edea62).
[guo@localhost git-test]$ git branch
* master
通常,合并分支时,git会用fast forward(快速合并)模式,但是有些快速合并不能成功而且合并时没有冲突,这个时候git会合并之后做一次新的提交。
但这种模式下,删除分支后,会丢掉分支信息。
(1)创建并切换到dev分支,新建文件code3.txt并编辑,commit提交。切换回master,编辑文件code.txt并commit提交。
[guo@localhost git-test]$ git checkout -b dev
[guo@localhost git-test]$ touch code3.txt
[guo@localhost git-test]$ vi code3.txt
[guo@localhost git-test]$ git add code3.txt
[guo@localhost git-test]$ git commit -m "new code3.txt"
[guo@localhost git-test]$ git checkout master
[guo@localhost git-test]$ vi code.txt
[guo@localhost git-test]$ git add code.txt
[guo@localhost git-test]$ git commit -m "add hello line"
? dev分支
[guo@localhost git-test]$ git log --pretty=oneline
5347c83dc0a518fa402fde25918f8b7a88798d07 new code3.txt
c68a39e0e25b41ad1993e09f7ac6f95e5164fb5e solve question
ab658e7e47989c50ca6d6279bc3ff7d19142f91a master branch commit
... ...
? master分支
087a26be044b372600908067ed630a4d45dd57c5 add hello line
c68a39e0e25b41ad1993e09f7ac6f95e5164fb5e solve question
ab658e7e47989c50ca6d6279bc3ff7d19142f91a master branch commit
... ...
(2)合并dev内容到master
git merge dev
该命令运行后,会弹出一个窗口:
Merge branch ‘dev‘   #修改此处信息,使用同vi

# Please enter a commit message to explain why this merge is necessary,
# especially if it merges an updated upstream into a topic branch.
#
# Lines starting with ‘#‘ will be ignored, and an empty message aborts
# the commit.
查看
[guo@localhost git-test]$ git log --pretty=oneline
5b683d9f1aa33ca5a112b17736b48389cf718efe Merge branch dev to master   #新增一次提交 没有new code3.txt分支提交信息
087a26be044b372600908067ed630a4d45dd57c5 add hello line
5347c83dc0a518fa402fde25918f8b7a88798d07 new code3.txt
....
[guo@localhost git-test]$ git log --pretty=oneline --graph
*   5b683d9f1aa33ca5a112b17736b48389cf718efe Merge branch dev to master
|\
| * 5347c83dc0a518fa402fde25918f8b7a88798d07 new code3.txt
* | 087a26be044b372600908067ed630a4d45dd57c5 add hello line
|/
*   c68a39e0e25b41ad1993e09f7ac6f95e5164fb5e solve question
|\
| * 5edea62a09485e725b1311eb5e39ce37a61b21bb branch dev commit 2
* | ab658e7e47989c50ca6d6279bc3ff7d19142f91a master branch commit
|/
* c1eb2f67b35e62aaece03a3e4caa7cc84191914f branch dev commit
不会起冲突,两个分支都有编辑,但是不是同一个文件!
如果要强制禁用fast forward模式,git就会在merge时生成一个新的commit,这样,从分支历史上就可看到分支信息。
(1)创建并切换到dev分支,编辑文件code.txt,commit提交。切换回master。
(2)合并dev分支,添加--no-ff参数,表示禁用Fast forward。
[guo@localhost git-test]$ git merge --no-ff -m "Disable mode fast forward" dev
Already up-to-date.
因为本次合并会创建一个新的
commit,所以加上-m参数,把commit描述进去。
--no-ff为了保存分支提交记录
[guo@localhost git-test]$ git log --pretty=oneline
04188f22bab5cdc8234db3953f89c0c3ff4c03b0 Disable mode fast forward
f4234444f9a85f208ac9dd8d0b9fcd3754fa1f9b add new line to dev
5b683d9f1aa33ca5a112b17736b48389cf718efe Merge branch dev to master
... ...
软件开发中,经常有bug需要修复。在git中,由于分支的强大,每个bug可以通过一个新的临时分支来修复,修复后,合并分支,然后将临时分支删除。
(1)目标:修复代号001的bug任务时,很自然的想要创建一个分支bug-001来修复它。但是,当前dev上进行的工作还没有提交:
[guo@localhost git-test]$ vi code.txt
[guo@localhost git-test]$ git status
# On branch dev
# Changes not staged for commit:
#   (use "git add <file>..." to update what will be committed)
#   (use "git checkout -- <file>..." to discard changes in working directory)
#
#	modified:   code.txt
#
no changes added to commit (use "git add" and/or "git commit -a")
?? 该工作只进行了一半,还没有办法提交,预计还需1天时间完成。但是必须在2个小时内修复bug,怎么办?
(2)git提供stash功能,可以将当前工作现场“储存”起来,等以后恢复现场时再继续工作。
[guo@localhost git-test]$ git stash
Saved working directory and index state WIP on dev: 04188f2 Disable mode fast forward
HEAD is now at 04188f2 Disable mode fast forward
再次检查,工作区变干净了
[guo@localhost git-test]$ git status
# On branch dev
nothing to commit, working directory clean
(3)确定哪个分支的bug,假设是master,在master上创建临时分支。然后修复。
git checkout master
git checkout -b bug-001
vi code.txt #修复
git add code.txt
git commit -m "clear bug-001"
(4)修复完成后,切换到master分支,完成合并(禁止fast forward模式:可以保存修复的分支记录,即使临时分支被删除),删除bug-001分支。
git checkout master
git merge --no-ff -m "修复bug-001" bug-001
(5)现在bug修复完成,回到dev分支干活。
git checkout dev
(6)git stash list命令查看,其可以显示保存的工作现场
(7)恢复现场git stash pop
登录GitHub网站,点击右上角“+”号,选择下拉菜单中的 New repository 。
(1)点击账户头像后的下拉三角,选择‘settings‘下的 SSH and GPG keys
???如果某台机器需要与github上的仓库交互,那么就要把这台机器的ssh公钥添加到这个github账户
(2)将自己电脑的SSH公钥粘贴到SSH keys下的Key中。
?? centos7系统
配置用户名与邮箱
git config --global user.name <username>
git config --global user.email <email>
username与email为GitHub注册时填写。
git config --list #查看配置
生成ssh密匙
[guo@localhost ~]$ ssh-keygen -t rsa -C ‘14******94@**.com‘
Generating public/private rsa key pair.
Enter file in which to save the key (/home/guo/.ssh/id_rsa):
一直按回车即可
/home/guo/.ssh/文件夹下生成两个文件id_rsa与id_rsa.pub。
id_rsa是私钥,自己保留!
把公钥id_rsa.pub内容复制到GitHub的Key中,点击Add SSH key 。
?? Windows系统
下载Git Bash,其他操作同上述一样。
生成的文件对放在 /c/Users/Guo/.ssh/id_rsa 目录下。
(1)git clone <repo ssh addr> ?
(2)如果克隆是发生错误,执行代码:
eval "$(ssh-agent -s)"
ssh-add
(1)开发时,创建新的分支。
$ git checkout -b smart
# 开发
$ touch prac.md
$ vi prac.md
# 本机保存、提交
$ git add prac.md
$ git commit -m "new prac file"
当开发一段时间,完成某功能后,将代码向GitHub推送
(2)推送分支,代码向GitHub推送。命令git push origin 分支名称?
推送分支,就是把该分支上的所有本地代码提交到远程库,推动时要指定本地分支,这样,git就会把该分支推送到远程库对应的远程分支上。远程分支用origin表示。
$ git push origin smart
Enumerating objects: 4, done.
Counting objects: 100% (4/4), done.
Delta compression using up to 8 threads
Compressing objects: 100% (2/2), done.
Writing objects: 100% (3/3), 286 bytes | 95.00 KiB/s, done.
Total 3 (delta 0), reused 0 (delta 0)
remote:
remote: Create a pull request for ‘smart‘ on GitHub by visiting:
remote:      https://github.com/miaomiaowu-gx/HelloWorld/pull/new/smart
remote:
To https://github.com/miaomiaowu-gx/HelloWorld.git
 * [new branch]      smart -> smart
命令 git branch --set-upstream-to=origin/远程分支名 本地分支名
$ git branch --set-upstream-to=origin/smart smart
Branch ‘smart‘ set up to track remote branch ‘smart‘ from ‘origin‘.
# 分支smart设置为跟踪来自origin的远程分支smart
修改本地文件并commit,此时使用git status查询信息:
$ git status
On branch smart
Your branch is ahead of ‘origin/smart‘ by 1 commit.
  (use "git push" to publish your local commits)

nothing to commit, working tree clean
一旦已经跟踪远程的分支,直接使用git push推送即可,无需后面再加其他参数!
git pull origin 分支名称,该命令会把远程分支smart上的代码下载并合并到本地所在分支。
$ git pull origin smart
From https://github.com/miaomiaowu-gx/HelloWorld
 * branch            smart      -> FETCH_HEAD
Already up to date.
项目经理:
(1)项目经理搭建项目的框架。
(2)搭建完项目框架后,项目经理把项目框架代码放到服务器。
普通员工:
(1)在自己的电脑上,生成ssh公钥,然后把公钥给项目经理,项目经理把它添加在服务器上。
(2)项目经理会给每个组员的项目代码的地址,组员把代码下载到自己的电脑上。
(3)创建本地分支dev,在dev分支中进行每天的开发。
(4)每一个员工开发完自己的代码后,都需要将代码发布到远程的dev分支上。
项目里一般会出现两个分支:
- Master:用于保存发布的项目代码版本。如V1.0、V2.0。
- Dev:用于保存开发过程中的代码。
注意:不是写点代码就向 远程dev推送,别人有可能会使用你推送的dev分支上的代码。所以要求推送上的代码具有完整性、准确性。
标签:users ssh start block vim pull top may ble
原文地址:https://www.cnblogs.com/miaomiaowu/p/13111196.html